Yamaha QL5 Reference Manual - Page 145
Using Parameter Changes to control parameters, MIDI CONTROL CHANGE window
 |
View all Yamaha QL5 manuals
Add to My Manuals
Save this manual to your list of manuals |
Page 145 highlights
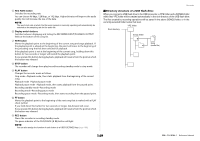
MIDI CONTROL CHANGE window Display this window by pressing any event in the CONTROL CHANGE page. In this window, you can specify the event assigned to each control number. 1 2 3 1 MODE field Enables you to select the type of event. 2 PARAMETER 1/2 field In conjunction with the MODE field, this field specifies the type of event. 3 OK button Confirms the settings and closes the window. NOTE • The list shown is the same for all models of the QL series. For the QL1, the display will indicate "Cannot Assign!" if you specify a parameter that does not exist on that model. • If NRPN mode is selected as the control change transmission/reception mode, the settings in this window are ignored. • For details on the events that can be assigned to Control Changes, refer to the QL Data List (End of Manual). MIDI Using Parameter Changes to control parameters On the QL series console, you can use a type of system exclusive messages called "Parameter Changes" to control specific events (fader/knob operations, [ON] key on/off operations, system and user settings, etc.) as an alternative to using Control Changes or NRPN messages. For details on the Parameter Changes that can be transmitted and received, refer to "MIDI Data Format" in the QL Data List (End of Manual). STEP 1. Connect the QL series console to an external device. 2. As described in "Basic MIDI settings" on page 138, select the ports and MIDI channels (device number) that will be used to transmit/receive parameter changes. 3. Use the Tx button and Rx button of the PARAMETER CHANGE field in the MIDI SETUP page to turn on parameter change transmission/reception. NOTE • Parameter changes include a "device number" that specifies the transmitting or receiving device. The transmit (Tx) channel and receive (Rx) channel specified on the MIDI SETUP page are used as the device number. • Please be aware that if the device number included in the transmitted Parameter Change does not match the device number of the receiving QL console, the message will be ignored. • Do not turn Parameter Change and Control Change transmission/reception on at the same time. Otherwise, a large amount of data will flood the MIDI port and may cause overflows or other problems. 145 Reference Manual
-
 1
1 -
2
-
3
-
4
-
5
-
6
-
7
-
8
-
9
-
10
-
11
-
12
-
13
-
14
-
15
-
16
-
17
-
18
-
19
-
20
-
21
-
22
-
23
-
24
-
25
-
26
-
27
-
28
-
29
-
30
-
31
-
32
-
33
-
34
-
35
-
36
-
37
-
38
-
39
-
40
-
41
-
42
-
43
-
44
-
45
-
46
-
47
-
48
-
49
-
50
-
51
-
52
-
53
-
54
-
55
-
56
-
57
-
58
-
59
-
60
-
61
-
62
-
63
-
64
-
65
-
66
-
67
-
68
-
69
-
70
-
71
-
72
-
73
-
74
-
75
-
76
-
77
-
78
-
79
-
80
-
81
-
82
-
83
-
84
-
85
-
86
-
87
-
88
-
89
-
90
-
91
-
92
-
93
-
94
-
95
-
96
-
97
-
98
-
99
-
100
-
101
-
102
-
103
-
104
-
105
-
106
-
107
-
108
-
109
-
110
-
111
-
112
-
113
-
114
-
115
-
116
-
117
-
118
-
119
-
120
-
121
-
122
-
123
-
124
-
125
-
126
-
127
-
128
-
129
-
130
-
131
-
132
-
133
-
134
-
135
-
136
-
137
-
138
-
139
-
 140
140 -
 141
141 -
 142
142 -
 143
143 -
 144
144 -
 145
145 -
 146
146 -
 147
147 -
 148
148 -
 149
149 -
 150
150 -
151
-
152
-
153
-
154
-
155
-
156
-
157
-
158
-
159
-
160
-
161
-
162
-
163
-
164
-
165
-
166
-
167
-
168
-
169
-
170
-
171
-
172
-
173
-
174
-
175
-
176
-
177
-
178
-
179
-
180
-
181
-
182
-
183
-
184
-
185
-
186
-
187
-
188
-
189
-
190
-
191
-
192
-
193
-
194
-
195
-
196
-
197
-
198
-
199
-
200
-
201
-
202
-
203
-
204
-
205
-
206
-
207
-
208
-
209
-
210
-
211
-
212
-
213
-
214
-
215
-
216
-
217
-
218
-
219
-
220
-
221
-
222
-
223
-
224
-
225
-
226
-
227
-
228
-
229
-
230
-
231
-
232
-
233
-
234
-
235
-
236
-
237
-
238
-
239
-
240
-
241
-
242
-
243
-
244
-
245
-
246
-
247
-
248
-
249
-
250
-
251
-
252
-
253
-
254
-
255
-
256
-
257
-
258
-
259
-
260
-
261
-
262
-
263
-
264
 |
 |
