Yamaha QL5 Reference Manual - Page 177
Saving and loading setup data to and from a USB flash drive, Unlocking the console
 |
View all Yamaha QL5 manuals
Add to My Manuals
Save this manual to your list of manuals |
Page 177 highlights
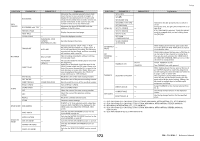
SETUP screen Unlocking the console STEP 1. Press the CONSOLE LOCK screen. 2. If you are logged-in as a user for whom a password is set, enter the password for the user or for the Administrator, then press the OK button. NOTE If you are logged-in as a user for whom no password is set, the console will be unlocked when you touch the CONSOLE LOCK screen. Specifying the CONSOLE LOCK screen image If an image file has been saved on the USB flash drive, you can view that image on the CONSOLE LOCK screen. In the SAVE/LOAD window, specify the image file that you want to display, and then load it from the USB flash drive. For details about loading files from the USB flash drive, refer to "Loading a file from a USB flash drive" on page 180. NOTE Supported image file format is BMP in 800 x 600 pixels and 16/24/32-bit, but they will be converted into 16-bit for display. Setup Saving and loading setup data to and from a USB flash drive You can connect a commercially-available USB flash drive to the USB connector located to the right of the display, and save the internal settings and user authentication keys of the QL series console to the USB flash drive or load them from the USB flash drive. NOTICE An ACCESS indicator is shown in the Function Access Area while data is being accessed (saved, loaded, or deleted). During this time, do not disconnect the USB port or power-off the QL unit. Doing so may damage the data in the flash drive. NOTE • Operation is guaranteed only for USB flash drives. • The operation of USB flash drives with capacities of up to 32GB has been verified. (However, this does not necessarily guarantee the operation of all USB flash drives.) The FAT16 and FAT32 formats are supported. A USB flash drive with a capacity of 4GB or larger will be formatted in FAT32, and a USB flash drive with a capacity of 2GB or smaller will be formatted in FAT16. Basic operation STEP 1. In the Function Access Area, press the SETUP button. 2. In the SETUP screen, press the SAVE/LOAD button. 3. Save/load/edit the data. SETUP screen 177 Reference Manual
-
 1
1 -
2
-
3
-
4
-
5
-
6
-
7
-
8
-
9
-
10
-
11
-
12
-
13
-
14
-
15
-
16
-
17
-
18
-
19
-
20
-
21
-
22
-
23
-
24
-
25
-
26
-
27
-
28
-
29
-
30
-
31
-
32
-
33
-
34
-
35
-
36
-
37
-
38
-
39
-
40
-
41
-
42
-
43
-
44
-
45
-
46
-
47
-
48
-
49
-
50
-
51
-
52
-
53
-
54
-
55
-
56
-
57
-
58
-
59
-
60
-
61
-
62
-
63
-
64
-
65
-
66
-
67
-
68
-
69
-
70
-
71
-
72
-
73
-
74
-
75
-
76
-
77
-
78
-
79
-
80
-
81
-
82
-
83
-
84
-
85
-
86
-
87
-
88
-
89
-
90
-
91
-
92
-
93
-
94
-
95
-
96
-
97
-
98
-
99
-
100
-
101
-
102
-
103
-
104
-
105
-
106
-
107
-
108
-
109
-
110
-
111
-
112
-
113
-
114
-
115
-
116
-
117
-
118
-
119
-
120
-
121
-
122
-
123
-
124
-
125
-
126
-
127
-
128
-
129
-
130
-
131
-
132
-
133
-
134
-
135
-
136
-
137
-
138
-
139
-
140
-
141
-
142
-
143
-
144
-
145
-
146
-
147
-
148
-
149
-
150
-
151
-
152
-
153
-
154
-
155
-
156
-
157
-
158
-
159
-
160
-
161
-
162
-
163
-
164
-
165
-
166
-
167
-
168
-
169
-
170
-
171
-
 172
172 -
 173
173 -
 174
174 -
 175
175 -
 176
176 -
 177
177 -
 178
178 -
 179
179 -
 180
180 -
 181
181 -
 182
182 -
183
-
184
-
185
-
186
-
187
-
188
-
189
-
190
-
191
-
192
-
193
-
194
-
195
-
196
-
197
-
198
-
199
-
200
-
201
-
202
-
203
-
204
-
205
-
206
-
207
-
208
-
209
-
210
-
211
-
212
-
213
-
214
-
215
-
216
-
217
-
218
-
219
-
220
-
221
-
222
-
223
-
224
-
225
-
226
-
227
-
228
-
229
-
230
-
231
-
232
-
233
-
234
-
235
-
236
-
237
-
238
-
239
-
240
-
241
-
242
-
243
-
244
-
245
-
246
-
247
-
248
-
249
-
250
-
251
-
252
-
253
-
254
-
255
-
256
-
257
-
258
-
259
-
260
-
261
-
262
-
263
-
264
 |
 |
