Yamaha QL5 Reference Manual - Page 96
Talkback and Oscillator, Using Talkback
 |
View all Yamaha QL5 manuals
Add to My Manuals
Save this manual to your list of manuals |
Page 96 highlights
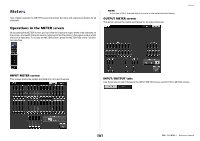
Talkback and Oscillator Talkback is a function that sends the signal of the selected INPUT jack to the desired bus. This is used mainly to convey instructions from the operator or sound engineer to the performers and staff. QL series consoles also feature an oscillator that can output a sine wave or pink noise to the desired bus, so that you will be able to check external equipment or to test the acoustical response of the room or hall. The diagram below shows the signal flow of the talkback and oscillator signals. CASCADE IN M O N MIX ST O MATRIX CUE 1 2 1516 L R(C) 1 2 7 8 L R SLOT1 1-16 SLOT2 1-16 DANTE IN 1-64{32} INPUT 1-32{16} CASCADE IN SELECT Talkback and Oscillator Using Talkback The Talkback function sends the signal (that is input at the input jacks) to the desired bus. STEP 1. In the Function Access Area, press the MONITOR button. 2. Press the TALKBACK display button or the ASSIGN field in the MONITOR screen. 3. Connect a mic to the INPUT jack on the rear panel. 4. Press a button in the ASSIGN field in the TALKBACK window to specify the bus(es) to which the talkback signal will be sent (multiple selections are allowed). 5. To enable talkback, press the TALKBACK ON button to turn it on. 6. Press the INPUT TO TALKBACK button to select an input. Use the [TOUCH AND TURN] knob to adjust the volume. [DANTE] DANTE INPUT 64{32} DANTE IN METER [INPUT] [1-32{16}] +48V MASTER +48V ON +48V INPUT 2 1 3 + - AD GAIN/TRIM PRE GC METER HA METER Compensation Gain 32{16} TALKBACK DANTE IN 1-64{32} INPUT 1-32{16} INPUT SELECT ON OSCILLATOR Sine Wave Pink Noise Burst Noise HPF LPF OSC LEVEL METER ON MONITOR screen NOTE • The PAD will be switched on or off internally when the HA gain is adjusted between +17 dB and +18 dB. • Keep in mind that noise may be generated when using phantom power if there is a difference between the Hot and Cold output impedance of an external device connected to the INPUT jack. • You can also assign talkback on/off or an ASSIGN change to a USER DEFINED key. In this case, you can select either a Latch operation or an Unlatch operation (the function will be enabled only while you continue holding down the key) (page 169). • When talkback is on, you can use the talkback dimmer to lower the monitor levels other than the talkback signal (page 90). 96 Reference Manual
-
 1
1 -
2
-
3
-
4
-
5
-
6
-
7
-
8
-
9
-
10
-
11
-
12
-
13
-
14
-
15
-
16
-
17
-
18
-
19
-
20
-
21
-
22
-
23
-
24
-
25
-
26
-
27
-
28
-
29
-
30
-
31
-
32
-
33
-
34
-
35
-
36
-
37
-
38
-
39
-
40
-
41
-
42
-
43
-
44
-
45
-
46
-
47
-
48
-
49
-
50
-
51
-
52
-
53
-
54
-
55
-
56
-
57
-
58
-
59
-
60
-
61
-
62
-
63
-
64
-
65
-
66
-
67
-
68
-
69
-
70
-
71
-
72
-
73
-
74
-
75
-
76
-
77
-
78
-
79
-
80
-
81
-
82
-
83
-
84
-
85
-
86
-
87
-
88
-
89
-
90
-
 91
91 -
 92
92 -
 93
93 -
 94
94 -
 95
95 -
 96
96 -
 97
97 -
 98
98 -
 99
99 -
 100
100 -
 101
101 -
102
-
103
-
104
-
105
-
106
-
107
-
108
-
109
-
110
-
111
-
112
-
113
-
114
-
115
-
116
-
117
-
118
-
119
-
120
-
121
-
122
-
123
-
124
-
125
-
126
-
127
-
128
-
129
-
130
-
131
-
132
-
133
-
134
-
135
-
136
-
137
-
138
-
139
-
140
-
141
-
142
-
143
-
144
-
145
-
146
-
147
-
148
-
149
-
150
-
151
-
152
-
153
-
154
-
155
-
156
-
157
-
158
-
159
-
160
-
161
-
162
-
163
-
164
-
165
-
166
-
167
-
168
-
169
-
170
-
171
-
172
-
173
-
174
-
175
-
176
-
177
-
178
-
179
-
180
-
181
-
182
-
183
-
184
-
185
-
186
-
187
-
188
-
189
-
190
-
191
-
192
-
193
-
194
-
195
-
196
-
197
-
198
-
199
-
200
-
201
-
202
-
203
-
204
-
205
-
206
-
207
-
208
-
209
-
210
-
211
-
212
-
213
-
214
-
215
-
216
-
217
-
218
-
219
-
220
-
221
-
222
-
223
-
224
-
225
-
226
-
227
-
228
-
229
-
230
-
231
-
232
-
233
-
234
-
235
-
236
-
237
-
238
-
239
-
240
-
241
-
242
-
243
-
244
-
245
-
246
-
247
-
248
-
249
-
250
-
251
-
252
-
253
-
254
-
255
-
256
-
257
-
258
-
259
-
260
-
261
-
262
-
263
-
264
 |
 |
