Yamaha QL5 Reference Manual - Page 161
Setting the Administrator password, Creating a user authentication key
 |
View all Yamaha QL5 manuals
Add to My Manuals
Save this manual to your list of manuals |
Page 161 highlights
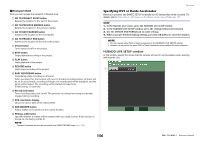
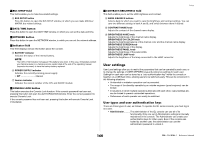
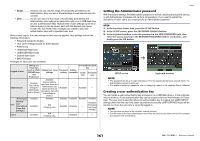
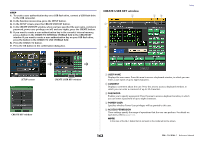
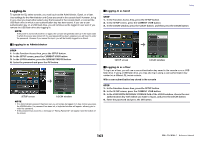
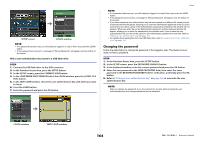
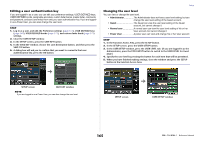
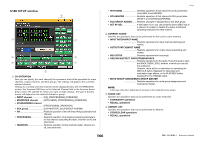
• Guest A Guest can use only the range of functionality permitted by the Administrator. Only one set of Guest settings is maintained inside the console. • User A User can use only the range of functionality permitted by the Administrator. User settings are saved internally or on a USB flash drive as user authentication keys. Multiple sets of user settings (up to ten in internal memory) can be saved, each with the desired user name. A User who has Power User privileges can create or edit user authentication keys with a specified user level. When a user logs in, the user settings for that user are applied. User settings include the following information. • Password (except for Guest) • User Level settings (except for Administrator) • Preferences • USER DEFINED keys • USER DEFINED knobs • Custom fader bank • MASTER fader Privileges for each user are as follows. Logged-in user Editing user setup data, such as USER DEFINED keys and Preferences Editing User Level settings User authentication key Password Editing setting comments Create Overwrite new -save Available Administrator Available (Can edit the settings for Administrator and for Guest.) (Cannot edit the user level, since the administrator can always perform all operations. Can edit the settings for Available - Available - Guest.) Power user Available Available Available Available Available Available User Normal user (User without Power User privileges) Available N/A (Viewing only) Available Available Available - (Excluding User Level settings) Guest Available N/A (Viewing only) - Available - - Setup Setting the Administrator password With the factory settings, the Administrator password is not set, meaning that anyone can log in with Administrator privileges and perform all operations. If you want to restrict the operations of other users, you must specify an Administrator password. STEP 1. In the Function Access Area, press the SETUP button. 2. In the SETUP screen, press the PASSWORD CHANGE button. 3. In the keyboard window, enter the password in the NEW PASSWORD field, then enter the same password in the RE-ENTER PASSWORD field for verification, and finally press the OK button. SETUP screen Keyboard window NOTE • The password can be up to eight characters. If the two passwords that were entered match, the Administrator password will be set. • For details on entering a password, refer to "Assigning a name" in the separate Owner's Manual. Creating a user authentication key You can create a user authentication key and save it on a USB flash drive or in the console's internal memory. A user authentication key can be created only by an Administrator or Power User. The user level is specified when the authentication key is created, but USER SETUP settings other than the user level (such as preferences and the USER DEFINED keys) will be carried over from the user who is currently logged-in. NOTE • You can store ten keys in the console's internal memory. • The file name of the user authentication key will be the current user name, and it will be created and saved in the root directory. 161 Reference Manual
-
 1
1 -
2
-
3
-
4
-
5
-
6
-
7
-
8
-
9
-
10
-
11
-
12
-
13
-
14
-
15
-
16
-
17
-
18
-
19
-
20
-
21
-
22
-
23
-
24
-
25
-
26
-
27
-
28
-
29
-
30
-
31
-
32
-
33
-
34
-
35
-
36
-
37
-
38
-
39
-
40
-
41
-
42
-
43
-
44
-
45
-
46
-
47
-
48
-
49
-
50
-
51
-
52
-
53
-
54
-
55
-
56
-
57
-
58
-
59
-
60
-
61
-
62
-
63
-
64
-
65
-
66
-
67
-
68
-
69
-
70
-
71
-
72
-
73
-
74
-
75
-
76
-
77
-
78
-
79
-
80
-
81
-
82
-
83
-
84
-
85
-
86
-
87
-
88
-
89
-
90
-
91
-
92
-
93
-
94
-
95
-
96
-
97
-
98
-
99
-
100
-
101
-
102
-
103
-
104
-
105
-
106
-
107
-
108
-
109
-
110
-
111
-
112
-
113
-
114
-
115
-
116
-
117
-
118
-
119
-
120
-
121
-
122
-
123
-
124
-
125
-
126
-
127
-
128
-
129
-
130
-
131
-
132
-
133
-
134
-
135
-
136
-
137
-
138
-
139
-
140
-
141
-
142
-
143
-
144
-
145
-
146
-
147
-
148
-
149
-
150
-
151
-
152
-
153
-
154
-
155
-
 156
156 -
 157
157 -
 158
158 -
 159
159 -
 160
160 -
 161
161 -
 162
162 -
 163
163 -
 164
164 -
 165
165 -
 166
166 -
167
-
168
-
169
-
170
-
171
-
172
-
173
-
174
-
175
-
176
-
177
-
178
-
179
-
180
-
181
-
182
-
183
-
184
-
185
-
186
-
187
-
188
-
189
-
190
-
191
-
192
-
193
-
194
-
195
-
196
-
197
-
198
-
199
-
200
-
201
-
202
-
203
-
204
-
205
-
206
-
207
-
208
-
209
-
210
-
211
-
212
-
213
-
214
-
215
-
216
-
217
-
218
-
219
-
220
-
221
-
222
-
223
-
224
-
225
-
226
-
227
-
228
-
229
-
230
-
231
-
232
-
233
-
234
-
235
-
236
-
237
-
238
-
239
-
240
-
241
-
242
-
243
-
244
-
245
-
246
-
247
-
248
-
249
-
250
-
251
-
252
-
253
-
254
-
255
-
256
-
257
-
258
-
259
-
260
-
261
-
262
-
263
-
264
 |
 |
