Yamaha QL5 Reference Manual - Page 171
FUNCTION, PARAMETER 1, Explanation, GAIN/DIGITAL GAIN. Lit when DIGITAL GAIN is
 |
View all Yamaha QL5 manuals
Add to My Manuals
Save this manual to your list of manuals |
Page 171 highlights
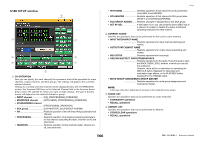
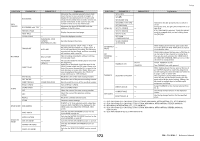
FUNCTION CUE EFFECT BYPASS PARAMETER 1 OUTPUT CLEAR CUE SPECIFIC CH CUE MODE EFFECT RACK1-8 PREMIUM RACK1A PREMIUM RACK1B : PREMIUM RACK8A PREMIUM RACK8B LATCH PARAMETER 2 *2) - GAIN KNOB FUNCTION UNLATCH - GEQ FREQ BANK GPI OUT INC DEC LATCH UNLATCH - PORT1-PORT5 HELP - - HOME SELECTED CH VIEW - OVERVIEW - TOGGLE - METER MIDI PEAK HOLD ON PROGRAM CHANGE CONTROL CHANGE NOTE ON - PGM 1-128 CC 1-31, 33-95, 102-119 NOTE ON C-2 (0) : NOTE ON G 8 (127) Explanation Switch CUE on/off. CUE the channel selected from list 2). Select the CUE MODE. Toggle the function of the GAIN knob (ANALOG GAIN/DIGITAL GAIN). Lit when DIGITAL GAIN is selected. Assign the function of the GAIN knob (ANALOG GAIN/DIGITAL) to DIGITAL GAIN only while held down. * However if the GAIN KNOB FUNCTION is switched to DIGITAL GAIN in the PREFERENCE screen etc., this will remain lit until the next time it is pressed. Adds or removes a frequency bank in the GEQ EDIT screen. Toggle the GPI OUT function. Lit when active. Make GPI OUT active only while pressed. Opens and closes the HELP window. Operating the controllers on the panel (excluding faders), or controllers on the screen, while holding down this key will display the related information. Displays the SELECTED CHANNEL VIEW screen. Displays the OVERVIEW screen. Each press of the key will alternately display the SELECTED CHANNEL VIEW screen and the OVERVIEW screen. Turns the meter's peak hold function on/off. Lit when on. Transmit the corresponding MIDI message. Setup FUNCTION PARAMETER 1 MONITOR ON OUTPUT SELECTED CH ASSIGN MONITOR DIMMER ON SOURCE SELECT MUTE MASTER MUTE GROUP 1 : MUTE GROUP 8 ALL MUTE NUENDO LIVE TRANSPORT PEAK CLEAR OSCILLATOR ON OSCILLATOR SELECTED CH ASSIGN DIRECT ASSIGN PARAMETER 2 - - STEREO L/R MONO (C) LCR PB OUT *5) DEFINE - - GO TO PROJECT START GO TO PREV MARKER REWIND FAST FORWARD GO TO NEXT MARKER GO TO PROJECT END CYCLE STOP START REC EASY RECORDING - - - *1) Explanation Switch MONITOR on/off. Switch the monitor output on/off. While holding down this key, press the SEL key of a MIX or MATRIX channel to switch the assignment on/off. During this time, the [SEL] LED will be lit if assign is ON, or dark if OFF. The assignment setting made while holding down this key will be stored. Pressing the key again will recall the stored setting. Settings can be stored in multiple keys to facilitate rapid assignment switching. Enable the dimmer and attenuate the monitor signal. Recall the selected signal to the monitor. Switch MUTE GROUP MASTER on/off. Turns all MUTE GROUP MASTER settings on/off together. Operate the transport functions of Nuendo Live. Clear the peak indicators of the Nuendo Live screen. Switch the OSC on/off. While holding down this key, press a SEL key of a channel to switch the assignment on/off. During this time, the [SEL] LED will be lit if assign is ON, or dark if OFF. Assign the oscillator to the channel selected from list 1). 171 Reference Manual
-
 1
1 -
2
-
3
-
4
-
5
-
6
-
7
-
8
-
9
-
10
-
11
-
12
-
13
-
14
-
15
-
16
-
17
-
18
-
19
-
20
-
21
-
22
-
23
-
24
-
25
-
26
-
27
-
28
-
29
-
30
-
31
-
32
-
33
-
34
-
35
-
36
-
37
-
38
-
39
-
40
-
41
-
42
-
43
-
44
-
45
-
46
-
47
-
48
-
49
-
50
-
51
-
52
-
53
-
54
-
55
-
56
-
57
-
58
-
59
-
60
-
61
-
62
-
63
-
64
-
65
-
66
-
67
-
68
-
69
-
70
-
71
-
72
-
73
-
74
-
75
-
76
-
77
-
78
-
79
-
80
-
81
-
82
-
83
-
84
-
85
-
86
-
87
-
88
-
89
-
90
-
91
-
92
-
93
-
94
-
95
-
96
-
97
-
98
-
99
-
100
-
101
-
102
-
103
-
104
-
105
-
106
-
107
-
108
-
109
-
110
-
111
-
112
-
113
-
114
-
115
-
116
-
117
-
118
-
119
-
120
-
121
-
122
-
123
-
124
-
125
-
126
-
127
-
128
-
129
-
130
-
131
-
132
-
133
-
134
-
135
-
136
-
137
-
138
-
139
-
140
-
141
-
142
-
143
-
144
-
145
-
146
-
147
-
148
-
149
-
150
-
151
-
152
-
153
-
154
-
155
-
156
-
157
-
158
-
159
-
160
-
161
-
162
-
163
-
164
-
165
-
 166
166 -
 167
167 -
 168
168 -
 169
169 -
 170
170 -
 171
171 -
 172
172 -
 173
173 -
 174
174 -
 175
175 -
 176
176 -
177
-
178
-
179
-
180
-
181
-
182
-
183
-
184
-
185
-
186
-
187
-
188
-
189
-
190
-
191
-
192
-
193
-
194
-
195
-
196
-
197
-
198
-
199
-
200
-
201
-
202
-
203
-
204
-
205
-
206
-
207
-
208
-
209
-
210
-
211
-
212
-
213
-
214
-
215
-
216
-
217
-
218
-
219
-
220
-
221
-
222
-
223
-
224
-
225
-
226
-
227
-
228
-
229
-
230
-
231
-
232
-
233
-
234
-
235
-
236
-
237
-
238
-
239
-
240
-
241
-
242
-
243
-
244
-
245
-
246
-
247
-
248
-
249
-
250
-
251
-
252
-
253
-
254
-
255
-
256
-
257
-
258
-
259
-
260
-
261
-
262
-
263
-
264
 |
 |
