Yamaha QL5 Reference Manual - Page 162
In the Function Access Area, press the SETUP button.
 |
View all Yamaha QL5 manuals
Add to My Manuals
Save this manual to your list of manuals |
Page 162 highlights
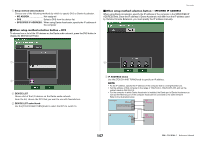
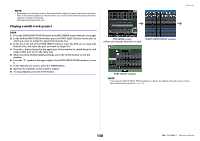
STEP 1. To create a user authentication key on a USB flash drive, connect a USB flash drive to the USB connector. 2. In the Function Access Area, press the SETUP button. 3. In the SETUP screen, press the CREATE USER KEY button. 4. In the CREATE USER KEY window, when you have specified the user name, comment, password, power user privileges on/off, and user rights, press the CREATE button. 5. If you want to create a user authentication key in the console's internal memory, press a button in the CREATE TO INTERNAL STORAGE field in the CREATE KEY window. If you want to create a user authentication key on your USB flash drive, press the button in the CREATE TO USB STORAGE field. 6. Press the CREATE TO button. 7. Press the OK button in the confirmation dialog box. CREATE USER KEY window 2 1 5 34 Setup SETUP screen CREATE KEY window CREATE USER KEY window 1 USER NAME Displays the user name. Press this area to access a keyboard window, in which you can enter a user name of up to eight characters. 2 COMMENT Displays a comment about the user. Press this area to access a keyboard window, in which you can enter a comment of up to 32 characters. 3 PASSWORD Enables you to specify a password. Press this area to access a keyboard window, in which you can enter a password of up to eight characters. 4 POWER USER Specifies whether Power User privileges will be granted to this user. 5 ACCESS PERMISSION These settings specify the range of operations that the user can perform. For details on each item, refer to page 165. NOTE In the case of the QL1, faders that do not exist on the model will not be shown. 162 Reference Manual
-
 1
1 -
2
-
3
-
4
-
5
-
6
-
7
-
8
-
9
-
10
-
11
-
12
-
13
-
14
-
15
-
16
-
17
-
18
-
19
-
20
-
21
-
22
-
23
-
24
-
25
-
26
-
27
-
28
-
29
-
30
-
31
-
32
-
33
-
34
-
35
-
36
-
37
-
38
-
39
-
40
-
41
-
42
-
43
-
44
-
45
-
46
-
47
-
48
-
49
-
50
-
51
-
52
-
53
-
54
-
55
-
56
-
57
-
58
-
59
-
60
-
61
-
62
-
63
-
64
-
65
-
66
-
67
-
68
-
69
-
70
-
71
-
72
-
73
-
74
-
75
-
76
-
77
-
78
-
79
-
80
-
81
-
82
-
83
-
84
-
85
-
86
-
87
-
88
-
89
-
90
-
91
-
92
-
93
-
94
-
95
-
96
-
97
-
98
-
99
-
100
-
101
-
102
-
103
-
104
-
105
-
106
-
107
-
108
-
109
-
110
-
111
-
112
-
113
-
114
-
115
-
116
-
117
-
118
-
119
-
120
-
121
-
122
-
123
-
124
-
125
-
126
-
127
-
128
-
129
-
130
-
131
-
132
-
133
-
134
-
135
-
136
-
137
-
138
-
139
-
140
-
141
-
142
-
143
-
144
-
145
-
146
-
147
-
148
-
149
-
150
-
151
-
152
-
153
-
154
-
155
-
156
-
 157
157 -
 158
158 -
 159
159 -
 160
160 -
 161
161 -
 162
162 -
 163
163 -
 164
164 -
 165
165 -
 166
166 -
 167
167 -
168
-
169
-
170
-
171
-
172
-
173
-
174
-
175
-
176
-
177
-
178
-
179
-
180
-
181
-
182
-
183
-
184
-
185
-
186
-
187
-
188
-
189
-
190
-
191
-
192
-
193
-
194
-
195
-
196
-
197
-
198
-
199
-
200
-
201
-
202
-
203
-
204
-
205
-
206
-
207
-
208
-
209
-
210
-
211
-
212
-
213
-
214
-
215
-
216
-
217
-
218
-
219
-
220
-
221
-
222
-
223
-
224
-
225
-
226
-
227
-
228
-
229
-
230
-
231
-
232
-
233
-
234
-
235
-
236
-
237
-
238
-
239
-
240
-
241
-
242
-
243
-
244
-
245
-
246
-
247
-
248
-
249
-
250
-
251
-
252
-
253
-
254
-
255
-
256
-
257
-
258
-
259
-
260
-
261
-
262
-
263
-
264
 |
 |
