Yamaha QL5 Reference Manual - Page 173
USER DEFINED knobs, About TOUCH AND TURN
 |
View all Yamaha QL5 manuals
Add to My Manuals
Save this manual to your list of manuals |
Page 173 highlights
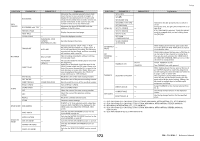
USER DEFINED knobs This section explains how to assign the desired functions to the USER DEFINED knobs in the lower part of the touch screen, and to press these knobs to execute the defined function. If you are logged-in as a user, you can make USER DEFINED knob settings for the user. If you are logged-in as the Administrator, you can also make the USER DEFINED knob settings for the Guest account. NOTE For details on the assignable functions and their parameters, refer to "Functions that can be assigned to USER DEFINED knobs" on page 174. STEP 1. In the Function Access Area, press the SETUP button. 2. In the SETUP screen, press the USER SETUP button. 3. In the USER SETUP window, press the USER DEFINED KNOBS tab. 4. Press the button corresponding to the USER DEFINED knob to which you want to assign a function. 5. In the USER DEFINED KNOB SETUP window, make sure that the FUNCTION field is enclosed by a frame, then select the function that you want to assign. 6. If the selected function has parameters, press the PARAMETER 1 or 2 field to move the frame, then select parameters 1 and 2 in the same way. 7. Press the OK button to close the USER DEFINED KNOB SETUP window. 8. To execute an assigned function, press the corresponding USER DEFINED [1]-[4] knob in the lower part of the touch screen, then operate the [TOUCH AND TURN] knob. Setup • The four buttons in the SOFTWARE USER DEFINED KNOBS page correspond to USER DEFINED knobs [1]-[4] in the lower part of the touch screen. The name of the function or parameter assigned to each knob appears to the right of the corresponding button. If nothing is assigned to the knob, an indication of "---" will appear next to the button. • The list shown in the USER DEFINED KNOB SETUP window is the same for all models of the QL series. For the QL1, the display will indicate "Cannot Assign!" if you specify a parameter that does not exist on that model. About TOUCH AND TURN You can press a desired knob in the touch screen and then use the [TOUCH AND TURN] knob to immediately operate that on-screen knob. At this time, a pink frame is shown around the knob in the touch screen, indicating that you can operate that knob. USER SETUP window (USER DEFINED KNOBS page) USER DEFINED KNOB SETUP window NOTE • If you are logged-in as the Administrator, you can also turn on the FOR GUEST button to access the SOFTWARE USER DEFINED KNOBS for Guest page and make USER DEFINED knob settings for the Guest account. 173 Reference Manual
-
 1
1 -
2
-
3
-
4
-
5
-
6
-
7
-
8
-
9
-
10
-
11
-
12
-
13
-
14
-
15
-
16
-
17
-
18
-
19
-
20
-
21
-
22
-
23
-
24
-
25
-
26
-
27
-
28
-
29
-
30
-
31
-
32
-
33
-
34
-
35
-
36
-
37
-
38
-
39
-
40
-
41
-
42
-
43
-
44
-
45
-
46
-
47
-
48
-
49
-
50
-
51
-
52
-
53
-
54
-
55
-
56
-
57
-
58
-
59
-
60
-
61
-
62
-
63
-
64
-
65
-
66
-
67
-
68
-
69
-
70
-
71
-
72
-
73
-
74
-
75
-
76
-
77
-
78
-
79
-
80
-
81
-
82
-
83
-
84
-
85
-
86
-
87
-
88
-
89
-
90
-
91
-
92
-
93
-
94
-
95
-
96
-
97
-
98
-
99
-
100
-
101
-
102
-
103
-
104
-
105
-
106
-
107
-
108
-
109
-
110
-
111
-
112
-
113
-
114
-
115
-
116
-
117
-
118
-
119
-
120
-
121
-
122
-
123
-
124
-
125
-
126
-
127
-
128
-
129
-
130
-
131
-
132
-
133
-
134
-
135
-
136
-
137
-
138
-
139
-
140
-
141
-
142
-
143
-
144
-
145
-
146
-
147
-
148
-
149
-
150
-
151
-
152
-
153
-
154
-
155
-
156
-
157
-
158
-
159
-
160
-
161
-
162
-
163
-
164
-
165
-
166
-
167
-
 168
168 -
 169
169 -
 170
170 -
 171
171 -
 172
172 -
 173
173 -
 174
174 -
 175
175 -
 176
176 -
 177
177 -
 178
178 -
179
-
180
-
181
-
182
-
183
-
184
-
185
-
186
-
187
-
188
-
189
-
190
-
191
-
192
-
193
-
194
-
195
-
196
-
197
-
198
-
199
-
200
-
201
-
202
-
203
-
204
-
205
-
206
-
207
-
208
-
209
-
210
-
211
-
212
-
213
-
214
-
215
-
216
-
217
-
218
-
219
-
220
-
221
-
222
-
223
-
224
-
225
-
226
-
227
-
228
-
229
-
230
-
231
-
232
-
233
-
234
-
235
-
236
-
237
-
238
-
239
-
240
-
241
-
242
-
243
-
244
-
245
-
246
-
247
-
248
-
249
-
250
-
251
-
252
-
253
-
254
-
255
-
256
-
257
-
258
-
259
-
260
-
261
-
262
-
263
-
264
 |
 |
