Yamaha QL5 Reference Manual - Page 17
PATCH/NAME screen, Selecting the output channel for each output port
 |
View all Yamaha QL5 manuals
Add to My Manuals
Save this manual to your list of manuals |
Page 17 highlights
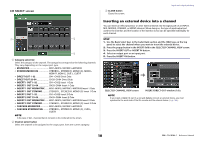
PATCH/NAME screen 3 45 9 1 2 7 6 8 1 PATCH button Indicates the port that is patched to the output channel. If you press this button when another tab is active, a window will appear, enabling you to select the network and port. 2 Channel select button Selects the channel to set. NOTE Switching channels on this screen will not affect the channel selection on the console. 3 Channel icon button Indicates the icon and color that are currently selected for the corresponding channel. When you press this button, a screen will appear in which you can select an icon or sample name. 4 Channel number display box Indicates the channel number. This item cannot be changed. 5 Channel name input box Indicates the name that is assigned to the corresponding channel. When you press this field, a keyboard window allowing you to assign a name will appear. 6 Category select list Select the type of port. Input and output patching 7 Port select buttons From the category, these buttons let you select the port to patch. To cancel the selection, press the button once again. 8 Tabs Enable you to switch between items. 9 Close button Closes the screen. Selecting the output channel for each output port STEP 1. In the Function Access Area, press the SETUP button. 2. Press the OUTPUT PORT button in the SYSTEM SETUP field located in the center of the SETUP screen. 3. In the tabs below the OUTPUT PORT screen, select the output port you want to control. 4. Press the channel select button of the port you want to operate. 5. Use the category select list and the channel select buttons to select the send-source channel. SETUP screen OUTPUT PORT screen NOTE If PATCH CONFIRMATION in the PREFERENCE tab on the USER SETUP screen is ON, a confirmation dialog box will appear when you attempt to change the patch settings. If STEAL PATCH CONFIRMATION is ON, a confirmation dialog box will appear when you attempt to change a location that is already patched elsewhere. 17 Reference Manual
-
 1
1 -
2
-
3
-
4
-
5
-
6
-
7
-
8
-
9
-
10
-
11
-
 12
12 -
 13
13 -
 14
14 -
 15
15 -
 16
16 -
 17
17 -
 18
18 -
 19
19 -
 20
20 -
 21
21 -
 22
22 -
23
-
24
-
25
-
26
-
27
-
28
-
29
-
30
-
31
-
32
-
33
-
34
-
35
-
36
-
37
-
38
-
39
-
40
-
41
-
42
-
43
-
44
-
45
-
46
-
47
-
48
-
49
-
50
-
51
-
52
-
53
-
54
-
55
-
56
-
57
-
58
-
59
-
60
-
61
-
62
-
63
-
64
-
65
-
66
-
67
-
68
-
69
-
70
-
71
-
72
-
73
-
74
-
75
-
76
-
77
-
78
-
79
-
80
-
81
-
82
-
83
-
84
-
85
-
86
-
87
-
88
-
89
-
90
-
91
-
92
-
93
-
94
-
95
-
96
-
97
-
98
-
99
-
100
-
101
-
102
-
103
-
104
-
105
-
106
-
107
-
108
-
109
-
110
-
111
-
112
-
113
-
114
-
115
-
116
-
117
-
118
-
119
-
120
-
121
-
122
-
123
-
124
-
125
-
126
-
127
-
128
-
129
-
130
-
131
-
132
-
133
-
134
-
135
-
136
-
137
-
138
-
139
-
140
-
141
-
142
-
143
-
144
-
145
-
146
-
147
-
148
-
149
-
150
-
151
-
152
-
153
-
154
-
155
-
156
-
157
-
158
-
159
-
160
-
161
-
162
-
163
-
164
-
165
-
166
-
167
-
168
-
169
-
170
-
171
-
172
-
173
-
174
-
175
-
176
-
177
-
178
-
179
-
180
-
181
-
182
-
183
-
184
-
185
-
186
-
187
-
188
-
189
-
190
-
191
-
192
-
193
-
194
-
195
-
196
-
197
-
198
-
199
-
200
-
201
-
202
-
203
-
204
-
205
-
206
-
207
-
208
-
209
-
210
-
211
-
212
-
213
-
214
-
215
-
216
-
217
-
218
-
219
-
220
-
221
-
222
-
223
-
224
-
225
-
226
-
227
-
228
-
229
-
230
-
231
-
232
-
233
-
234
-
235
-
236
-
237
-
238
-
239
-
240
-
241
-
242
-
243
-
244
-
245
-
246
-
247
-
248
-
249
-
250
-
251
-
252
-
253
-
254
-
255
-
256
-
257
-
258
-
259
-
260
-
261
-
262
-
263
-
264
 |
 |
