Yamaha QL5 Reference Manual - Page 21
Directly outputting an INPUT channel, DIRECT OUT field, DIRECT OUT PATCH button, DIRECT OUT LEVEL knob
 |
View all Yamaha QL5 manuals
Add to My Manuals
Save this manual to your list of manuals |
Page 21 highlights
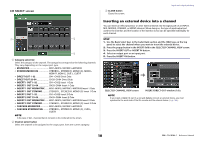
Directly outputting an INPUT channel The signal of an INPUT channel can be output directly from an OUTPUT jack on the I/O device, from the desired OMNI OUT jack, or from the output channel of a desired slot. STEP 1. Use the Bank Select keys in the Fader Bank section and the [SEL] keys on the top panel to select the INPUT channel that you want to output directly. 2. Press the popup button in the INSERT field in the SELECTED CHANNEL VIEW screen. 3. Press the DIRECT OUT PATCH button in the INSERT/DIRECT OUT window. 4. Select an output port. 5. Press the DIRECT OUT ON button. INSERT/DIRECT OUT window (1ch) 6 1 4 Input and output patching SELECTED CHANNEL VIEW screen INSERT/DIRECT OUT window (1ch) NOTE If you install a digital I/O card in a slot and digitally connect an external device, you must synchronize the word clock of the QL console and the external device (page 184). 23 5 1 DIRECT OUT field Enables you to make settings for direct output. Press one of four fields to choose PRE HPF (immediately before the HPF), PRE EQ (immediately before the EQ) or PRE FADER (immediately before the fader), or POST ON (immediately after the [ON] key) as the direct output position. 2 DIRECT OUT PATCH button Displays the currently-selected Direct Out output port. Press this button to open the PORT SELECT window, in which you can select an output port. 3 DIRECT OUT ON button Switches the Direct Out on or off. 4 DIRECT OUT LEVEL knob Indicates the output level of the Direct Out. You can use the [TOUCH AND TURN] knob to adjust the level. 5 APPLY TO ALL INPUT button (input channels only) Specifies whether the insert point/Direct Out point settings will be applied to all input channels. 6 Close button Closes the screen. 21 Reference Manual
-
 1
1 -
2
-
3
-
4
-
5
-
6
-
7
-
8
-
9
-
10
-
11
-
12
-
13
-
14
-
15
-
 16
16 -
 17
17 -
 18
18 -
 19
19 -
 20
20 -
 21
21 -
 22
22 -
 23
23 -
 24
24 -
 25
25 -
 26
26 -
27
-
28
-
29
-
30
-
31
-
32
-
33
-
34
-
35
-
36
-
37
-
38
-
39
-
40
-
41
-
42
-
43
-
44
-
45
-
46
-
47
-
48
-
49
-
50
-
51
-
52
-
53
-
54
-
55
-
56
-
57
-
58
-
59
-
60
-
61
-
62
-
63
-
64
-
65
-
66
-
67
-
68
-
69
-
70
-
71
-
72
-
73
-
74
-
75
-
76
-
77
-
78
-
79
-
80
-
81
-
82
-
83
-
84
-
85
-
86
-
87
-
88
-
89
-
90
-
91
-
92
-
93
-
94
-
95
-
96
-
97
-
98
-
99
-
100
-
101
-
102
-
103
-
104
-
105
-
106
-
107
-
108
-
109
-
110
-
111
-
112
-
113
-
114
-
115
-
116
-
117
-
118
-
119
-
120
-
121
-
122
-
123
-
124
-
125
-
126
-
127
-
128
-
129
-
130
-
131
-
132
-
133
-
134
-
135
-
136
-
137
-
138
-
139
-
140
-
141
-
142
-
143
-
144
-
145
-
146
-
147
-
148
-
149
-
150
-
151
-
152
-
153
-
154
-
155
-
156
-
157
-
158
-
159
-
160
-
161
-
162
-
163
-
164
-
165
-
166
-
167
-
168
-
169
-
170
-
171
-
172
-
173
-
174
-
175
-
176
-
177
-
178
-
179
-
180
-
181
-
182
-
183
-
184
-
185
-
186
-
187
-
188
-
189
-
190
-
191
-
192
-
193
-
194
-
195
-
196
-
197
-
198
-
199
-
200
-
201
-
202
-
203
-
204
-
205
-
206
-
207
-
208
-
209
-
210
-
211
-
212
-
213
-
214
-
215
-
216
-
217
-
218
-
219
-
220
-
221
-
222
-
223
-
224
-
225
-
226
-
227
-
228
-
229
-
230
-
231
-
232
-
233
-
234
-
235
-
236
-
237
-
238
-
239
-
240
-
241
-
242
-
243
-
244
-
245
-
246
-
247
-
248
-
249
-
250
-
251
-
252
-
253
-
254
-
255
-
256
-
257
-
258
-
259
-
260
-
261
-
262
-
263
-
264
 |
 |
