ZyXEL ENC User Guide - Page 208
VLAN Management Configuration Examples, Table 95, LABEL, DESCRIPTION
 |
View all ZyXEL ENC manuals
Add to My Manuals
Save this manual to your list of manuals |
Page 208 highlights
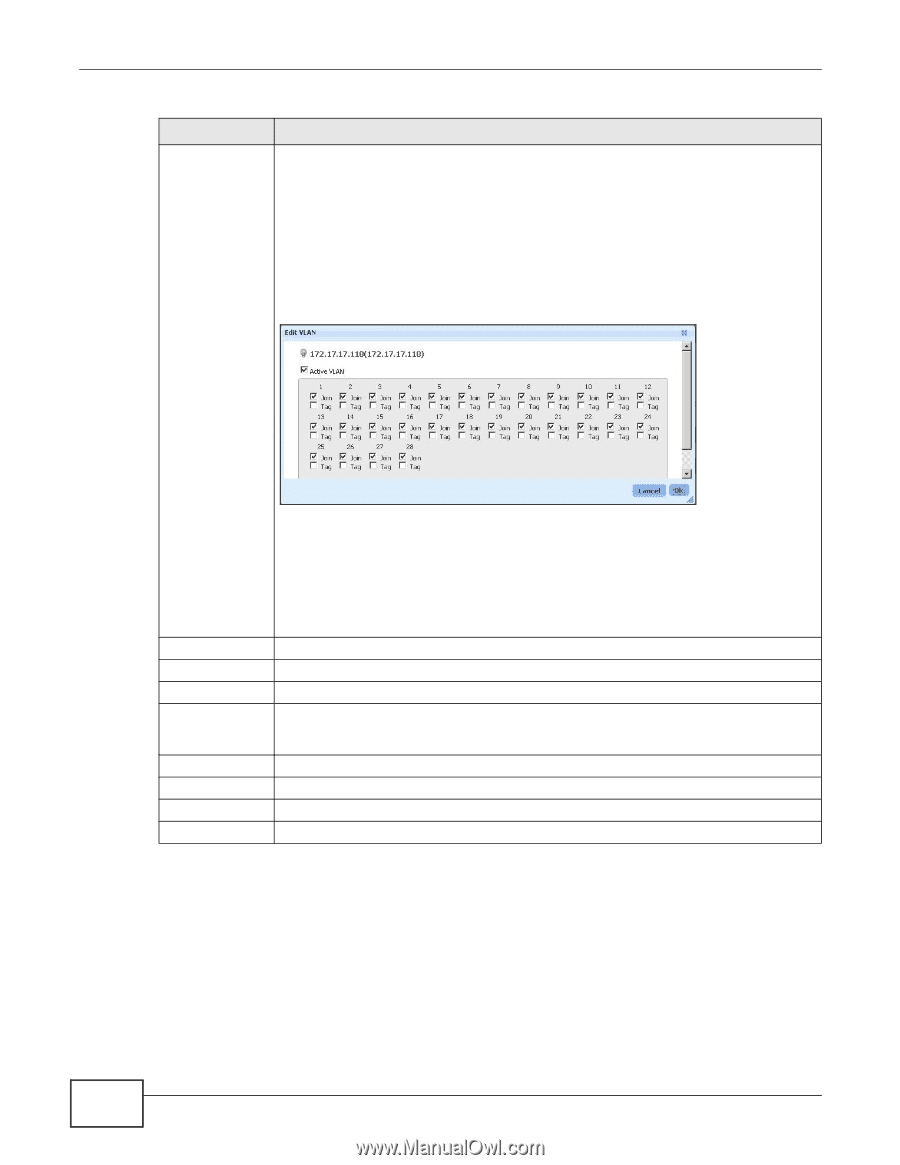
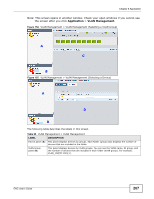
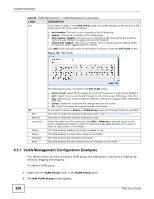
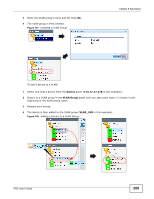
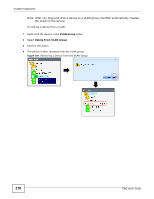
Chapter 8 Application Table 95 VLAN Management > VLAN Management (continued) LABEL DESCRIPTION (C) If you select a folder in the VLAN Group panel, this screen displays all the devices in the folder and all the ports' VLAN settings. • Not member: This port is not a member of the VLAN group. • Joined: This port is a member of the VLAN group. • Not member Tagged: This port is not a member of the VLAN group but outgoing traffic through this port is tagged with another VLAN ID. • Joined and Tagged: This port is a member of the VLAN group and outgoing traffic through this port is tagged with the VLAN ID. Click Edit at the right top corner of each device's section to open the Edit VLAN screen. Figure 156 Edit VLAN (D) Edit Remove check box Status Name Group ID Ports The following describes the fields in the Edit VLAN screen. • Active VLAN: Select this to enable this VLAN on the device or clear this to disable it. • Join: Select this on a port to add the port to this VLAN group. Otherwise, clear this. • Tag: Select this on a port to add the VLAN ID to the port's outgoing traffic. Otherwise, clear this. • Cancel: Select this to discard the changes and exit this screen. • Ok: Click this to save the changes and exit this screen. If you select a device in Device or VLAN Group panel, the following fields are available. Click this to modify the selected VLAN group entry. See Section 8.3.2 on page 211. Click this to delete the selected VLAN group entry. Select the check box of an entry and click Edit or Remove to take the action for the eTTntry respectively. Select or clear the check box at the table heading line to select or clear all check boxes in this column. This field displays whether the VLAN is enabled or not. This field displays the descriptive name for the VLAN. This field displays the identifier of the VLAN. This field displays the port numbers that are members of this VLAN. 8.3.1 VLAN Management Configuration Examples This section shows you how to create a VLAN group, and add/remove a device to a VLAN group easily by dragging and dropping. To create a VLAN group: 1 Right-click the VLAN Group folder in the VLAN Group panel. 2 The Add VLAN Group screen appears. 208 ENC User's Guide
-
 1
1 -
2
-
3
-
4
-
5
-
6
-
7
-
8
-
9
-
10
-
11
-
12
-
13
-
14
-
15
-
16
-
17
-
18
-
19
-
20
-
21
-
22
-
23
-
24
-
25
-
26
-
27
-
28
-
29
-
30
-
31
-
32
-
33
-
34
-
35
-
36
-
37
-
38
-
39
-
40
-
41
-
42
-
43
-
44
-
45
-
46
-
47
-
48
-
49
-
50
-
51
-
52
-
53
-
54
-
55
-
56
-
57
-
58
-
59
-
60
-
61
-
62
-
63
-
64
-
65
-
66
-
67
-
68
-
69
-
70
-
71
-
72
-
73
-
74
-
75
-
76
-
77
-
78
-
79
-
80
-
81
-
82
-
83
-
84
-
85
-
86
-
87
-
88
-
89
-
90
-
91
-
92
-
93
-
94
-
95
-
96
-
97
-
98
-
99
-
100
-
101
-
102
-
103
-
104
-
105
-
106
-
107
-
108
-
109
-
110
-
111
-
112
-
113
-
114
-
115
-
116
-
117
-
118
-
119
-
120
-
121
-
122
-
123
-
124
-
125
-
126
-
127
-
128
-
129
-
130
-
131
-
132
-
133
-
134
-
135
-
136
-
137
-
138
-
139
-
140
-
141
-
142
-
143
-
144
-
145
-
146
-
147
-
148
-
149
-
150
-
151
-
152
-
153
-
154
-
155
-
156
-
157
-
158
-
159
-
160
-
161
-
162
-
163
-
164
-
165
-
166
-
167
-
168
-
169
-
170
-
171
-
172
-
173
-
174
-
175
-
176
-
177
-
178
-
179
-
180
-
181
-
182
-
183
-
184
-
185
-
186
-
187
-
188
-
189
-
190
-
191
-
192
-
193
-
194
-
195
-
196
-
197
-
198
-
199
-
200
-
201
-
202
-
 203
203 -
 204
204 -
 205
205 -
 206
206 -
 207
207 -
 208
208 -
 209
209 -
 210
210 -
 211
211 -
 212
212 -
 213
213 -
214
-
215
-
216
-
217
-
218
-
219
-
220
-
221
-
222
-
223
-
224
-
225
-
226
-
227
-
228
-
229
-
230
-
231
-
232
-
233
-
234
-
235
-
236
-
237
-
238
-
239
-
240
-
241
-
242
-
243
-
244
-
245
-
246
-
247
-
248
-
249
-
250
-
251
-
252
-
253
-
254
-
255
-
256
-
257
-
258
-
259
-
260
-
261
-
262
-
263
-
264
-
265
-
266
-
267
-
268
-
269
-
270
-
271
-
272
-
273
-
274
-
275
-
276
-
277
-
278
-
279
-
280
-
281
-
282
-
283
-
284
-
285
-
286
-
287
-
288
-
289
-
290
-
291
-
292
-
293
-
294
-
295
-
296
-
297
-
298
-
299
-
300
-
301
-
302
-
303
-
304
-
305
-
306
-
307
-
308
-
309
-
310
-
311
-
312
-
313
-
314
-
315
-
316
-
317
-
318
-
319
-
320
-
321
-
322
-
323
-
324
-
325
-
326
-
327
-
328
-
329
-
330
-
331
-
332
-
333
-
334
-
335
-
336
-
337
-
338
-
339
-
340
-
341
-
342
-
343
-
344
-
345
-
346
-
347
-
348
-
349
-
350
-
351
-
352
-
353
-
354
-
355
-
356
-
357
-
358
-
359
-
360
-
361
-
362
-
363
-
364
-
365
-
366
-
367
-
368
-
369
-
370
-
371
-
372
-
373
-
374
-
375
-
376
-
377
-
378
-
379
-
380
-
381
-
382
-
383
-
384
-
385
-
386
-
387
-
388
-
389
-
390
 |
 |