Compaq ProLiant 1000 ProLiant Server Troubleshooting Guide - Page 53
New Hardware, utility, and then restart the server.
 |
View all Compaq ProLiant 1000 manuals
Add to My Manuals
Save this manual to your list of manuals |
Page 53 highlights
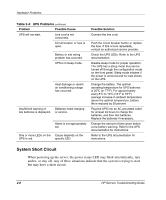
Hardware Problems New Hardware To troubleshoot problems that occur after you add hardware to the server: IMPORTANT: Always obtain a printed copy of Inspect data before and after adding, removing, or repositioning any board or options. Refer to "Inspect Utility" in Chapter 4. 1. If the system completes POST, run the Inspect Utility, which shows changes made to the server. Use the resulting changes to troubleshoot possible causes of the problem. Refer to "Inspect Utility" in Chapter 4 for more information. 2. Check for memory, I/O, and interrupt conflicts. 3. Check all cables for loose connections. Be sure that all cables are connected to the correct locations and are the correct lengths. Refer to your server-specific user documentation and "Loose Connections" in this chapter. 4. Be sure that all software updates, such as device drivers, ROMPaq utilities, patches, SmartStart releases, and other SoftPaq utilities, are installed and current. For example, if you are using a Smart Array controller, you need the latest Smart Array Controller device driver. 5. Run the server setup utility after boards or other options are installed or replaced to be sure that all system components recognize the changes. If you do not run the utility, you may receive a POST error message indicating a configuration error. After you check the settings in the server setup utility, save and exit the utility, and then restart the server. 6. Be sure that all switch settings are set as indicated by the server setup utility. For additional information about required switch settings, refer to your serverspecific user documentation. 7. Be sure that the hard drive signal cables are lined up properly with the connector pins on the controller and the hard drives. Be sure that there are no bent connectors. 8. Be sure that all boards are properly installed in the unit. 9. Run Diagnostics to see if it will recognize and test the device. Refer to "Diagnostics" in Chapter 4 for more information. HP Servers Troubleshooting Guide 2-11
-
 1
1 -
2
-
3
-
4
-
5
-
6
-
7
-
8
-
9
-
10
-
11
-
12
-
13
-
14
-
15
-
16
-
17
-
18
-
19
-
20
-
21
-
22
-
23
-
24
-
25
-
26
-
27
-
28
-
29
-
30
-
31
-
32
-
33
-
34
-
35
-
36
-
37
-
38
-
39
-
40
-
41
-
42
-
43
-
44
-
45
-
46
-
47
-
 48
48 -
 49
49 -
 50
50 -
 51
51 -
 52
52 -
 53
53 -
 54
54 -
 55
55 -
 56
56 -
 57
57 -
 58
58 -
59
-
60
-
61
-
62
-
63
-
64
-
65
-
66
-
67
-
68
-
69
-
70
-
71
-
72
-
73
-
74
-
75
-
76
-
77
-
78
-
79
-
80
-
81
-
82
-
83
-
84
-
85
-
86
-
87
-
88
-
89
-
90
-
91
-
92
-
93
-
94
-
95
-
96
-
97
-
98
-
99
-
100
-
101
-
102
-
103
-
104
-
105
-
106
-
107
-
108
-
109
-
110
-
111
-
112
-
113
-
114
-
115
-
116
-
117
-
118
-
119
-
120
-
121
-
122
-
123
-
124
-
125
-
126
-
127
-
128
-
129
-
130
-
131
-
132
-
133
-
134
-
135
-
136
-
137
-
138
-
139
-
140
-
141
-
142
-
143
-
144
-
145
-
146
-
147
-
148
-
149
-
150
-
151
-
152
-
153
-
154
-
155
-
156
-
157
-
158
-
159
-
160
-
161
-
162
-
163
-
164
-
165
-
166
-
167
-
168
-
169
-
170
-
171
-
172
-
173
-
174
-
175
-
176
-
177
-
178
-
179
-
180
-
181
-
182
-
183
-
184
-
185
-
186
-
187
-
188
-
189
-
190
-
191
-
192
-
193
-
194
-
195
-
196
-
197
-
198
-
199
-
200
-
201
-
202
-
203
-
204
-
205
-
206
-
207
-
208
-
209
-
210
-
211
-
212
-
213
-
214
-
215
-
216
-
217
-
218
-
219
-
220
-
221
-
222
-
223
-
224
-
225
-
226
-
227
-
228
-
229
-
230
-
231
-
232
-
233
-
234
-
235
-
236
-
237
-
238
-
239
-
240
-
241
-
242
-
243
-
244
-
245
-
246
-
247
-
248
-
249
-
250
-
251
-
252
-
253
-
254
-
255
-
256
-
257
-
258
-
259
-
260
-
261
-
262
-
263
-
264
-
265
-
266
-
267
-
268
-
269
-
270
-
271
-
272
-
273
-
274
-
275
-
276
-
277
-
278
-
279
-
280
-
281
-
282
-
283
-
284
-
285
-
286
-
287
-
288
-
289
-
290
-
291
-
292
-
293
-
294
-
295
-
296
-
297
-
298
-
299
-
300
-
301
-
302
-
303
-
304
-
305
-
306
-
307
 |
 |