Dell EqualLogic PS6210XS EqualLogic Group Manager Administrator s Guide PS Ser - Page 143
About Changing the Reported Volume Size, Decrease the Reported Size of a Volume
 |
View all Dell EqualLogic PS6210XS manuals
Add to My Manuals
Save this manual to your list of manuals |
Page 143 highlights
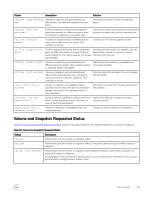
2. Click Volumes in the Volumes panel (not an individual volume name). 3. In the Activities panel, click Manage recovery bin. The Volume Recovery Bin dialog box opens. 4. Select the volume name that you want to permanently delete in the recovery bin. 5. Click Purge. To purge all volumes in the recovery bin at the same time, click Purge All. 6. When prompted to confirm the decision, click Yes to continue with the purge or No to cancel. NOTE: When a volume is purged, all of its data is lost. About Changing the Reported Volume Size You can increase the reported size of a volume while the volume is online and without disrupting access to the volume. To decrease the size of a volume, it must first be set offline. Changing the size of a volume is subject to the following conditions: • Before changing a reported volume size, Dell recommends that you fully understand the impact on the operating system, file system, and applications using the volume. • Not all operating systems, file systems, and applications easily handle volume size changes or behave in a predictable manner when you change a volume size. • You cannot change the size of a template volume. Changing the reported volume size affects the space that the group allocates to the volume and for volume snapshots and replication as follows: • For a volume that is not thin-provisioned, changing the reported size proportionally changes the amount of space the group allocates to the volume (the volume reserve). • For a thin-provisioned volume, changing the reported size changes the minimum volume reserve, in-use space warning limit, and maximum in-use space, because they are based on a percentage of the reported size. The space that the group allocates to the volume (the volume reserve) might also change. • If the volume reserve changes due to the reported volume size change, snapshot space and replication space also change. NOTE: If you are replicating the volume, the secondary group does not recognize the reported size change until the next replication. Decrease the Reported Size of a Volume Decreasing the size of a volume is sometimes called "shrinking" a volume. The following considerations apply to decreasing the size of a volume: • The volume must be set offline before its size can be decreased. After you finish decreasing the volume size, you can set the volume online again. • CAUTION: If you decrease a volume size to less than the amount of space currently in use, you could lose data. • If you do not specify a unit for the size, the unit defaults to MB. • Resizing out-of-sync synchronous replication (SyncRep) volumes is not supported. You cannot use the Group Manager GUI to decrease the reported size of a volume. Instead, you must use the following Group Manager CLI command: volume select volume_name shrink new_size See the Dell EqualLogic Group Manager CLI Reference Guide for more information about using CLI commands that relate to volumes. About Volumes 143
-
 1
1 -
2
-
3
-
4
-
5
-
6
-
7
-
8
-
9
-
10
-
11
-
12
-
13
-
14
-
15
-
16
-
17
-
18
-
19
-
20
-
21
-
22
-
23
-
24
-
25
-
26
-
27
-
28
-
29
-
30
-
31
-
32
-
33
-
34
-
35
-
36
-
37
-
38
-
39
-
40
-
41
-
42
-
43
-
44
-
45
-
46
-
47
-
48
-
49
-
50
-
51
-
52
-
53
-
54
-
55
-
56
-
57
-
58
-
59
-
60
-
61
-
62
-
63
-
64
-
65
-
66
-
67
-
68
-
69
-
70
-
71
-
72
-
73
-
74
-
75
-
76
-
77
-
78
-
79
-
80
-
81
-
82
-
83
-
84
-
85
-
86
-
87
-
88
-
89
-
90
-
91
-
92
-
93
-
94
-
95
-
96
-
97
-
98
-
99
-
100
-
101
-
102
-
103
-
104
-
105
-
106
-
107
-
108
-
109
-
110
-
111
-
112
-
113
-
114
-
115
-
116
-
117
-
118
-
119
-
120
-
121
-
122
-
123
-
124
-
125
-
126
-
127
-
128
-
129
-
130
-
131
-
132
-
133
-
134
-
135
-
136
-
137
-
 138
138 -
 139
139 -
 140
140 -
 141
141 -
 142
142 -
 143
143 -
 144
144 -
 145
145 -
 146
146 -
 147
147 -
 148
148 -
149
-
150
-
151
-
152
-
153
-
154
-
155
-
156
-
157
-
158
-
159
-
160
-
161
-
162
-
163
-
164
-
165
-
166
-
167
-
168
-
169
-
170
-
171
-
172
-
173
-
174
-
175
-
176
-
177
-
178
-
179
-
180
-
181
-
182
-
183
-
184
-
185
-
186
-
187
-
188
-
189
-
190
-
191
-
192
-
193
-
194
-
195
-
196
-
197
-
198
-
199
-
200
-
201
-
202
-
203
-
204
-
205
-
206
-
207
-
208
-
209
-
210
-
211
-
212
-
213
-
214
-
215
-
216
-
217
-
218
-
219
-
220
-
221
-
222
-
223
-
224
-
225
-
226
-
227
-
228
-
229
-
230
-
231
-
232
-
233
-
234
-
235
-
236
-
237
-
238
-
239
-
240
-
241
-
242
-
243
-
244
-
245
-
246
-
247
-
248
-
249
-
250
-
251
-
252
-
253
-
254
-
255
-
256
-
257
-
258
-
259
-
260
-
261
-
262
-
263
-
264
-
265
-
266
-
267
-
268
-
269
-
270
-
271
-
272
-
273
-
274
-
275
-
276
-
277
-
278
-
279
-
280
-
281
-
282
-
283
-
284
-
285
-
286
-
287
-
288
-
289
-
290
-
291
-
292
-
293
-
294
-
295
-
296
-
297
-
298
-
299
-
300
-
301
-
302
-
303
-
304
-
305
-
306
-
307
-
308
-
309
-
310
-
311
-
312
-
313
-
314
-
315
-
316
-
317
-
318
-
319
-
320
-
321
-
322
-
323
-
324
-
325
-
326
-
327
-
328
-
329
-
330
-
331
-
332
-
333
-
334
-
335
-
336
-
337
-
338
-
339
-
340
-
341
-
342
-
343
-
344
-
345
-
346
-
347
-
348
-
349
-
350
-
351
-
352
-
353
-
354
-
355
 |
 |
