Dell EqualLogic PS6210XS EqualLogic Group Manager Administrator s Guide PS Ser - Page 289
Activate the Source Cluster, Create a NAS Container Replication Schedule, a Replication Partner
 |
View all Dell EqualLogic PS6210XS manuals
Add to My Manuals
Save this manual to your list of manuals |
Page 289 highlights
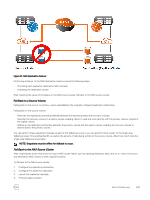
NOTE: To display replication history: 1. Click Monitoring. 2. Below NAS Replication, select Outbound Replica Containers. 3. Select the Replication History button. Activate the Source Cluster When you configure the source cluster to serve client requests, you reverse the changes that you made when you activated the destination cluster for failover. While the source cluster is being activated, client connections might fail and need to be reestablished. However, the change should be transparent to clients as long as they continue to use the same FQDN to reach the SMB share or NFS export. Your environment will determine how you change the configuration. To activate the source cluster, either: • Change the Domain Name System (DNS) server to point to the source cluster. Make the change on the DNS server used to resolve any NAS cluster virtual IPs (VIPs). • Join the NAS cluster to AD or LDAP/NIS, if it has not been done already. Create a NAS Container Replication Schedule Before you can define a replication schedule, you must: • Configure replication partners • Configure replication between two NAS containers on the partners To create a NAS container replication schedule: 1. Log in to the source cluster. 2. Click NAS, expand Local Containers, and then select a NAS container on which you have configured replication. 3. Click Create schedule. The Schedule Settings tab of the Create Schedule wizard opens. 4. In Name, type a name for the replication schedule. 5. Select the Replication schedule option. 6. Specify one of the following options and click Next: • A frequency at which the schedule should run: once, hourly, daily, schedule • To use an existing schedule as a template for the new schedule 7. If you are using an existing schedule, in the Select Existing Schedule tab, select the schedule to use as a template for the new schedule and click Next. 8. On the Schedule Type tab, specify the following information, as appropriate, and click Next: • Start date • End date • Time to start running the schedule • Repeat interval 9. On the Summary tab, either: • Click Copy to copy the schedule summary, which you can paste in a text editor such as Notepad. • Click Back to modify any of the replication schedule settings. • Click Finish to create the replication schedule. Configure a Replication Partner For both volume and NAS replication, you must configure the replication partnership on the two replication partners. To configure a replication partner: About Data Recovery 289
-
 1
1 -
2
-
3
-
4
-
5
-
6
-
7
-
8
-
9
-
10
-
11
-
12
-
13
-
14
-
15
-
16
-
17
-
18
-
19
-
20
-
21
-
22
-
23
-
24
-
25
-
26
-
27
-
28
-
29
-
30
-
31
-
32
-
33
-
34
-
35
-
36
-
37
-
38
-
39
-
40
-
41
-
42
-
43
-
44
-
45
-
46
-
47
-
48
-
49
-
50
-
51
-
52
-
53
-
54
-
55
-
56
-
57
-
58
-
59
-
60
-
61
-
62
-
63
-
64
-
65
-
66
-
67
-
68
-
69
-
70
-
71
-
72
-
73
-
74
-
75
-
76
-
77
-
78
-
79
-
80
-
81
-
82
-
83
-
84
-
85
-
86
-
87
-
88
-
89
-
90
-
91
-
92
-
93
-
94
-
95
-
96
-
97
-
98
-
99
-
100
-
101
-
102
-
103
-
104
-
105
-
106
-
107
-
108
-
109
-
110
-
111
-
112
-
113
-
114
-
115
-
116
-
117
-
118
-
119
-
120
-
121
-
122
-
123
-
124
-
125
-
126
-
127
-
128
-
129
-
130
-
131
-
132
-
133
-
134
-
135
-
136
-
137
-
138
-
139
-
140
-
141
-
142
-
143
-
144
-
145
-
146
-
147
-
148
-
149
-
150
-
151
-
152
-
153
-
154
-
155
-
156
-
157
-
158
-
159
-
160
-
161
-
162
-
163
-
164
-
165
-
166
-
167
-
168
-
169
-
170
-
171
-
172
-
173
-
174
-
175
-
176
-
177
-
178
-
179
-
180
-
181
-
182
-
183
-
184
-
185
-
186
-
187
-
188
-
189
-
190
-
191
-
192
-
193
-
194
-
195
-
196
-
197
-
198
-
199
-
200
-
201
-
202
-
203
-
204
-
205
-
206
-
207
-
208
-
209
-
210
-
211
-
212
-
213
-
214
-
215
-
216
-
217
-
218
-
219
-
220
-
221
-
222
-
223
-
224
-
225
-
226
-
227
-
228
-
229
-
230
-
231
-
232
-
233
-
234
-
235
-
236
-
237
-
238
-
239
-
240
-
241
-
242
-
243
-
244
-
245
-
246
-
247
-
248
-
249
-
250
-
251
-
252
-
253
-
254
-
255
-
256
-
257
-
258
-
259
-
260
-
261
-
262
-
263
-
264
-
265
-
266
-
267
-
268
-
269
-
270
-
271
-
272
-
273
-
274
-
275
-
276
-
277
-
278
-
279
-
280
-
281
-
282
-
283
-
 284
284 -
 285
285 -
 286
286 -
 287
287 -
 288
288 -
 289
289 -
 290
290 -
 291
291 -
 292
292 -
 293
293 -
 294
294 -
295
-
296
-
297
-
298
-
299
-
300
-
301
-
302
-
303
-
304
-
305
-
306
-
307
-
308
-
309
-
310
-
311
-
312
-
313
-
314
-
315
-
316
-
317
-
318
-
319
-
320
-
321
-
322
-
323
-
324
-
325
-
326
-
327
-
328
-
329
-
330
-
331
-
332
-
333
-
334
-
335
-
336
-
337
-
338
-
339
-
340
-
341
-
342
-
343
-
344
-
345
-
346
-
347
-
348
-
349
-
350
-
351
-
352
-
353
-
354
-
355
 |
 |
