Dell EqualLogic PS6210XS EqualLogic Group Manager Administrator s Guide PS Ser - Page 63
Modify RADIUS Server Settings, Delete a RADIUS Server Connection
 |
View all Dell EqualLogic PS6210XS manuals
Add to My Manuals
Save this manual to your list of manuals |
Page 63 highlights
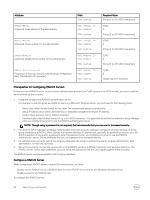
1. Click Group → Group Configuration. 2. Click the Administration tab. 3. In the Authentication panel, under Authentication Type, select RADIUS and then click the RADIUS settings button to open the RADIUS Settings dialog box. 4. In the RADIUS Authentication Servers section, click Add. The Add RADIUS Authentication Server dialog box opens. 5. Specify the IP address of the server. If the server uses a port other than port 1812 (the default), specify the correct port number. 6. Specify and confirm the RADIUS secret and click OK. 7. (Optional) Specify the server timeout and retry values: • Request timeout (seconds) - Number of seconds the group waits for an accounting server to transmit before timing out. The default setting is 2 seconds. • Retries - Number of times the group tries to contact an accounting server after the first failure. The default setting is 1. 8. (Optional) If you want to add information for RADIUS accounting servers, click Add under the Radius Accounting Servers subpanel and repeat steps 5 to 7. 9. To add additional servers, repeat steps 3 to 6. To finish, click OK. 10. On the Group Configuration iSCSI tab, you must select the checkbox for enabling RADIUS authentication for iSCSI initiators. By default, all RADIUS authentication and accounting options are now enabled. Modify RADIUS Server Settings You can modify the following settings on a RADIUS authentication or accounting server: • Server IP address • Password (secret) - up to 63 ASCII characters • Request timeout value • Number of retries value To modify a RADIUS setting: 1. Click Group → Group Configuration. 2. Click the Administration tab. 3. In the Authentication panel, select RADIUS and then click the RADIUS settings button to open the RADIUS Settings dialog box. 4. Select the server IP address and click Modify. The Modify RADIUS Authentication Server dialog box opens. 5. Change a server IP address or password settings and click OK. 6. Click OK to confirm. Delete a RADIUS Server Connection To delete an unwanted RADIUS server connection: NOTE: To delete a RADIUS account, remove it from the Active Directory server first before you delete it from the storage group. Deleting an Active Directory account (or group) from the storage group does not remove it from the Active Directory server. 1. Click Group → Group Configuration. 2. Click the Administration tab. 3. In the Authentication panel, select RADIUS and then click the RADIUS settings button to open the RADIUS Settings dialog box. 4. Select the server IP address that you want to remove and then click Delete. 5. To confirm the deletion, click Yes. 6. Click OK. About Group-Level Security 63
-
 1
1 -
2
-
3
-
4
-
5
-
6
-
7
-
8
-
9
-
10
-
11
-
12
-
13
-
14
-
15
-
16
-
17
-
18
-
19
-
20
-
21
-
22
-
23
-
24
-
25
-
26
-
27
-
28
-
29
-
30
-
31
-
32
-
33
-
34
-
35
-
36
-
37
-
38
-
39
-
40
-
41
-
42
-
43
-
44
-
45
-
46
-
47
-
48
-
49
-
50
-
51
-
52
-
53
-
54
-
55
-
56
-
57
-
 58
58 -
 59
59 -
 60
60 -
 61
61 -
 62
62 -
 63
63 -
 64
64 -
 65
65 -
 66
66 -
 67
67 -
 68
68 -
69
-
70
-
71
-
72
-
73
-
74
-
75
-
76
-
77
-
78
-
79
-
80
-
81
-
82
-
83
-
84
-
85
-
86
-
87
-
88
-
89
-
90
-
91
-
92
-
93
-
94
-
95
-
96
-
97
-
98
-
99
-
100
-
101
-
102
-
103
-
104
-
105
-
106
-
107
-
108
-
109
-
110
-
111
-
112
-
113
-
114
-
115
-
116
-
117
-
118
-
119
-
120
-
121
-
122
-
123
-
124
-
125
-
126
-
127
-
128
-
129
-
130
-
131
-
132
-
133
-
134
-
135
-
136
-
137
-
138
-
139
-
140
-
141
-
142
-
143
-
144
-
145
-
146
-
147
-
148
-
149
-
150
-
151
-
152
-
153
-
154
-
155
-
156
-
157
-
158
-
159
-
160
-
161
-
162
-
163
-
164
-
165
-
166
-
167
-
168
-
169
-
170
-
171
-
172
-
173
-
174
-
175
-
176
-
177
-
178
-
179
-
180
-
181
-
182
-
183
-
184
-
185
-
186
-
187
-
188
-
189
-
190
-
191
-
192
-
193
-
194
-
195
-
196
-
197
-
198
-
199
-
200
-
201
-
202
-
203
-
204
-
205
-
206
-
207
-
208
-
209
-
210
-
211
-
212
-
213
-
214
-
215
-
216
-
217
-
218
-
219
-
220
-
221
-
222
-
223
-
224
-
225
-
226
-
227
-
228
-
229
-
230
-
231
-
232
-
233
-
234
-
235
-
236
-
237
-
238
-
239
-
240
-
241
-
242
-
243
-
244
-
245
-
246
-
247
-
248
-
249
-
250
-
251
-
252
-
253
-
254
-
255
-
256
-
257
-
258
-
259
-
260
-
261
-
262
-
263
-
264
-
265
-
266
-
267
-
268
-
269
-
270
-
271
-
272
-
273
-
274
-
275
-
276
-
277
-
278
-
279
-
280
-
281
-
282
-
283
-
284
-
285
-
286
-
287
-
288
-
289
-
290
-
291
-
292
-
293
-
294
-
295
-
296
-
297
-
298
-
299
-
300
-
301
-
302
-
303
-
304
-
305
-
306
-
307
-
308
-
309
-
310
-
311
-
312
-
313
-
314
-
315
-
316
-
317
-
318
-
319
-
320
-
321
-
322
-
323
-
324
-
325
-
326
-
327
-
328
-
329
-
330
-
331
-
332
-
333
-
334
-
335
-
336
-
337
-
338
-
339
-
340
-
341
-
342
-
343
-
344
-
345
-
346
-
347
-
348
-
349
-
350
-
351
-
352
-
353
-
354
-
355
 |
 |
