Dell EqualLogic PS6210XS EqualLogic Group Manager Administrator s Guide PS Ser - Page 271
Recovery Volume Options, How to Handle a Failed Operation
 |
View all Dell EqualLogic PS6210XS manuals
Add to My Manuals
Save this manual to your list of manuals |
Page 271 highlights
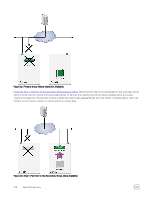
• Retain the iSCSI target name of the original volume. • Keep the ability to demote to the replica set. (Unless you are permanently promoting the replica set, make sure that you keep this ability.) 7. Click Next to open the Promote Replica Set - iSCSI Access panel. 8. Specify the following information: • Conditions that a computer must match to connect to the recovery volume. Type a CHAP user name, IP address, or iSCSI initiator name. • Recovery volume permission (either read-only or read-write). • Whether to allow initiators with different iSCSI qualified names (IQNs) access to the recovery volume. 9. Click Next to open the Promote Replica Set - Summary dialog box. 10. Review the information. Click Finish, or click Back to make changes. After the promote operation completes, the replica set disappears from the list of inbound replica sets, and the recovery volume appears in the list of volumes. Recovery Volume Options After you promote an inbound replica set to a recovery volume: • You can connect to the recovery volume. • When the original volume on the primary group becomes available, go to the next step in the failover and failback process. • To reverse the inbound replica set promotion and cancel the failover, demote the recovery volume to an inbound replica set: a. Click Volumes. b. Expand Volumes and then select the recovery volume name. c. Click Demote to replica set. • If the original volume becomes permanently unavailable, you can make the inbound replica set promotion permanent. Recovery Volume Restrictions To temporarily fail over a volume to the secondary group, you promote the volume's inbound replica set to a recovery volume. Users can connect to the recovery volume and resume accessing the volume data. All volume operations apply to a recovery volume, with some exceptions: • You cannot change: - Volume size - Volume name - Public alias - RAID preference - Replication partner - Thin-provisioning settings (applicable only to recovery template volumes and recovery thin clone volumes) - Permission (applicable only to recovery template volumes) • You cannot delete a recovery template volume if any of the following objects are attached: - Recovery thin clone volumes - Thin clone replica sets - Permanently promoted thin clone replica sets How to Handle a Failed Operation To check the status of a Replicate to Partner operation and the Failback to Primary operation: 1. Open the Alarms panel and click the Failback Operations tab. About Data Recovery 271
-
 1
1 -
2
-
3
-
4
-
5
-
6
-
7
-
8
-
9
-
10
-
11
-
12
-
13
-
14
-
15
-
16
-
17
-
18
-
19
-
20
-
21
-
22
-
23
-
24
-
25
-
26
-
27
-
28
-
29
-
30
-
31
-
32
-
33
-
34
-
35
-
36
-
37
-
38
-
39
-
40
-
41
-
42
-
43
-
44
-
45
-
46
-
47
-
48
-
49
-
50
-
51
-
52
-
53
-
54
-
55
-
56
-
57
-
58
-
59
-
60
-
61
-
62
-
63
-
64
-
65
-
66
-
67
-
68
-
69
-
70
-
71
-
72
-
73
-
74
-
75
-
76
-
77
-
78
-
79
-
80
-
81
-
82
-
83
-
84
-
85
-
86
-
87
-
88
-
89
-
90
-
91
-
92
-
93
-
94
-
95
-
96
-
97
-
98
-
99
-
100
-
101
-
102
-
103
-
104
-
105
-
106
-
107
-
108
-
109
-
110
-
111
-
112
-
113
-
114
-
115
-
116
-
117
-
118
-
119
-
120
-
121
-
122
-
123
-
124
-
125
-
126
-
127
-
128
-
129
-
130
-
131
-
132
-
133
-
134
-
135
-
136
-
137
-
138
-
139
-
140
-
141
-
142
-
143
-
144
-
145
-
146
-
147
-
148
-
149
-
150
-
151
-
152
-
153
-
154
-
155
-
156
-
157
-
158
-
159
-
160
-
161
-
162
-
163
-
164
-
165
-
166
-
167
-
168
-
169
-
170
-
171
-
172
-
173
-
174
-
175
-
176
-
177
-
178
-
179
-
180
-
181
-
182
-
183
-
184
-
185
-
186
-
187
-
188
-
189
-
190
-
191
-
192
-
193
-
194
-
195
-
196
-
197
-
198
-
199
-
200
-
201
-
202
-
203
-
204
-
205
-
206
-
207
-
208
-
209
-
210
-
211
-
212
-
213
-
214
-
215
-
216
-
217
-
218
-
219
-
220
-
221
-
222
-
223
-
224
-
225
-
226
-
227
-
228
-
229
-
230
-
231
-
232
-
233
-
234
-
235
-
236
-
237
-
238
-
239
-
240
-
241
-
242
-
243
-
244
-
245
-
246
-
247
-
248
-
249
-
250
-
251
-
252
-
253
-
254
-
255
-
256
-
257
-
258
-
259
-
260
-
261
-
262
-
263
-
264
-
265
-
 266
266 -
 267
267 -
 268
268 -
 269
269 -
 270
270 -
 271
271 -
 272
272 -
 273
273 -
 274
274 -
 275
275 -
 276
276 -
277
-
278
-
279
-
280
-
281
-
282
-
283
-
284
-
285
-
286
-
287
-
288
-
289
-
290
-
291
-
292
-
293
-
294
-
295
-
296
-
297
-
298
-
299
-
300
-
301
-
302
-
303
-
304
-
305
-
306
-
307
-
308
-
309
-
310
-
311
-
312
-
313
-
314
-
315
-
316
-
317
-
318
-
319
-
320
-
321
-
322
-
323
-
324
-
325
-
326
-
327
-
328
-
329
-
330
-
331
-
332
-
333
-
334
-
335
-
336
-
337
-
338
-
339
-
340
-
341
-
342
-
343
-
344
-
345
-
346
-
347
-
348
-
349
-
350
-
351
-
352
-
353
-
354
-
355
 |
 |
