Kyocera KM-C3232E C2525E/C3225E/C3232E/C4035E Operation Guide Rev-1.0 (Advance - Page 195
Scanner File Utility, About the Scanner File Utility, Preparing for Use, Operation Flow
 |
View all Kyocera KM-C3232E manuals
Add to My Manuals
Save this manual to your list of manuals |
Page 195 highlights
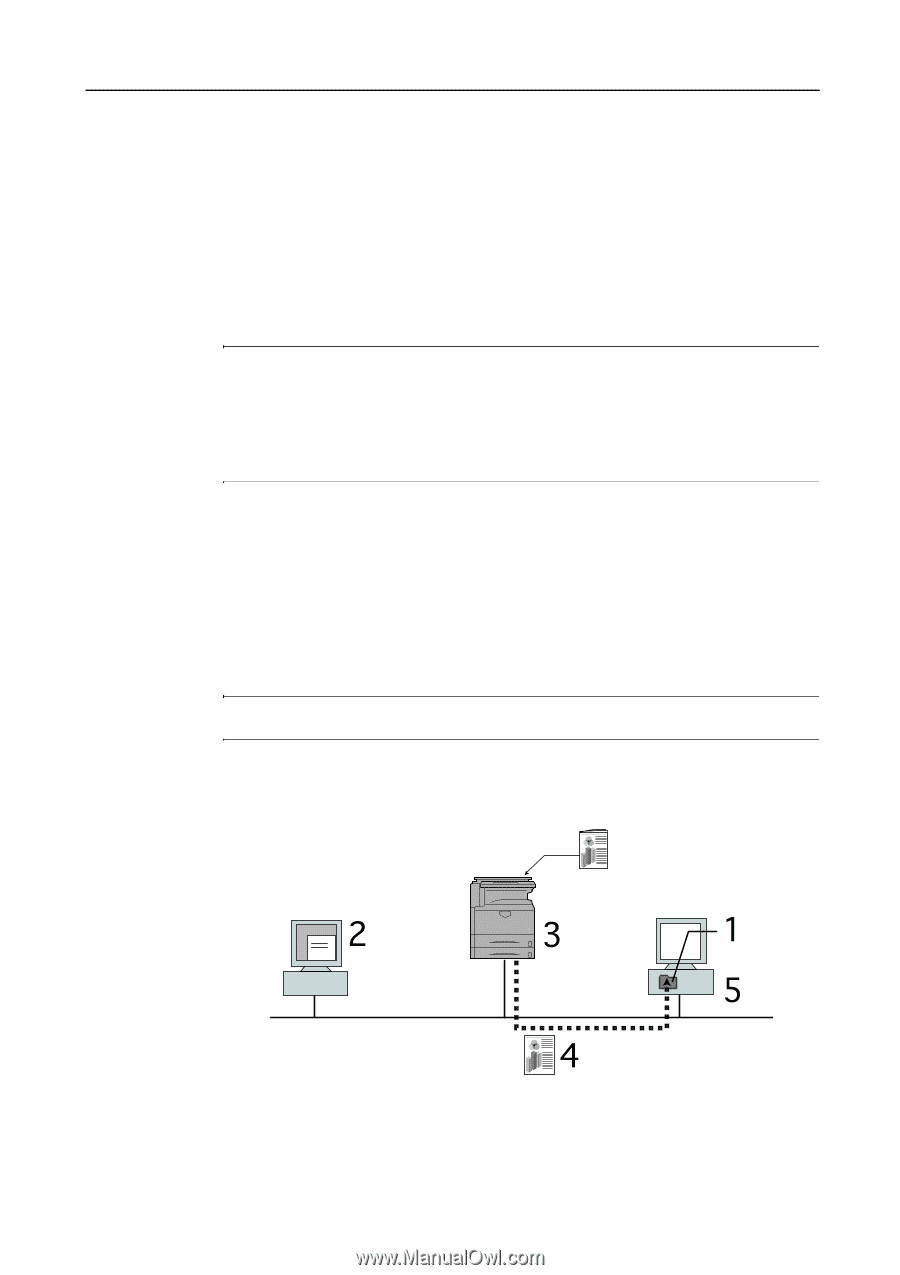
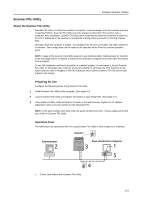
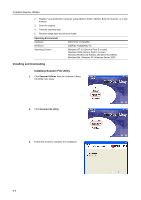
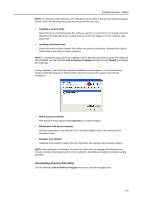
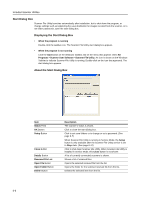
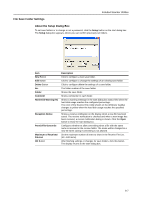
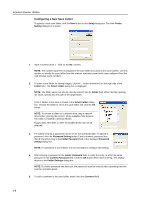
Included Scanner Utilities Scanner File Utility About the Scanner File Utility Scanner File Utility is a utility that enables a computer to receive images from the scanner and save in specified folders. Scanner File Utility saves the images received from the scanner onto a computer. After installation, Scanner File Utility starts automatically when the computer is turned on. An icon is displayed on the task bar to indicate the running status and wait for incoming scanner data. Operation from the computer is simple - just configure the desired save folder and folder password in advance. Then, image data can be saved to the specified folder from the scanner operation panel. NOTE: Usage of the Scanner File Utility requires to use Address Editor, Address Book for Scanner or the web page feature to register in advance the destination computer and save folder information for the scanner. To use DB Assistant to add text information to scanned images, it is necessary to launch Scanner File Utility on the target save computer and select whether to send with the PDF Keyword Assist option (add text data to images) or with the Database Assist option (create a CSV file as text data together with image). Preparing for Use Configure the following before using Scanner File Utility. 1 Install Scanner File Utility on the computer. (See page 6-4) 2 Launch Scanner File Utility and register the folders to save image files. (See page 6-7) 3 Using Address Editor, Address Book for Scanner or the web browser, register the IP address, registration name and save number for the destination PC. NOTE: In the save number entry field, enter the same number (from 001 - 100) as registered for the save folder in Scanner File Utility. Operation Flow The following is the operational flow for using Scanner File Utility to save images to a computer. Scanner Administrator Save destination computer 1. Create save folders with Scanner File Utility 6-3
-
 1
1 -
2
-
3
-
4
-
5
-
6
-
7
-
8
-
9
-
10
-
11
-
12
-
13
-
14
-
15
-
16
-
17
-
18
-
19
-
20
-
21
-
22
-
23
-
24
-
25
-
26
-
27
-
28
-
29
-
30
-
31
-
32
-
33
-
34
-
35
-
36
-
37
-
38
-
39
-
40
-
41
-
42
-
43
-
44
-
45
-
46
-
47
-
48
-
49
-
50
-
51
-
52
-
53
-
54
-
55
-
56
-
57
-
58
-
59
-
60
-
61
-
62
-
63
-
64
-
65
-
66
-
67
-
68
-
69
-
70
-
71
-
72
-
73
-
74
-
75
-
76
-
77
-
78
-
79
-
80
-
81
-
82
-
83
-
84
-
85
-
86
-
87
-
88
-
89
-
90
-
91
-
92
-
93
-
94
-
95
-
96
-
97
-
98
-
99
-
100
-
101
-
102
-
103
-
104
-
105
-
106
-
107
-
108
-
109
-
110
-
111
-
112
-
113
-
114
-
115
-
116
-
117
-
118
-
119
-
120
-
121
-
122
-
123
-
124
-
125
-
126
-
127
-
128
-
129
-
130
-
131
-
132
-
133
-
134
-
135
-
136
-
137
-
138
-
139
-
140
-
141
-
142
-
143
-
144
-
145
-
146
-
147
-
148
-
149
-
150
-
151
-
152
-
153
-
154
-
155
-
156
-
157
-
158
-
159
-
160
-
161
-
162
-
163
-
164
-
165
-
166
-
167
-
168
-
169
-
170
-
171
-
172
-
173
-
174
-
175
-
176
-
177
-
178
-
179
-
180
-
181
-
182
-
183
-
184
-
185
-
186
-
187
-
188
-
189
-
 190
190 -
 191
191 -
 192
192 -
 193
193 -
 194
194 -
 195
195 -
 196
196 -
 197
197 -
 198
198 -
 199
199 -
 200
200 -
201
-
202
-
203
-
204
-
205
-
206
-
207
-
208
-
209
-
210
-
211
-
212
-
213
-
214
-
215
-
216
-
217
-
218
-
219
-
220
-
221
-
222
-
223
-
224
-
225
-
226
-
227
-
228
-
229
-
230
-
231
-
232
-
233
-
234
-
235
-
236
-
237
-
238
-
239
-
240
-
241
-
242
-
243
-
244
-
245
-
246
-
247
-
248
-
249
-
250
-
251
-
252
-
253
-
254
-
255
-
256
-
257
-
258
-
259
-
260
-
261
-
262
-
263
-
264
-
265
-
266
-
267
-
268
-
269
-
270
-
271
-
272
-
273
-
274
-
275
-
276
-
277
-
278
-
279
-
280
-
281
-
282
-
283
-
284
-
285
-
286
-
287
-
288
-
289
-
290
-
291
-
292
-
293
-
294
-
295
-
296
-
297
-
298
-
299
-
300
-
301
-
302
-
303
-
304
-
305
-
306
-
307
-
308
-
309
-
310
-
311
-
312
-
313
-
314
-
315
-
316
-
317
-
318
-
319
-
320
-
321
-
322
-
323
-
324
-
325
-
326
-
327
-
328
-
329
-
330
-
331
-
332
-
333
-
334
-
335
-
336
-
337
-
338
-
339
-
340
-
341
-
342
-
343
-
344
-
345
-
346
-
347
-
348
-
349
-
350
-
351
-
352
-
353
-
354
-
355
-
356
-
357
-
358
-
359
-
360
-
361
-
362
-
363
-
364
-
365
-
366
-
367
-
368
-
369
-
370
-
371
-
372
-
373
-
374
 |
 |