Kyocera KM-C3232E C2525E/C3225E/C3232E/C4035E Operation Guide Rev-1.0 (Advance - Page 320
Fax Job Accounting, Response to Unauthorized Requests, Default Counter Limit Value, Setting
 |
View all Kyocera KM-C3232E manuals
Add to My Manuals
Save this manual to your list of manuals |
Page 320 highlights
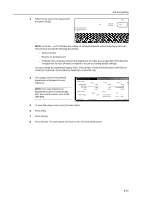
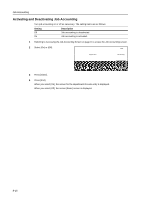
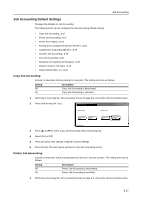
Job Accounting Fax Job Accounting Activate or deactivate job accounting when the optional fax function is used. The setting items are as follows. Setting Off On Description Fax Job Accounting is deactivated. Fax Job Accounting is activated. NOTE: This setting is displayed when the optional fax kit is installed. 1 Referring to Accessing the Job Accounting Screen on page 8-3, access the Job Accounting screen. 2 Press [Job Accntg Def. Set.]. 3 Press [S] or [T] to select Fax Job Accounting and press [Change #]. 4 Select [On] or [Off]. 5 Press [Close] to save settings or [Back] to cancel settings. 6 Press [Close]. The touch panel will return to the Job Accounting screen. Response to Unauthorized Requests Specify the actions when users attempt to copy in excess of the specified copy limitation. The setting items are as follows. Setting Stop job immediately Stop after job done Only warning Restriction Restricts usage and stops output immediately once the maximum usage has been exceeded. Continues output or scanning of the current job and restricts usage from the next job. Only a warning message is displayed. 1 Referring to Accessing the Job Accounting Screen on page 8-3, access the Job Accounting screen. 2 Press [Job Accntg Def. Set.]. 3 Press [S] or [T] to select Excess of Limit Setting and press [Change #]. 4 Press [Stop job immediately], [Stop after job done] or [Only warning]. 5 Press [Close] to save settings or [Back] to cancel settings. 6 Press [Close]. The touch panel will return to the Job Accounting screen. Default Counter Limit Value Specify the default of usage limitation when registering a new department. Specify between 1-999,999 sheets in 1 sheet increments. 1 Referring to Accessing the Job Accounting Screen on page 8-3, access the Job Accounting screen. 2 Press [Job Accntg Def. Set.]. 3 Press [S] or [T] to select Def. Val. of coun. Limit and press [Change #]. 8-20
-
 1
1 -
2
-
3
-
4
-
5
-
6
-
7
-
8
-
9
-
10
-
11
-
12
-
13
-
14
-
15
-
16
-
17
-
18
-
19
-
20
-
21
-
22
-
23
-
24
-
25
-
26
-
27
-
28
-
29
-
30
-
31
-
32
-
33
-
34
-
35
-
36
-
37
-
38
-
39
-
40
-
41
-
42
-
43
-
44
-
45
-
46
-
47
-
48
-
49
-
50
-
51
-
52
-
53
-
54
-
55
-
56
-
57
-
58
-
59
-
60
-
61
-
62
-
63
-
64
-
65
-
66
-
67
-
68
-
69
-
70
-
71
-
72
-
73
-
74
-
75
-
76
-
77
-
78
-
79
-
80
-
81
-
82
-
83
-
84
-
85
-
86
-
87
-
88
-
89
-
90
-
91
-
92
-
93
-
94
-
95
-
96
-
97
-
98
-
99
-
100
-
101
-
102
-
103
-
104
-
105
-
106
-
107
-
108
-
109
-
110
-
111
-
112
-
113
-
114
-
115
-
116
-
117
-
118
-
119
-
120
-
121
-
122
-
123
-
124
-
125
-
126
-
127
-
128
-
129
-
130
-
131
-
132
-
133
-
134
-
135
-
136
-
137
-
138
-
139
-
140
-
141
-
142
-
143
-
144
-
145
-
146
-
147
-
148
-
149
-
150
-
151
-
152
-
153
-
154
-
155
-
156
-
157
-
158
-
159
-
160
-
161
-
162
-
163
-
164
-
165
-
166
-
167
-
168
-
169
-
170
-
171
-
172
-
173
-
174
-
175
-
176
-
177
-
178
-
179
-
180
-
181
-
182
-
183
-
184
-
185
-
186
-
187
-
188
-
189
-
190
-
191
-
192
-
193
-
194
-
195
-
196
-
197
-
198
-
199
-
200
-
201
-
202
-
203
-
204
-
205
-
206
-
207
-
208
-
209
-
210
-
211
-
212
-
213
-
214
-
215
-
216
-
217
-
218
-
219
-
220
-
221
-
222
-
223
-
224
-
225
-
226
-
227
-
228
-
229
-
230
-
231
-
232
-
233
-
234
-
235
-
236
-
237
-
238
-
239
-
240
-
241
-
242
-
243
-
244
-
245
-
246
-
247
-
248
-
249
-
250
-
251
-
252
-
253
-
254
-
255
-
256
-
257
-
258
-
259
-
260
-
261
-
262
-
263
-
264
-
265
-
266
-
267
-
268
-
269
-
270
-
271
-
272
-
273
-
274
-
275
-
276
-
277
-
278
-
279
-
280
-
281
-
282
-
283
-
284
-
285
-
286
-
287
-
288
-
289
-
290
-
291
-
292
-
293
-
294
-
295
-
296
-
297
-
298
-
299
-
300
-
301
-
302
-
303
-
304
-
305
-
306
-
307
-
308
-
309
-
310
-
311
-
312
-
313
-
314
-
 315
315 -
 316
316 -
 317
317 -
 318
318 -
 319
319 -
 320
320 -
 321
321 -
 322
322 -
 323
323 -
 324
324 -
 325
325 -
326
-
327
-
328
-
329
-
330
-
331
-
332
-
333
-
334
-
335
-
336
-
337
-
338
-
339
-
340
-
341
-
342
-
343
-
344
-
345
-
346
-
347
-
348
-
349
-
350
-
351
-
352
-
353
-
354
-
355
-
356
-
357
-
358
-
359
-
360
-
361
-
362
-
363
-
364
-
365
-
366
-
367
-
368
-
369
-
370
-
371
-
372
-
373
-
374
 |
 |