Kyocera KM-C3232E C2525E/C3225E/C3232E/C4035E Operation Guide Rev-1.0 (Advance - Page 85
Printing Documents, Auto Color, Black&White, Start, Document Management, Function
 |
View all Kyocera KM-C3232E manuals
Add to My Manuals
Save this manual to your list of manuals |
Page 85 highlights
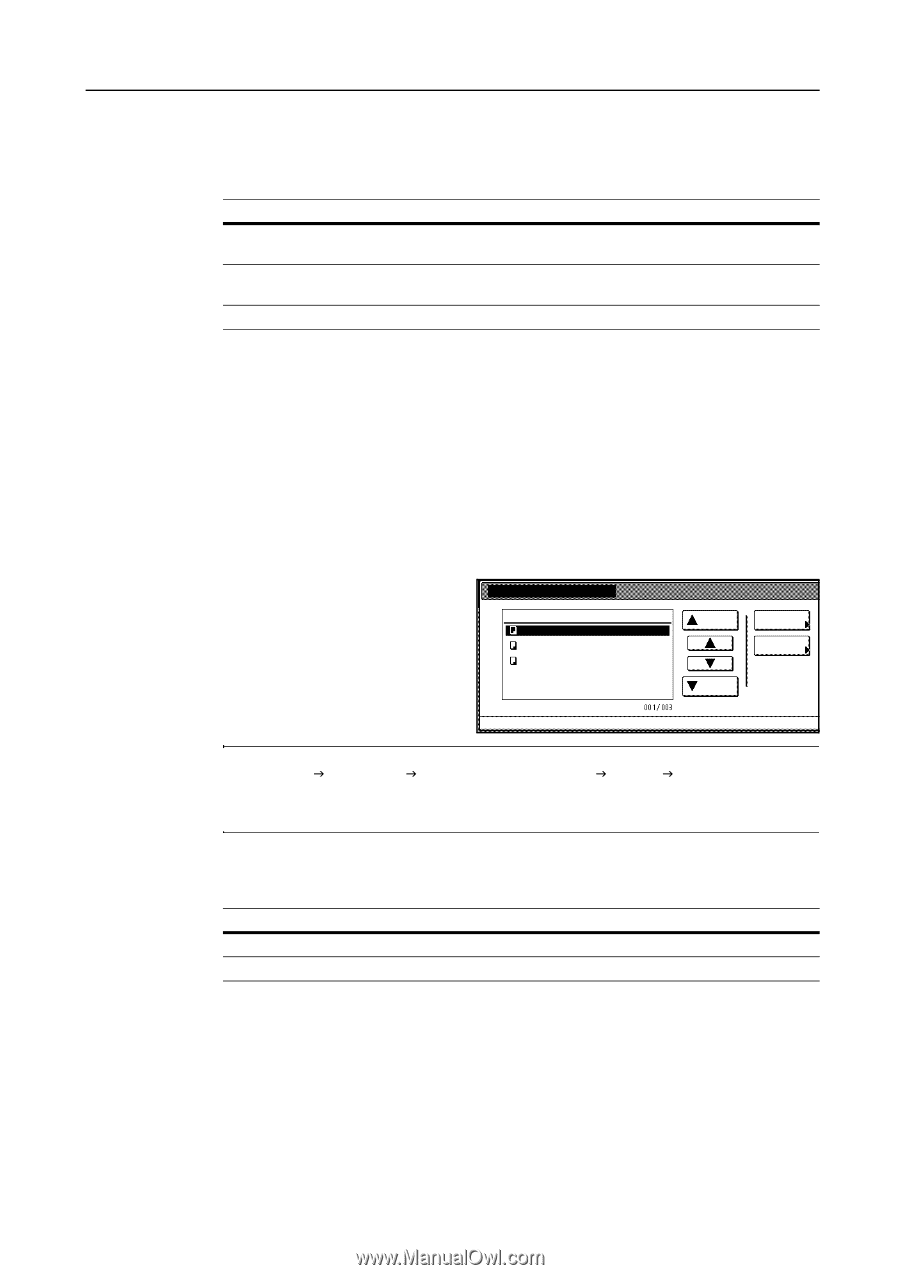
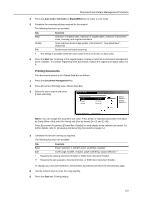
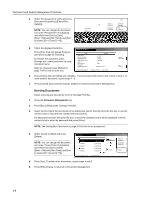
Document and Output Management Functions 4 Press the Auto Color, Full Color or Black&White key to select a color mode. 5 Complete the scanning settings required for the original. The following functions are available. Tab Basic Quality Edit Function Selection of original sizes, selection of original types, selection of document sizes, zooming, and original orientation Scan exposure level, image quality, color balance †, hue adjustment †, sharpness Border erase and batch scanning † This setting is available when the color mode is set to Full Color or Auto Color. 6 Press the Start key. Scanning of the original begins. Display is returned to Document Management when complete. To continue registering other documents, replace the original and repeat steps 2 to 6. Printing Documents Print documents stored in the Shared Data Box as follows. 1 Press the Document Management key. 2 Press [Document Printing] under Shared Data Box. 3 Select the job to reprint and press [Finish selecting]. Document Printing Document Data Box Doc003 Doc002 Doc001 1 08/08/'05 1 08/08/'05 1 08/08/'05 Up Down Order of indication Document Properties Document Management - Shared Data Box NOTE: You can change the document sort order. Press [Order of indication] and select from [Sort by Date] ([NewJOld] and [OldJNew]) and [Sort by Name] ([AJZ] and [ZJA]). Press [Document Properties] ([Check/Rev. Details]) to verify details of the selected document. For further details, refer to Reviewing and Renaming Documents on page 2-4. 4 Complete the function settings as required. The following functions are available. Tab Basic Edit Function Paper selection, 1-sided/2-sided, sort/offset, stapling † Cover page, booklet, margins, page numbering, output selection †† † Requires the optional document finisher or 3000 sheet document finisher. †† Requires the job separator, document finisher, or 3000 sheet document finisher. To change your document selection, press [Select document] and select the document(s) again. 5 Use the numeric keys to enter the copy quantity. 6 Press the Start key. Printing begins. 2-3
-
 1
1 -
2
-
3
-
4
-
5
-
6
-
7
-
8
-
9
-
10
-
11
-
12
-
13
-
14
-
15
-
16
-
17
-
18
-
19
-
20
-
21
-
22
-
23
-
24
-
25
-
26
-
27
-
28
-
29
-
30
-
31
-
32
-
33
-
34
-
35
-
36
-
37
-
38
-
39
-
40
-
41
-
42
-
43
-
44
-
45
-
46
-
47
-
48
-
49
-
50
-
51
-
52
-
53
-
54
-
55
-
56
-
57
-
58
-
59
-
60
-
61
-
62
-
63
-
64
-
65
-
66
-
67
-
68
-
69
-
70
-
71
-
72
-
73
-
74
-
75
-
76
-
77
-
78
-
79
-
 80
80 -
 81
81 -
 82
82 -
 83
83 -
 84
84 -
 85
85 -
 86
86 -
 87
87 -
 88
88 -
 89
89 -
 90
90 -
91
-
92
-
93
-
94
-
95
-
96
-
97
-
98
-
99
-
100
-
101
-
102
-
103
-
104
-
105
-
106
-
107
-
108
-
109
-
110
-
111
-
112
-
113
-
114
-
115
-
116
-
117
-
118
-
119
-
120
-
121
-
122
-
123
-
124
-
125
-
126
-
127
-
128
-
129
-
130
-
131
-
132
-
133
-
134
-
135
-
136
-
137
-
138
-
139
-
140
-
141
-
142
-
143
-
144
-
145
-
146
-
147
-
148
-
149
-
150
-
151
-
152
-
153
-
154
-
155
-
156
-
157
-
158
-
159
-
160
-
161
-
162
-
163
-
164
-
165
-
166
-
167
-
168
-
169
-
170
-
171
-
172
-
173
-
174
-
175
-
176
-
177
-
178
-
179
-
180
-
181
-
182
-
183
-
184
-
185
-
186
-
187
-
188
-
189
-
190
-
191
-
192
-
193
-
194
-
195
-
196
-
197
-
198
-
199
-
200
-
201
-
202
-
203
-
204
-
205
-
206
-
207
-
208
-
209
-
210
-
211
-
212
-
213
-
214
-
215
-
216
-
217
-
218
-
219
-
220
-
221
-
222
-
223
-
224
-
225
-
226
-
227
-
228
-
229
-
230
-
231
-
232
-
233
-
234
-
235
-
236
-
237
-
238
-
239
-
240
-
241
-
242
-
243
-
244
-
245
-
246
-
247
-
248
-
249
-
250
-
251
-
252
-
253
-
254
-
255
-
256
-
257
-
258
-
259
-
260
-
261
-
262
-
263
-
264
-
265
-
266
-
267
-
268
-
269
-
270
-
271
-
272
-
273
-
274
-
275
-
276
-
277
-
278
-
279
-
280
-
281
-
282
-
283
-
284
-
285
-
286
-
287
-
288
-
289
-
290
-
291
-
292
-
293
-
294
-
295
-
296
-
297
-
298
-
299
-
300
-
301
-
302
-
303
-
304
-
305
-
306
-
307
-
308
-
309
-
310
-
311
-
312
-
313
-
314
-
315
-
316
-
317
-
318
-
319
-
320
-
321
-
322
-
323
-
324
-
325
-
326
-
327
-
328
-
329
-
330
-
331
-
332
-
333
-
334
-
335
-
336
-
337
-
338
-
339
-
340
-
341
-
342
-
343
-
344
-
345
-
346
-
347
-
348
-
349
-
350
-
351
-
352
-
353
-
354
-
355
-
356
-
357
-
358
-
359
-
360
-
361
-
362
-
363
-
364
-
365
-
366
-
367
-
368
-
369
-
370
-
371
-
372
-
373
-
374
 |
 |