Kyocera KM-C3232E C2525E/C3225E/C3232E/C4035E Operation Guide Rev-1.0 (Advance - Page 318
Printer Error Report, Printing from Unregistered Sources (Printer
 |
View all Kyocera KM-C3232E manuals
Add to My Manuals
Save this manual to your list of manuals |
Page 318 highlights
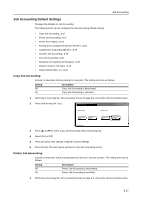
Job Accounting 2 Press [Job Accntg Def. Set.]. 3 Press [S] or [T] to select Print. Job Accounting and press [Change #]. 4 Select [On] or [Off]. 5 Press [Close] to save settings or [Back] to cancel settings. 6 Press [Close]. The touch panel will return to the Job Accounting screen. Printer Error Report When you use Job Accounting to manage printing, you can specify whether an error report is printed in case that the user attempts to print using the incorrect department code. When the user attempts to print using the incorrect department ID code, Account ID mismatch will be displayed and the job will not be printed. Press [Cancel] to print the error report. The setting items are as follows. Setting Off On Description Do not print error report when there is an account ID mismatch. Print error report even if there is an account ID mismatch. NOTE: This item is not shown when Printer Job Accounting (see page 8-17) is set to [Off]. 1 Referring to Accessing the Job Accounting Screen on page 8-3, access the Job Accounting screen. 2 Press [Job Accntg Def. Set.]. 3 Press [S] or [T] to select Printer error report and press [Change #]. 4 Select [On] or [Off]. 5 Press [Close] to save settings or [Back] to cancel settings. 6 Press [Close]. The touch panel will return to the Job Accounting screen. Printing from Unregistered Sources (Printer) If you use Job Accounting to manage printing, you can authorize or prohibit printing from computers with printer drivers that do not support Job Accounting. The setting items are as follows. Setting Off On Description Users cannot print unless their printer driver supports Job Accounting. Users can print from computers with printer drivers that do not support Job Accounting. NOTE: This item is not shown when Printer Job Accounting (see page 8-17) is set to [Off]. 1 Referring to Accessing the Job Accounting Screen on page 8-3, access the Job Accounting screen. 2 Press [Job Accntg Def. Set.]. 3 Press [S] or [T] to select Other Mgt. reg. (print) and press [Change #]. 4 Select [On] or [Off]. 8-18
-
 1
1 -
2
-
3
-
4
-
5
-
6
-
7
-
8
-
9
-
10
-
11
-
12
-
13
-
14
-
15
-
16
-
17
-
18
-
19
-
20
-
21
-
22
-
23
-
24
-
25
-
26
-
27
-
28
-
29
-
30
-
31
-
32
-
33
-
34
-
35
-
36
-
37
-
38
-
39
-
40
-
41
-
42
-
43
-
44
-
45
-
46
-
47
-
48
-
49
-
50
-
51
-
52
-
53
-
54
-
55
-
56
-
57
-
58
-
59
-
60
-
61
-
62
-
63
-
64
-
65
-
66
-
67
-
68
-
69
-
70
-
71
-
72
-
73
-
74
-
75
-
76
-
77
-
78
-
79
-
80
-
81
-
82
-
83
-
84
-
85
-
86
-
87
-
88
-
89
-
90
-
91
-
92
-
93
-
94
-
95
-
96
-
97
-
98
-
99
-
100
-
101
-
102
-
103
-
104
-
105
-
106
-
107
-
108
-
109
-
110
-
111
-
112
-
113
-
114
-
115
-
116
-
117
-
118
-
119
-
120
-
121
-
122
-
123
-
124
-
125
-
126
-
127
-
128
-
129
-
130
-
131
-
132
-
133
-
134
-
135
-
136
-
137
-
138
-
139
-
140
-
141
-
142
-
143
-
144
-
145
-
146
-
147
-
148
-
149
-
150
-
151
-
152
-
153
-
154
-
155
-
156
-
157
-
158
-
159
-
160
-
161
-
162
-
163
-
164
-
165
-
166
-
167
-
168
-
169
-
170
-
171
-
172
-
173
-
174
-
175
-
176
-
177
-
178
-
179
-
180
-
181
-
182
-
183
-
184
-
185
-
186
-
187
-
188
-
189
-
190
-
191
-
192
-
193
-
194
-
195
-
196
-
197
-
198
-
199
-
200
-
201
-
202
-
203
-
204
-
205
-
206
-
207
-
208
-
209
-
210
-
211
-
212
-
213
-
214
-
215
-
216
-
217
-
218
-
219
-
220
-
221
-
222
-
223
-
224
-
225
-
226
-
227
-
228
-
229
-
230
-
231
-
232
-
233
-
234
-
235
-
236
-
237
-
238
-
239
-
240
-
241
-
242
-
243
-
244
-
245
-
246
-
247
-
248
-
249
-
250
-
251
-
252
-
253
-
254
-
255
-
256
-
257
-
258
-
259
-
260
-
261
-
262
-
263
-
264
-
265
-
266
-
267
-
268
-
269
-
270
-
271
-
272
-
273
-
274
-
275
-
276
-
277
-
278
-
279
-
280
-
281
-
282
-
283
-
284
-
285
-
286
-
287
-
288
-
289
-
290
-
291
-
292
-
293
-
294
-
295
-
296
-
297
-
298
-
299
-
300
-
301
-
302
-
303
-
304
-
305
-
306
-
307
-
308
-
309
-
310
-
311
-
312
-
 313
313 -
 314
314 -
 315
315 -
 316
316 -
 317
317 -
 318
318 -
 319
319 -
 320
320 -
 321
321 -
 322
322 -
 323
323 -
324
-
325
-
326
-
327
-
328
-
329
-
330
-
331
-
332
-
333
-
334
-
335
-
336
-
337
-
338
-
339
-
340
-
341
-
342
-
343
-
344
-
345
-
346
-
347
-
348
-
349
-
350
-
351
-
352
-
353
-
354
-
355
-
356
-
357
-
358
-
359
-
360
-
361
-
362
-
363
-
364
-
365
-
366
-
367
-
368
-
369
-
370
-
371
-
372
-
373
-
374
 |
 |