Kyocera KM-C3232E C2525E/C3225E/C3232E/C4035E Operation Guide Rev-1.0 (Advance - Page 310
Deleting Accounts, Restricting Printer Usage All, Printer Job Accounting, New Account
 |
View all Kyocera KM-C3232E manuals
Add to My Manuals
Save this manual to your list of manuals |
Page 310 highlights
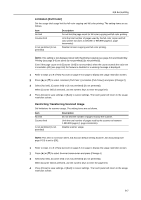
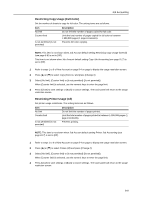
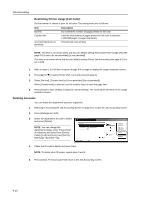
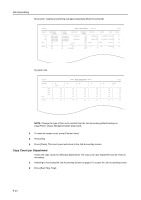
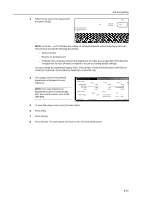
Job Accounting Restricting Printer Usage (Full Color) Set the number of sheets to print for full-color. The setting items are as follows. Item No limit Counter limit Is not permitted (Is not permited) Description Do not limit the number of pages printed for full color. Limit the total number of pages printed for full color to between 1-999,999 pages (1 page increments). Prevents full color printing. NOTE: This item is not shown when Job Account default setting Restricting Printer Usage (All) (see page 8-9) is set to [Is not permitted] ([Is not permited]). This item is not shown when Job Account default setting Printer Job Accounting (see page 8-17) is set to [Off]. 1 Refer to steps 1 to 9 of New Account on page 8-4 on page to display the usage restriction screen. 2 Press [S] or [T] to select Printer (Full. Col.) and press [Change #]. 3 Select [No limit], [Counter limit] or [Is not permitted] ([Is not permited]). When [Counter limit] is selected, use the numeric keys to enter the page limit. 4 Press [Close] to save settings or [Back] to cancel settings. The touch panel will return to the usage restriction screen. Deleting Accounts You can delete the department accounts registered. 1 Referring to Accessing the Job Accounting Screen on page 8-3, access the Job Accounting screen. 2 Press [Management Edit]. 3 Select the department ID code to delete and press [Delete]. Management Edit NOTE: You can change the department display order. Press [Order of indication] and select from [Sort by Code] ([1J9] and [9J1]) and [Sort by Name] ([AJZ] and [ZJA]). ID-Code 11111111 1st sales division 22222222 2nd sales division -------- ETC System Menu - Job Up Down Order of indication Mgt. Inf. Correction Delete Register 4 Check the ID code to delete and press [Yes]. NOTE: To delete other ID codes, repeat steps 3 and 4. 5 Press [Close]. The touch panel will return to the Job Accounting screen. 8-10
-
 1
1 -
2
-
3
-
4
-
5
-
6
-
7
-
8
-
9
-
10
-
11
-
12
-
13
-
14
-
15
-
16
-
17
-
18
-
19
-
20
-
21
-
22
-
23
-
24
-
25
-
26
-
27
-
28
-
29
-
30
-
31
-
32
-
33
-
34
-
35
-
36
-
37
-
38
-
39
-
40
-
41
-
42
-
43
-
44
-
45
-
46
-
47
-
48
-
49
-
50
-
51
-
52
-
53
-
54
-
55
-
56
-
57
-
58
-
59
-
60
-
61
-
62
-
63
-
64
-
65
-
66
-
67
-
68
-
69
-
70
-
71
-
72
-
73
-
74
-
75
-
76
-
77
-
78
-
79
-
80
-
81
-
82
-
83
-
84
-
85
-
86
-
87
-
88
-
89
-
90
-
91
-
92
-
93
-
94
-
95
-
96
-
97
-
98
-
99
-
100
-
101
-
102
-
103
-
104
-
105
-
106
-
107
-
108
-
109
-
110
-
111
-
112
-
113
-
114
-
115
-
116
-
117
-
118
-
119
-
120
-
121
-
122
-
123
-
124
-
125
-
126
-
127
-
128
-
129
-
130
-
131
-
132
-
133
-
134
-
135
-
136
-
137
-
138
-
139
-
140
-
141
-
142
-
143
-
144
-
145
-
146
-
147
-
148
-
149
-
150
-
151
-
152
-
153
-
154
-
155
-
156
-
157
-
158
-
159
-
160
-
161
-
162
-
163
-
164
-
165
-
166
-
167
-
168
-
169
-
170
-
171
-
172
-
173
-
174
-
175
-
176
-
177
-
178
-
179
-
180
-
181
-
182
-
183
-
184
-
185
-
186
-
187
-
188
-
189
-
190
-
191
-
192
-
193
-
194
-
195
-
196
-
197
-
198
-
199
-
200
-
201
-
202
-
203
-
204
-
205
-
206
-
207
-
208
-
209
-
210
-
211
-
212
-
213
-
214
-
215
-
216
-
217
-
218
-
219
-
220
-
221
-
222
-
223
-
224
-
225
-
226
-
227
-
228
-
229
-
230
-
231
-
232
-
233
-
234
-
235
-
236
-
237
-
238
-
239
-
240
-
241
-
242
-
243
-
244
-
245
-
246
-
247
-
248
-
249
-
250
-
251
-
252
-
253
-
254
-
255
-
256
-
257
-
258
-
259
-
260
-
261
-
262
-
263
-
264
-
265
-
266
-
267
-
268
-
269
-
270
-
271
-
272
-
273
-
274
-
275
-
276
-
277
-
278
-
279
-
280
-
281
-
282
-
283
-
284
-
285
-
286
-
287
-
288
-
289
-
290
-
291
-
292
-
293
-
294
-
295
-
296
-
297
-
298
-
299
-
300
-
301
-
302
-
303
-
304
-
 305
305 -
 306
306 -
 307
307 -
 308
308 -
 309
309 -
 310
310 -
 311
311 -
 312
312 -
 313
313 -
 314
314 -
 315
315 -
316
-
317
-
318
-
319
-
320
-
321
-
322
-
323
-
324
-
325
-
326
-
327
-
328
-
329
-
330
-
331
-
332
-
333
-
334
-
335
-
336
-
337
-
338
-
339
-
340
-
341
-
342
-
343
-
344
-
345
-
346
-
347
-
348
-
349
-
350
-
351
-
352
-
353
-
354
-
355
-
356
-
357
-
358
-
359
-
360
-
361
-
362
-
363
-
364
-
365
-
366
-
367
-
368
-
369
-
370
-
371
-
372
-
373
-
374
 |
 |