Kyocera KM-C3232E C2525E/C3225E/C3232E/C4035E Operation Guide Rev-1.0 (Advance - Page 262
Enabling Auto Cassette Switching, Specifying the Paper Size, Oficio 2, A3, B4, A4, A4R, B5, B5R, A5R
 |
View all Kyocera KM-C3232E manuals
Add to My Manuals
Save this manual to your list of manuals |
Page 262 highlights
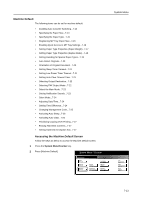
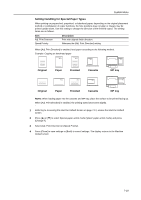
System Menu 3 Use the numeric keys to enter the 4 digit management code. The default setting is 2500 for the 25/25 ppm model, 3200 for the 32/25 and 32/32 ppm models and 4000 for the 40/35 ppm model. If the correct management code has been entered, the Machine Default screen will be displayed. NOTE: For security, it is recommended to change the management code. For further details, refer to Changing Management Code on page 7-25. If the optional security kit has been installed, the management code is 8 digits long. The default setting is 25002500 for the 25/25 ppm model, 32003200 for the 32/25 and 32/32 ppm models and 40004000 for the 40/35 ppm model. 4 Refer to the following configuration items to configure the default settings. Enabling Auto Cassette Switching Use auto cassette switching to automatically switch the paper source to another cassette loaded with the same size and orientation paper when the current cassette runs out of paper. You can also switch to a cassette with a different paper type. The setting items are as follows. Item Function Off On Paper Type All types of paper Feed same paper type Description Do not enable auto cassette switching. Enable auto cassette switching. Automatically switches a cassette even with different paper type if the paper is the same size and direction. Do not switch to a cassette with different paper type. 1 Referring to Accessing the Machine Default Screen on page 7-13, access the Machine Default screen. 2 Press [S] or [T] to select Auto cassette switching and press [Change #]. 3 Under Function, select [Off] or [On]. 4 Under Paper Type, select [All types of paper] or [Feed same paper type]. 5 Press [Close] to save settings or [Back] to cancel settings. The display returns to the Machine Default screen. Specifying the Paper Size Specify the paper sizes for Cassettes 1 - 4. The setting items are as follows. Item Auto Detection Standard sizes Description The paper size is automatically detected. [Centimeter] ([Centimetre]) or [Inch] selection is required. Specify a standard size. The following paper sizes: 11 × 17", 8 1/2 × 14", 11 × 8 1/2", 8 1/2 × 11", 5 1/2 × 8 1/2", 8 1/2 × 13 1/2", 8 1/2 × 13" (Oficio 2), A3, B4, A4, A4R, B5, B5R, A5R, Folio, 8K, 16K, 16KR are available. NOTE: 3rd cassette and 4th cassette are shown when the optional paper feeder is installed. 7-14
-
 1
1 -
2
-
3
-
4
-
5
-
6
-
7
-
8
-
9
-
10
-
11
-
12
-
13
-
14
-
15
-
16
-
17
-
18
-
19
-
20
-
21
-
22
-
23
-
24
-
25
-
26
-
27
-
28
-
29
-
30
-
31
-
32
-
33
-
34
-
35
-
36
-
37
-
38
-
39
-
40
-
41
-
42
-
43
-
44
-
45
-
46
-
47
-
48
-
49
-
50
-
51
-
52
-
53
-
54
-
55
-
56
-
57
-
58
-
59
-
60
-
61
-
62
-
63
-
64
-
65
-
66
-
67
-
68
-
69
-
70
-
71
-
72
-
73
-
74
-
75
-
76
-
77
-
78
-
79
-
80
-
81
-
82
-
83
-
84
-
85
-
86
-
87
-
88
-
89
-
90
-
91
-
92
-
93
-
94
-
95
-
96
-
97
-
98
-
99
-
100
-
101
-
102
-
103
-
104
-
105
-
106
-
107
-
108
-
109
-
110
-
111
-
112
-
113
-
114
-
115
-
116
-
117
-
118
-
119
-
120
-
121
-
122
-
123
-
124
-
125
-
126
-
127
-
128
-
129
-
130
-
131
-
132
-
133
-
134
-
135
-
136
-
137
-
138
-
139
-
140
-
141
-
142
-
143
-
144
-
145
-
146
-
147
-
148
-
149
-
150
-
151
-
152
-
153
-
154
-
155
-
156
-
157
-
158
-
159
-
160
-
161
-
162
-
163
-
164
-
165
-
166
-
167
-
168
-
169
-
170
-
171
-
172
-
173
-
174
-
175
-
176
-
177
-
178
-
179
-
180
-
181
-
182
-
183
-
184
-
185
-
186
-
187
-
188
-
189
-
190
-
191
-
192
-
193
-
194
-
195
-
196
-
197
-
198
-
199
-
200
-
201
-
202
-
203
-
204
-
205
-
206
-
207
-
208
-
209
-
210
-
211
-
212
-
213
-
214
-
215
-
216
-
217
-
218
-
219
-
220
-
221
-
222
-
223
-
224
-
225
-
226
-
227
-
228
-
229
-
230
-
231
-
232
-
233
-
234
-
235
-
236
-
237
-
238
-
239
-
240
-
241
-
242
-
243
-
244
-
245
-
246
-
247
-
248
-
249
-
250
-
251
-
252
-
253
-
254
-
255
-
256
-
 257
257 -
 258
258 -
 259
259 -
 260
260 -
 261
261 -
 262
262 -
 263
263 -
 264
264 -
 265
265 -
 266
266 -
 267
267 -
268
-
269
-
270
-
271
-
272
-
273
-
274
-
275
-
276
-
277
-
278
-
279
-
280
-
281
-
282
-
283
-
284
-
285
-
286
-
287
-
288
-
289
-
290
-
291
-
292
-
293
-
294
-
295
-
296
-
297
-
298
-
299
-
300
-
301
-
302
-
303
-
304
-
305
-
306
-
307
-
308
-
309
-
310
-
311
-
312
-
313
-
314
-
315
-
316
-
317
-
318
-
319
-
320
-
321
-
322
-
323
-
324
-
325
-
326
-
327
-
328
-
329
-
330
-
331
-
332
-
333
-
334
-
335
-
336
-
337
-
338
-
339
-
340
-
341
-
342
-
343
-
344
-
345
-
346
-
347
-
348
-
349
-
350
-
351
-
352
-
353
-
354
-
355
-
356
-
357
-
358
-
359
-
360
-
361
-
362
-
363
-
364
-
365
-
366
-
367
-
368
-
369
-
370
-
371
-
372
-
373
-
374
 |
 |