Dell PowerEdge T605 Hardware Owner's Manual (PDF) - Page 137
System Setup Program on See
 |
View all Dell PowerEdge T605 manuals
Add to My Manuals
Save this manual to your list of manuals |
Page 137 highlights
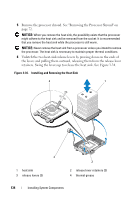
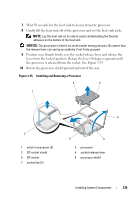
5 Install the heat sink. NOTE: If you did not receive a replacement heat sink, re-use the heat sink that you removed from the old processor. a If you receive a heat sink and pre-applied thermal grease with your processor kit, remove the protective sheet from the thermal grease layer on top of the heat sink. If you did not receive a replacement heat sink with your processor kit, do the following: • Using a clean lint-free cloth, remove the thermal grease from the heat sink removed from the old processor. • Open the grease packet included with your processor kit and apply thermal grease evenly to the top of the new processor. See Figure 3-34. b Place the heat sink on the processor. See Figure 3-34. c Lower the heat-sink retainers over the edges of the heat sink. One at a time, press the tabs on the retainers down and inward until they lock into place, securing the heat sink. 6 Install the processor shroud. See "Installing the Processor Shroud" on page 74. 7 Install the expansion card shroud. See "Installing the Expansion Card Shroud" on page 75. 8 Close the system. See "Closing the System" on page 70. 9 Place the system upright and on its feet on a flat, stable surface. 10 Reattach any peripherals, then connect the system to the electrical outlet. 11 Turn on the system and attached peripherals. As the system boots, it detects the presence of the new processor and automatically changes the system configuration information in the System Setup program. 12 Press to enter the System Setup program, and check that the processor information matches the new system configuration. See "Entering the System Setup Program" on page 43. Installing System Components 137
-
 1
1 -
2
-
3
-
4
-
5
-
6
-
7
-
8
-
9
-
10
-
11
-
12
-
13
-
14
-
15
-
16
-
17
-
18
-
19
-
20
-
21
-
22
-
23
-
24
-
25
-
26
-
27
-
28
-
29
-
30
-
31
-
32
-
33
-
34
-
35
-
36
-
37
-
38
-
39
-
40
-
41
-
42
-
43
-
44
-
45
-
46
-
47
-
48
-
49
-
50
-
51
-
52
-
53
-
54
-
55
-
56
-
57
-
58
-
59
-
60
-
61
-
62
-
63
-
64
-
65
-
66
-
67
-
68
-
69
-
70
-
71
-
72
-
73
-
74
-
75
-
76
-
77
-
78
-
79
-
80
-
81
-
82
-
83
-
84
-
85
-
86
-
87
-
88
-
89
-
90
-
91
-
92
-
93
-
94
-
95
-
96
-
97
-
98
-
99
-
100
-
101
-
102
-
103
-
104
-
105
-
106
-
107
-
108
-
109
-
110
-
111
-
112
-
113
-
114
-
115
-
116
-
117
-
118
-
119
-
120
-
121
-
122
-
123
-
124
-
125
-
126
-
127
-
128
-
129
-
130
-
131
-
 132
132 -
 133
133 -
 134
134 -
 135
135 -
 136
136 -
 137
137 -
 138
138 -
 139
139 -
 140
140 -
 141
141 -
 142
142 -
143
-
144
-
145
-
146
-
147
-
148
-
149
-
150
-
151
-
152
-
153
-
154
-
155
-
156
-
157
-
158
-
159
-
160
-
161
-
162
-
163
-
164
-
165
-
166
-
167
-
168
-
169
-
170
-
171
-
172
-
173
-
174
-
175
-
176
-
177
-
178
-
179
-
180
-
181
-
182
-
183
-
184
-
185
-
186
-
187
-
188
-
189
-
190
-
191
-
192
-
193
-
194
-
195
-
196
-
197
-
198
-
199
-
200
-
201
-
202
-
203
-
204
-
205
-
206
-
207
-
208
-
209
-
210
-
211
-
212
-
213
-
214
-
215
-
216
-
217
-
218
-
219
-
220
-
221
-
222
-
223
-
224
-
225
-
226
-
227
-
228
-
229
-
230
 |
 |