Dell PowerEdge T605 Hardware Owner's Manual (PDF) - Page 87
Ensure that all connectors are properly cabled and firmly seated.
 |
View all Dell PowerEdge T605 manuals
Add to My Manuals
Save this manual to your list of manuals |
Page 87 highlights
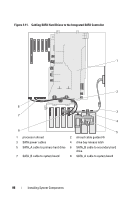
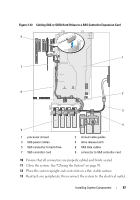
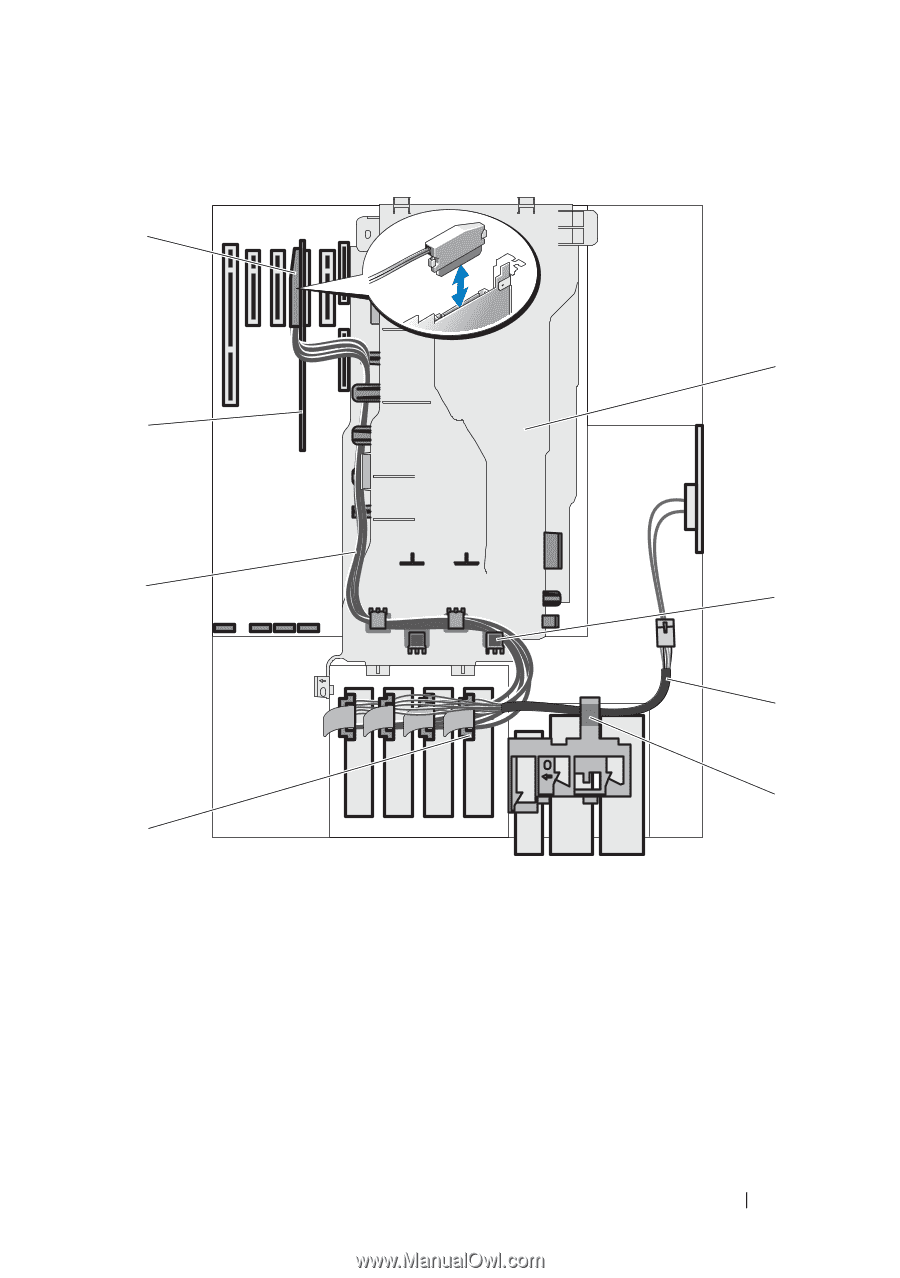
Figure 3-12. Cabling SAS or SATA Hard Drives to a SAS Controller Expansion Card 8 1 7 6 2 3 4 5 1 processor shroud 3 SAS power cables 5 SAS connector to hard drive 7 SAS controller card 2 shroud cable guides 4 drive release latch 6 SAS data cables 8 connector to SAS controller card 10 Ensure that all connectors are properly cabled and firmly seated. 11 Close the system. See "Closing the System" on page 70. 12 Place the system upright and on its feet on a flat, stable surface. 13 Reattach any peripherals, then connect the system to the electrical outlet. Installing System Components 87
-
 1
1 -
2
-
3
-
4
-
5
-
6
-
7
-
8
-
9
-
10
-
11
-
12
-
13
-
14
-
15
-
16
-
17
-
18
-
19
-
20
-
21
-
22
-
23
-
24
-
25
-
26
-
27
-
28
-
29
-
30
-
31
-
32
-
33
-
34
-
35
-
36
-
37
-
38
-
39
-
40
-
41
-
42
-
43
-
44
-
45
-
46
-
47
-
48
-
49
-
50
-
51
-
52
-
53
-
54
-
55
-
56
-
57
-
58
-
59
-
60
-
61
-
62
-
63
-
64
-
65
-
66
-
67
-
68
-
69
-
70
-
71
-
72
-
73
-
74
-
75
-
76
-
77
-
78
-
79
-
80
-
81
-
 82
82 -
 83
83 -
 84
84 -
 85
85 -
 86
86 -
 87
87 -
 88
88 -
 89
89 -
 90
90 -
 91
91 -
 92
92 -
93
-
94
-
95
-
96
-
97
-
98
-
99
-
100
-
101
-
102
-
103
-
104
-
105
-
106
-
107
-
108
-
109
-
110
-
111
-
112
-
113
-
114
-
115
-
116
-
117
-
118
-
119
-
120
-
121
-
122
-
123
-
124
-
125
-
126
-
127
-
128
-
129
-
130
-
131
-
132
-
133
-
134
-
135
-
136
-
137
-
138
-
139
-
140
-
141
-
142
-
143
-
144
-
145
-
146
-
147
-
148
-
149
-
150
-
151
-
152
-
153
-
154
-
155
-
156
-
157
-
158
-
159
-
160
-
161
-
162
-
163
-
164
-
165
-
166
-
167
-
168
-
169
-
170
-
171
-
172
-
173
-
174
-
175
-
176
-
177
-
178
-
179
-
180
-
181
-
182
-
183
-
184
-
185
-
186
-
187
-
188
-
189
-
190
-
191
-
192
-
193
-
194
-
195
-
196
-
197
-
198
-
199
-
200
-
201
-
202
-
203
-
204
-
205
-
206
-
207
-
208
-
209
-
210
-
211
-
212
-
213
-
214
-
215
-
216
-
217
-
218
-
219
-
220
-
221
-
222
-
223
-
224
-
225
-
226
-
227
-
228
-
229
-
230
 |
 |
Installing System Components
87
Figure 3-12.
Cabling SAS or SATA Hard Drives to a SAS Controller Expansion Card
10
Ensure that all connectors are properly cabled and firmly seated.
11
Close the system. See "Closing the System" on page 70.
12
Place the system upright and on its feet on a flat, stable surface.
13
Reattach any peripherals, then connect the system to the electrical outlet.
1
processor shroud
2
shroud cable guides
3
SAS power cables
4
drive release latch
5
SAS connector to hard drive
6
SAS data cables
7
SAS controller card
8
connector to SAS controller card
1
8
3
4
5
7
2
6