Dell PowerEdge T605 Hardware Owner's Manual (PDF) - Page 82
Hard Drives, Hard Drive Installation Guidelines, Removing a Hard Drive
 |
View all Dell PowerEdge T605 manuals
Add to My Manuals
Save this manual to your list of manuals |
Page 82 highlights
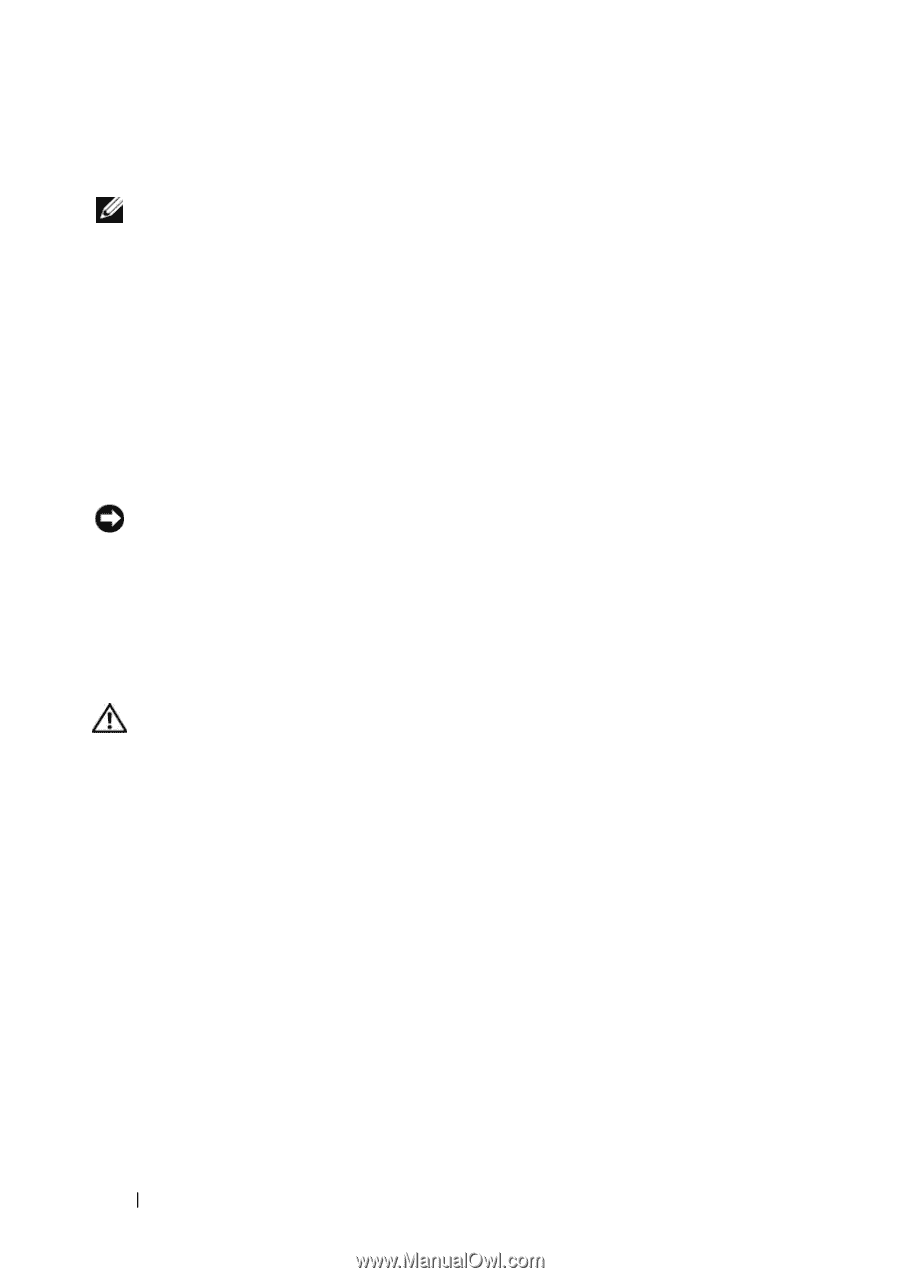
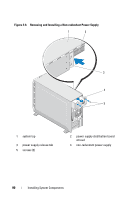
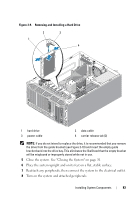
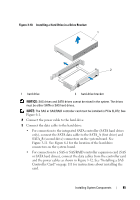
Hard Drives NOTE: The system's drive configuration must consist of all SATA hard drives or all SAS hard drives. Combining SATA and SAS drives is not supported. Hard Drive Installation Guidelines Your system can contain up to four 3.5-inch SATA or SAS hard drives in either a removable fixed hard drive bay (see Figure 3-9), or, when available, a leverrelease drive bay (see Figure 3-13). These drives connect either to the system board, an optional controller card, or a SAS/SATA backplane. SAS or SATA drives can be hot-pluggable only if your system has a lever-release drive bay. You may need to use different programs than those provided with the operating system to partition and format SAS or SATA hard drives. NOTICE: Do not turn off or restart your system while the drive is being formatted. Doing so can cause a drive failure. When you format a hard drive, allow enough time for the formatting to be completed. Be aware that high-capacity hard drives can take a number of hours to format. Removing a Hard Drive CAUTION: Only trained service technicians are authorized to remove the system cover and access any of the components inside the system. Before performing any procedure, see your Product Information Guide for complete information about safety precautions, working inside the system and protecting against electrostatic discharge. 1 Turn off the system and attached peripherals, and disconnect the system from the electrical outlet and peripherals. 2 Open the system. See "Opening the System" on page 68. 3 Disconnect the blue data cable and the power cable from the hard drive in the drive bay. 4 Press the blue carrier release tabs on each side of the hard-drive bracket toward each other and slide the drive and its bracket up and out of the bay. See Figure 3-9. 82 Installing System Components
-
 1
1 -
2
-
3
-
4
-
5
-
6
-
7
-
8
-
9
-
10
-
11
-
12
-
13
-
14
-
15
-
16
-
17
-
18
-
19
-
20
-
21
-
22
-
23
-
24
-
25
-
26
-
27
-
28
-
29
-
30
-
31
-
32
-
33
-
34
-
35
-
36
-
37
-
38
-
39
-
40
-
41
-
42
-
43
-
44
-
45
-
46
-
47
-
48
-
49
-
50
-
51
-
52
-
53
-
54
-
55
-
56
-
57
-
58
-
59
-
60
-
61
-
62
-
63
-
64
-
65
-
66
-
67
-
68
-
69
-
70
-
71
-
72
-
73
-
74
-
75
-
76
-
 77
77 -
 78
78 -
 79
79 -
 80
80 -
 81
81 -
 82
82 -
 83
83 -
 84
84 -
 85
85 -
 86
86 -
 87
87 -
88
-
89
-
90
-
91
-
92
-
93
-
94
-
95
-
96
-
97
-
98
-
99
-
100
-
101
-
102
-
103
-
104
-
105
-
106
-
107
-
108
-
109
-
110
-
111
-
112
-
113
-
114
-
115
-
116
-
117
-
118
-
119
-
120
-
121
-
122
-
123
-
124
-
125
-
126
-
127
-
128
-
129
-
130
-
131
-
132
-
133
-
134
-
135
-
136
-
137
-
138
-
139
-
140
-
141
-
142
-
143
-
144
-
145
-
146
-
147
-
148
-
149
-
150
-
151
-
152
-
153
-
154
-
155
-
156
-
157
-
158
-
159
-
160
-
161
-
162
-
163
-
164
-
165
-
166
-
167
-
168
-
169
-
170
-
171
-
172
-
173
-
174
-
175
-
176
-
177
-
178
-
179
-
180
-
181
-
182
-
183
-
184
-
185
-
186
-
187
-
188
-
189
-
190
-
191
-
192
-
193
-
194
-
195
-
196
-
197
-
198
-
199
-
200
-
201
-
202
-
203
-
204
-
205
-
206
-
207
-
208
-
209
-
210
-
211
-
212
-
213
-
214
-
215
-
216
-
217
-
218
-
219
-
220
-
221
-
222
-
223
-
224
-
225
-
226
-
227
-
228
-
229
-
230
 |
 |