Dell PowerEdge T605 Hardware Owner's Manual (PDF) - Page 175
See Entering the System Setup Program
 |
View all Dell PowerEdge T605 manuals
Add to My Manuals
Save this manual to your list of manuals |
Page 175 highlights
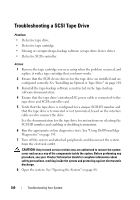
5 Turn off the system and attached peripherals, and disconnect the system from the electrical outlet. 6 Open the system. See "Opening the System" on page 68. 7 Ensure that the memory banks are populated correctly. See "General Memory Module Installation Guidelines" on page 127. If the memory modules are populated correctly, continue to the next step. 8 Reseat the memory modules in their sockets. See "Installing Memory Modules" on page 130. 9 Close the system. See "Closing the System" on page 70. 10 Reconnect the system to its electrical outlet, and turn on the system and attached peripherals. 11 Enter the System Setup program and check the system memory setting. See "Entering the System Setup Program" on page 43. If the amount of memory installed still does not match the system memory setting, proceed to the next step. 12 Turn off the system and attached peripherals, and disconnect the system from its electrical outlet. 13 Open the system. See "Opening the System" on page 68. 14 If a diagnostic test or error message indicates a specific memory module as faulty, swap or replace the module. Otherwise, swap the memory module in the first DIMM socket with a module of the same type and capacity that is known to be good. See "Installing Memory Modules" on page 130. 15 Close the system. See "Closing the System" on page 70. 16 Reconnect the system to its electrical outlet, and turn on the system and attached peripherals. 17 As the system boots, observe any error message that appears and the diagnostic indicators on the front of the system. 18 If the memory problem is still indicated, repeat step 12 through step 17 for each memory module installed. If the problem persists, see "Getting Help" on page 205. Troubleshooting Your System 175
-
 1
1 -
2
-
3
-
4
-
5
-
6
-
7
-
8
-
9
-
10
-
11
-
12
-
13
-
14
-
15
-
16
-
17
-
18
-
19
-
20
-
21
-
22
-
23
-
24
-
25
-
26
-
27
-
28
-
29
-
30
-
31
-
32
-
33
-
34
-
35
-
36
-
37
-
38
-
39
-
40
-
41
-
42
-
43
-
44
-
45
-
46
-
47
-
48
-
49
-
50
-
51
-
52
-
53
-
54
-
55
-
56
-
57
-
58
-
59
-
60
-
61
-
62
-
63
-
64
-
65
-
66
-
67
-
68
-
69
-
70
-
71
-
72
-
73
-
74
-
75
-
76
-
77
-
78
-
79
-
80
-
81
-
82
-
83
-
84
-
85
-
86
-
87
-
88
-
89
-
90
-
91
-
92
-
93
-
94
-
95
-
96
-
97
-
98
-
99
-
100
-
101
-
102
-
103
-
104
-
105
-
106
-
107
-
108
-
109
-
110
-
111
-
112
-
113
-
114
-
115
-
116
-
117
-
118
-
119
-
120
-
121
-
122
-
123
-
124
-
125
-
126
-
127
-
128
-
129
-
130
-
131
-
132
-
133
-
134
-
135
-
136
-
137
-
138
-
139
-
140
-
141
-
142
-
143
-
144
-
145
-
146
-
147
-
148
-
149
-
150
-
151
-
152
-
153
-
154
-
155
-
156
-
157
-
158
-
159
-
160
-
161
-
162
-
163
-
164
-
165
-
166
-
167
-
168
-
169
-
 170
170 -
 171
171 -
 172
172 -
 173
173 -
 174
174 -
 175
175 -
 176
176 -
 177
177 -
 178
178 -
 179
179 -
 180
180 -
181
-
182
-
183
-
184
-
185
-
186
-
187
-
188
-
189
-
190
-
191
-
192
-
193
-
194
-
195
-
196
-
197
-
198
-
199
-
200
-
201
-
202
-
203
-
204
-
205
-
206
-
207
-
208
-
209
-
210
-
211
-
212
-
213
-
214
-
215
-
216
-
217
-
218
-
219
-
220
-
221
-
222
-
223
-
224
-
225
-
226
-
227
-
228
-
229
-
230
 |
 |