Dell PowerEdge T605 Hardware Owner's Manual (PDF) - Page 184
Remove the processor shroud. See Removing the Processor Shroud
 |
View all Dell PowerEdge T605 manuals
Add to My Manuals
Save this manual to your list of manuals |
Page 184 highlights
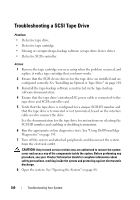
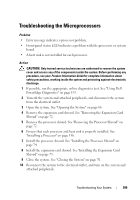
6 Ensure that the required device drivers for your controller are installed and are configured correctly. See the operating system documentation for more information. 7 Verify that the controller is enabled and the drives appear in the System Setup program. See "Entering the System Setup Program" on page 43. NOTICE: Do not perform the following step if you have a SAS RAID controller. 8 If you have a non-RAID SAS controller, remove the hard drive and swap its drive bay location with another hard drive that is functioning properly. If the problem is resolved, reinstall the hard drive in the original bay. See "Installing a Hot-plug Hard Drive" on page 89. If the hard drive functions properly in the original bay, the drive carrier could have intermittent problems. Replace the hard-drive carrier. See "Getting Help" on page 205. If the hard drive functioned properly in another bay but does not function in the original bay, the SAS/SATA backplane has a defective connector. See "Getting Help" on page 205. 9 Check the cable connections inside the system: a Turn off the system, including any attached peripherals, and disconnect the system from the electrical outlet. b Open the system. See "Opening the System" on page 68. c Remove the expansion card shroud. See "Removing the Expansion Card Shroud" on page 72. d Remove the processor shroud. See "Removing the Processor Shroud" on page 72. e Verify that the cable connections between the SAS/SATA backplane and the SAS controller are correct. See "Installing the SAS/SATA Backplane" on page 150. f Verify that the SAS cables are securely seated in their connectors. g Verify that the power cable on the SAS/SATA backplane is securely seated in the connector. h Install the processor shroud. See "Installing the Processor Shroud" on page 74. 184 Troubleshooting Your System
-
 1
1 -
2
-
3
-
4
-
5
-
6
-
7
-
8
-
9
-
10
-
11
-
12
-
13
-
14
-
15
-
16
-
17
-
18
-
19
-
20
-
21
-
22
-
23
-
24
-
25
-
26
-
27
-
28
-
29
-
30
-
31
-
32
-
33
-
34
-
35
-
36
-
37
-
38
-
39
-
40
-
41
-
42
-
43
-
44
-
45
-
46
-
47
-
48
-
49
-
50
-
51
-
52
-
53
-
54
-
55
-
56
-
57
-
58
-
59
-
60
-
61
-
62
-
63
-
64
-
65
-
66
-
67
-
68
-
69
-
70
-
71
-
72
-
73
-
74
-
75
-
76
-
77
-
78
-
79
-
80
-
81
-
82
-
83
-
84
-
85
-
86
-
87
-
88
-
89
-
90
-
91
-
92
-
93
-
94
-
95
-
96
-
97
-
98
-
99
-
100
-
101
-
102
-
103
-
104
-
105
-
106
-
107
-
108
-
109
-
110
-
111
-
112
-
113
-
114
-
115
-
116
-
117
-
118
-
119
-
120
-
121
-
122
-
123
-
124
-
125
-
126
-
127
-
128
-
129
-
130
-
131
-
132
-
133
-
134
-
135
-
136
-
137
-
138
-
139
-
140
-
141
-
142
-
143
-
144
-
145
-
146
-
147
-
148
-
149
-
150
-
151
-
152
-
153
-
154
-
155
-
156
-
157
-
158
-
159
-
160
-
161
-
162
-
163
-
164
-
165
-
166
-
167
-
168
-
169
-
170
-
171
-
172
-
173
-
174
-
175
-
176
-
177
-
178
-
 179
179 -
 180
180 -
 181
181 -
 182
182 -
 183
183 -
 184
184 -
 185
185 -
 186
186 -
 187
187 -
 188
188 -
 189
189 -
190
-
191
-
192
-
193
-
194
-
195
-
196
-
197
-
198
-
199
-
200
-
201
-
202
-
203
-
204
-
205
-
206
-
207
-
208
-
209
-
210
-
211
-
212
-
213
-
214
-
215
-
216
-
217
-
218
-
219
-
220
-
221
-
222
-
223
-
224
-
225
-
226
-
227
-
228
-
229
-
230
 |
 |