Sharp AR M162 AR-M162 AR-M207 Operation Manual Suite - Page 111
Scanner Driver Settings
 |
View all Sharp AR M162 manuals
Add to My Manuals
Save this manual to your list of manuals |
Page 111 highlights
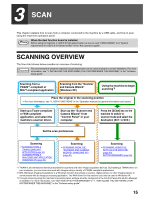
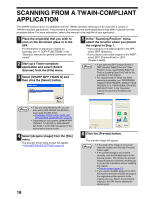
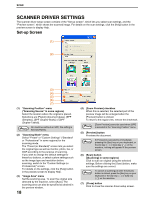
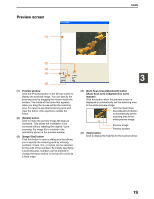
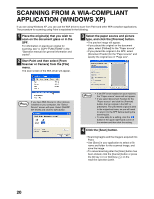
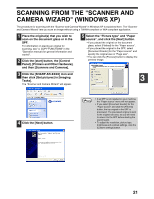
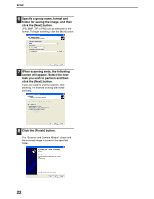
SCAN SCANNER DRIVER SETTINGS The scanner driver setup screen consists of the "Set-up screen", which lets you select scan settings, and the "Preview screen", which shows the scanned image. For details on the scan settings, click the [Help] button in the preview screen to display Help. Set-up Screen (1) (2) (3) (4) (5) (6) (7) (1) "Scanning Position" menu ("Scanning Source" in some regions) Select the location where the original is placed. Selections are [Platen] (document glass), [SPF (Simplex)], [SPF (Duplex-Book)] or [SPF (Duplex-Tablet)]. On machines without an SPF, this setting is Note fixed at [Platen]. (2) "Scanning Mode" menu Select "Preset" or "Custom Settings" ("Standard" or "Professional" in some regions) for the scanning mode. The "Preset (or Standard)" screen lets you select the original type as well as monitor, photo, fax, or OCR according to the purpose of scanning. If you wish to change the default settings for these four buttons, or select custom settings such as the image type and resolution before scanning, switch to the "Custom Settings (or Professional)" screen. For details on the settings, click the [Help] button in the preview screen to display Help. (3) "Image Area" menu Set the scanning area. To scan the original size detected by the machine, select [Auto]. The scanning area can also be specified as desired in the preview window. 18 (4) [Zoom Preview] checkbox When this is selected, the selected part of the preview image will be enlarged when the [Preview] button is clicked. To return to the regular view, remove the checkmark. [Zoom Preview] cannot be used when [SPF] Note is selected in the "Scanning Position" menu. (5) [Preview] button Previews the document. Note If [Preview] is canceled by immediately pressing the [Esc] key on your keyboard, or the [C] key ( ) or [CA] key ( ) on the machine, nothing will appear in the preview screen. (6) [Scan] button ([Scanning] in some regions) Click to scan an original using the selected settings. Before clicking the [Scan] button, make sure the settings are correct. Note To cancel a scanning job after the [Scan] button is clicked, press the [Esc] key on your keyboard or the [C] key ( ) or [CA] key ( ) on the machine. (7) [Close] button Click to close the scanner driver setup screen.
-
 1
1 -
2
-
3
-
4
-
5
-
6
-
7
-
8
-
9
-
10
-
11
-
12
-
13
-
14
-
15
-
16
-
17
-
18
-
19
-
20
-
21
-
22
-
23
-
24
-
25
-
26
-
27
-
28
-
29
-
30
-
31
-
32
-
33
-
34
-
35
-
36
-
37
-
38
-
39
-
40
-
41
-
42
-
43
-
44
-
45
-
46
-
47
-
48
-
49
-
50
-
51
-
52
-
53
-
54
-
55
-
56
-
57
-
58
-
59
-
60
-
61
-
62
-
63
-
64
-
65
-
66
-
67
-
68
-
69
-
70
-
71
-
72
-
73
-
74
-
75
-
76
-
77
-
78
-
79
-
80
-
81
-
82
-
83
-
84
-
85
-
86
-
87
-
88
-
89
-
90
-
91
-
92
-
93
-
94
-
95
-
96
-
97
-
98
-
99
-
100
-
101
-
102
-
103
-
104
-
105
-
 106
106 -
 107
107 -
 108
108 -
 109
109 -
 110
110 -
 111
111 -
 112
112 -
 113
113 -
 114
114 -
 115
115 -
 116
116 -
117
-
118
-
119
-
120
-
121
-
122
-
123
-
124
-
125
-
126
-
127
-
128
-
129
-
130
-
131
-
132
-
133
-
134
-
135
-
136
-
137
-
138
-
139
-
140
-
141
-
142
-
143
-
144
-
145
-
146
-
147
-
148
-
149
-
150
-
151
-
152
-
153
-
154
-
155
-
156
-
157
-
158
-
159
-
160
-
161
-
162
-
163
-
164
-
165
-
166
-
167
-
168
-
169
-
170
-
171
-
172
-
173
-
174
-
175
-
176
-
177
-
178
-
179
-
180
-
181
-
182
-
183
-
184
-
185
-
186
-
187
-
188
-
189
-
190
-
191
-
192
-
193
-
194
-
195
-
196
-
197
-
198
-
199
-
200
-
201
-
202
-
203
-
204
-
205
-
206
-
207
-
208
-
209
-
210
-
211
-
212
-
213
-
214
-
215
-
216
-
217
-
218
-
219
-
220
-
221
-
222
-
223
-
224
-
225
-
226
-
227
-
228
-
229
-
230
-
231
-
232
-
233
-
234
-
235
-
236
-
237
-
238
-
239
-
240
-
241
-
242
-
243
-
244
-
245
-
246
-
247
-
248
-
249
-
250
-
251
-
252
-
253
-
254
-
255
-
256
-
257
-
258
-
259
-
260
-
261
-
262
-
263
-
264
-
265
-
266
-
267
-
268
-
269
-
270
-
271
-
272
-
273
-
274
-
275
-
276
-
277
-
278
-
279
-
280
-
281
-
282
-
283
-
284
-
285
-
286
-
287
-
288
-
289
-
290
-
291
-
292
-
293
-
294
-
295
-
296
-
297
-
298
-
299
-
300
-
301
-
302
-
303
-
304
-
305
-
306
-
307
-
308
-
309
-
310
-
311
-
312
-
313
-
314
-
315
-
316
-
317
-
318
-
319
-
320
-
321
-
322
-
323
-
324
-
325
-
326
-
327
-
328
-
329
-
330
-
331
-
332
-
333
-
334
-
335
-
336
-
337
-
338
-
339
-
340
-
341
-
342
-
343
-
344
-
345
-
346
-
347
-
348
-
349
-
350
-
351
-
352
-
353
-
354
-
355
-
356
-
357
-
358
-
359
-
360
-
361
-
362
-
363
-
364
-
365
-
366
-
367
-
368
-
369
-
370
-
371
-
372
 |
 |
