Sharp AR M162 AR-M162 AR-M207 Operation Manual Suite - Page 351
Check the contents of the window
 |
View all Sharp AR M162 manuals
Add to My Manuals
Save this manual to your list of manuals |
Page 351 highlights
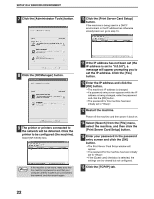
SETUP IN A WINDOWS ENVIRONMENT 9 Printers connected to the network are detected. Select the machine and click the [Next] button. Note If the machine is not found, make sure that the machine is powered on and that the machine and your computer are connected to the network, and then search again. If the machine is still not found, use the custom installation procedure to directly specify the IP address. (Page 26) 10 A confirmation window will appear. Check the contents and then click the [Next] button. 11 When the printer driver selection window appears, select the printer driver to be installed and click the [Next] button. Select the checkboxes of the printer drivers to be installed. 13 Check the contents of the window and click the [Next] button. Installation of the printer driver begins. Caution If you are using Windows 2000/XP/Server 2003 If a warning message regarding the Windows logo test or digital signature appears, be sure to click the [Continue Anyway] or [Yes] button. 14 When "The installation of the SHARP software is complete" appears, click the [OK] button. 15 Click the [Close] button. 2 Note After the installation, a message prompting you to restart your computer may appear. In this case, click the [Yes] button to restart your computer. This completes the installation of the software. After installation, see "CONFIGURING THE PRINTER DRIVER" (page 42) to check the printer driver settings. Note If you installed the PS printer driver, the PS display font can be installed from the "PRINTER UTILITIES" CD-ROM that accompanies the PS3 expansion kit. (Page 30) To use the PS printer driver, the PS3 Note expansion kit must be installed. 12 Select whether or not you wish the printer to be your default printer and click the [Next] button. If you are installing multiple printer drivers, select the printer that you wish to use as your default printer. If you do not wish to set either printer driver as the default printer, select [No]. 25
-
 1
1 -
2
-
3
-
4
-
5
-
6
-
7
-
8
-
9
-
10
-
11
-
12
-
13
-
14
-
15
-
16
-
17
-
18
-
19
-
20
-
21
-
22
-
23
-
24
-
25
-
26
-
27
-
28
-
29
-
30
-
31
-
32
-
33
-
34
-
35
-
36
-
37
-
38
-
39
-
40
-
41
-
42
-
43
-
44
-
45
-
46
-
47
-
48
-
49
-
50
-
51
-
52
-
53
-
54
-
55
-
56
-
57
-
58
-
59
-
60
-
61
-
62
-
63
-
64
-
65
-
66
-
67
-
68
-
69
-
70
-
71
-
72
-
73
-
74
-
75
-
76
-
77
-
78
-
79
-
80
-
81
-
82
-
83
-
84
-
85
-
86
-
87
-
88
-
89
-
90
-
91
-
92
-
93
-
94
-
95
-
96
-
97
-
98
-
99
-
100
-
101
-
102
-
103
-
104
-
105
-
106
-
107
-
108
-
109
-
110
-
111
-
112
-
113
-
114
-
115
-
116
-
117
-
118
-
119
-
120
-
121
-
122
-
123
-
124
-
125
-
126
-
127
-
128
-
129
-
130
-
131
-
132
-
133
-
134
-
135
-
136
-
137
-
138
-
139
-
140
-
141
-
142
-
143
-
144
-
145
-
146
-
147
-
148
-
149
-
150
-
151
-
152
-
153
-
154
-
155
-
156
-
157
-
158
-
159
-
160
-
161
-
162
-
163
-
164
-
165
-
166
-
167
-
168
-
169
-
170
-
171
-
172
-
173
-
174
-
175
-
176
-
177
-
178
-
179
-
180
-
181
-
182
-
183
-
184
-
185
-
186
-
187
-
188
-
189
-
190
-
191
-
192
-
193
-
194
-
195
-
196
-
197
-
198
-
199
-
200
-
201
-
202
-
203
-
204
-
205
-
206
-
207
-
208
-
209
-
210
-
211
-
212
-
213
-
214
-
215
-
216
-
217
-
218
-
219
-
220
-
221
-
222
-
223
-
224
-
225
-
226
-
227
-
228
-
229
-
230
-
231
-
232
-
233
-
234
-
235
-
236
-
237
-
238
-
239
-
240
-
241
-
242
-
243
-
244
-
245
-
246
-
247
-
248
-
249
-
250
-
251
-
252
-
253
-
254
-
255
-
256
-
257
-
258
-
259
-
260
-
261
-
262
-
263
-
264
-
265
-
266
-
267
-
268
-
269
-
270
-
271
-
272
-
273
-
274
-
275
-
276
-
277
-
278
-
279
-
280
-
281
-
282
-
283
-
284
-
285
-
286
-
287
-
288
-
289
-
290
-
291
-
292
-
293
-
294
-
295
-
296
-
297
-
298
-
299
-
300
-
301
-
302
-
303
-
304
-
305
-
306
-
307
-
308
-
309
-
310
-
311
-
312
-
313
-
314
-
315
-
316
-
317
-
318
-
319
-
320
-
321
-
322
-
323
-
324
-
325
-
326
-
327
-
328
-
329
-
330
-
331
-
332
-
333
-
334
-
335
-
336
-
337
-
338
-
339
-
340
-
341
-
342
-
343
-
344
-
345
-
 346
346 -
 347
347 -
 348
348 -
 349
349 -
 350
350 -
 351
351 -
 352
352 -
 353
353 -
 354
354 -
 355
355 -
 356
356 -
357
-
358
-
359
-
360
-
361
-
362
-
363
-
364
-
365
-
366
-
367
-
368
-
369
-
370
-
371
-
372
 |
 |
