Sharp AR M162 AR-M162 AR-M207 Operation Manual Suite - Page 227
Distinctive Ring, Remote Reception, Account Control, Account # Set
 |
View all Sharp AR M162 manuals
Add to My Manuals
Save this manual to your list of manuals |
Page 227 highlights
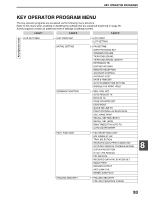
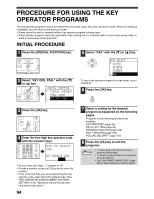
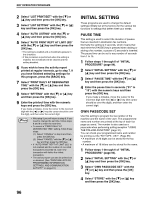
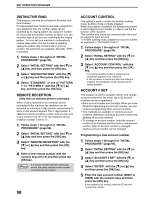
KEY OPERATOR PROGRAMS DISTINCTIVE RING This program can only be activated in Australia, and New Zealand. If multiple telephone numbers have been assigned to your telephone line, the number called can be identified by its ringing pattern. By using one number for voice calls and another number for faxes, you can tell which type of call you are receiving by the ringing pattern. You can set your machine to automatically receive faxes when your fax number is called by setting the pattern that corresponds to your fax number. Six selections are available. Normally "OFF" is selected. 1 Follow steps 1 through 6 of "INITIAL PROCEDURE" (page 94). 2 Select "INITIAL SETTING" with the [ ] or [ ] key and then press the [OK] key. 3 Select "DISTINCTIVE RING" with the [ ] or [ ] key and then press the [OK] key. 4 Select "STANDARD" or one of "PATTERN 1" to "PATTERN 5" with the [ ] or [ ] key, and then press the [OK] key. REMOTE RECEPTION (Only when an extension phone is connected) When a call is received on an extension phone connected to the machine, fax reception can be activated by entering a 1-digit number and pressing twice on the phone's keypad. This 1-digit number is called the remote reception number, and you can set it to any number from "0" to "9". Normally the remote reception number is set to "5". 1 Follow steps 1 through 6 of "INITIAL PROCEDURE" (page 94). 2 Select "INITIAL SETTING" with the [ ] or [ ] key and then press the [OK] key. 3 Select "REMOTE RECEPTION" with the [ ] or [ ] key and then press the [OK] key. 4 Enter a new remote number with the numeric keys (0 to 9) and then press the [OK] key. Note If a remote number has been previously stored, the newly entered remote number overwrites the old number. 98 ACCOUNT CONTROL This setting is used to enable (or disable) auditing mode. Auditing mode is initially disabled. When this program is enabled, the operator must enter a valid 5-digit account number in order to use the fax function of the machine. This function also tracks fax communication time and fax pages for each account. To enable auditing mode, program an account number as explained in "ACCOUNT # SET". 1 Follow steps 1 through 6 of "INITIAL PROCEDURE" (page 94). 2 Select "INITIAL SETTING" with the [ ] or [ ] key and then press the [OK] key. 3 Select "ACCOUNT CONTROL" with the [ ] or [ ] key and then press the [OK] key. • The setting (auditing mode) is enabled and a checkmark appears in the checkbox. • If this procedure is performed when the setting is enabled, the checkmark will be cleared and the setting disabled. ACCOUNT # SET This program is used to program, delete, and change account numbers for fax mode. Up to 50 account numbers can be programmed. • Each account number has five digits. When you have finished programming one account number, you can continue programming other account numbers. • Two methods are available for deleting account numbers: deleting an individual account number and deleting all account numbers. • To change an account number, enter the account number to be changed and then enter a new account number. After an account number is changed, another account number can be changed. Programming a new account number 1 Follow steps 1 through 6 of "INITIAL PROCEDURE" (page 94). 2 Select "INITIAL SETTING" with the [ ] or [ ] key and then press the [OK] key. 3 Select "ACCOUNT # SET" with the [ ] or [ ] key and then press the [OK] key. 4 Select "ENTER" with the [ ] or [ ] key and then press the [OK] key. 5 Enter the new account number (00001 to 99999) with the numeric keys and then press the [OK] key. If the number is not correct, press the [C] key and re-enter the number.
-
 1
1 -
2
-
3
-
4
-
5
-
6
-
7
-
8
-
9
-
10
-
11
-
12
-
13
-
14
-
15
-
16
-
17
-
18
-
19
-
20
-
21
-
22
-
23
-
24
-
25
-
26
-
27
-
28
-
29
-
30
-
31
-
32
-
33
-
34
-
35
-
36
-
37
-
38
-
39
-
40
-
41
-
42
-
43
-
44
-
45
-
46
-
47
-
48
-
49
-
50
-
51
-
52
-
53
-
54
-
55
-
56
-
57
-
58
-
59
-
60
-
61
-
62
-
63
-
64
-
65
-
66
-
67
-
68
-
69
-
70
-
71
-
72
-
73
-
74
-
75
-
76
-
77
-
78
-
79
-
80
-
81
-
82
-
83
-
84
-
85
-
86
-
87
-
88
-
89
-
90
-
91
-
92
-
93
-
94
-
95
-
96
-
97
-
98
-
99
-
100
-
101
-
102
-
103
-
104
-
105
-
106
-
107
-
108
-
109
-
110
-
111
-
112
-
113
-
114
-
115
-
116
-
117
-
118
-
119
-
120
-
121
-
122
-
123
-
124
-
125
-
126
-
127
-
128
-
129
-
130
-
131
-
132
-
133
-
134
-
135
-
136
-
137
-
138
-
139
-
140
-
141
-
142
-
143
-
144
-
145
-
146
-
147
-
148
-
149
-
150
-
151
-
152
-
153
-
154
-
155
-
156
-
157
-
158
-
159
-
160
-
161
-
162
-
163
-
164
-
165
-
166
-
167
-
168
-
169
-
170
-
171
-
172
-
173
-
174
-
175
-
176
-
177
-
178
-
179
-
180
-
181
-
182
-
183
-
184
-
185
-
186
-
187
-
188
-
189
-
190
-
191
-
192
-
193
-
194
-
195
-
196
-
197
-
198
-
199
-
200
-
201
-
202
-
203
-
204
-
205
-
206
-
207
-
208
-
209
-
210
-
211
-
212
-
213
-
214
-
215
-
216
-
217
-
218
-
219
-
220
-
221
-
 222
222 -
 223
223 -
 224
224 -
 225
225 -
 226
226 -
 227
227 -
 228
228 -
 229
229 -
 230
230 -
 231
231 -
 232
232 -
233
-
234
-
235
-
236
-
237
-
238
-
239
-
240
-
241
-
242
-
243
-
244
-
245
-
246
-
247
-
248
-
249
-
250
-
251
-
252
-
253
-
254
-
255
-
256
-
257
-
258
-
259
-
260
-
261
-
262
-
263
-
264
-
265
-
266
-
267
-
268
-
269
-
270
-
271
-
272
-
273
-
274
-
275
-
276
-
277
-
278
-
279
-
280
-
281
-
282
-
283
-
284
-
285
-
286
-
287
-
288
-
289
-
290
-
291
-
292
-
293
-
294
-
295
-
296
-
297
-
298
-
299
-
300
-
301
-
302
-
303
-
304
-
305
-
306
-
307
-
308
-
309
-
310
-
311
-
312
-
313
-
314
-
315
-
316
-
317
-
318
-
319
-
320
-
321
-
322
-
323
-
324
-
325
-
326
-
327
-
328
-
329
-
330
-
331
-
332
-
333
-
334
-
335
-
336
-
337
-
338
-
339
-
340
-
341
-
342
-
343
-
344
-
345
-
346
-
347
-
348
-
349
-
350
-
351
-
352
-
353
-
354
-
355
-
356
-
357
-
358
-
359
-
360
-
361
-
362
-
363
-
364
-
365
-
366
-
367
-
368
-
369
-
370
-
371
-
372
 |
 |
