Xerox 3635MFP Systems Administrator Guide - Page 121
Con Network Accounting
 |
UPC - 095205741049
View all Xerox 3635MFP manuals
Add to My Manuals
Save this manual to your list of manuals |
Page 121 highlights
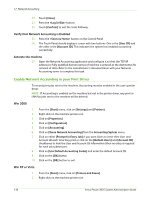
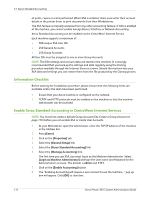
Configure Network Accounting Configure Network Accounting 1. Press the button on the machine to enter the Tools Pathway. 2. Enter the Administrator's Password. The default is 1111. 3. Touch [Enter]. 4. Press the button. 5. Touch [Accounting]. 6. Touch [Accounting Enablement]. 7. Touch [Authentication Mode]. 8. Touch [On] underneath the Network Accounting option. 9. Touch [Save]. 10. Touch [Network Accounting Setup]. 11. Touch [Network Accounting Authentication]. 12. Touch [Enabled] to enable authentication or [Disabled] to disable authentication: • [Enabled] - Users will be required to enter a valid an Account ID for any job. The Account ID are alphanumeric strings between 1 and 32 characters in length (specified in the third party accounting application). • [Disabled] - Allows the machine to accept both valid and invalid User and Account IDs. This options is useful if conducting an analysis for the resources used on a particular machine before Authentication controls are instituted. Users will still be required to enter at least one character into the User and Account ID fields. 13. Touch [Save] to retain the settings. NOTE: If you want to set up a default value for the User ID and/or Account ID follow these steps. Otherwise proceed to Verify that Network Accounting is Enabled on page 110. 14. Touch [Network Accounting validation setups]. 15. Touch [User ID] and enter a default User ID. 16. Touch [Save]. 17. Touch [Account ID] and enter a default Account ID. 18. Touch [Save]. 19. Touch [Network Accounting Login Display Mode]. 20. Select one of the following option: • [Display User ID Details] and [Display Account ID Details] - If you want user details to show on the machine User Interface. • [Mask User ID Details] and [Mask Account ID Details] - If you want user details to be replaced by asterisks (***) on the machine User Interface. 21. Touch [Save]. Xerox Phaser 3635 System Administration Guide 109
-
 1
1 -
2
-
3
-
4
-
5
-
6
-
7
-
8
-
9
-
10
-
11
-
12
-
13
-
14
-
15
-
16
-
17
-
18
-
19
-
20
-
21
-
22
-
23
-
24
-
25
-
26
-
27
-
28
-
29
-
30
-
31
-
32
-
33
-
34
-
35
-
36
-
37
-
38
-
39
-
40
-
41
-
42
-
43
-
44
-
45
-
46
-
47
-
48
-
49
-
50
-
51
-
52
-
53
-
54
-
55
-
56
-
57
-
58
-
59
-
60
-
61
-
62
-
63
-
64
-
65
-
66
-
67
-
68
-
69
-
70
-
71
-
72
-
73
-
74
-
75
-
76
-
77
-
78
-
79
-
80
-
81
-
82
-
83
-
84
-
85
-
86
-
87
-
88
-
89
-
90
-
91
-
92
-
93
-
94
-
95
-
96
-
97
-
98
-
99
-
100
-
101
-
102
-
103
-
104
-
105
-
106
-
107
-
108
-
109
-
110
-
111
-
112
-
113
-
114
-
115
-
 116
116 -
 117
117 -
 118
118 -
 119
119 -
 120
120 -
 121
121 -
 122
122 -
 123
123 -
 124
124 -
 125
125 -
 126
126 -
127
-
128
-
129
-
130
-
131
-
132
-
133
-
134
-
135
-
136
-
137
-
138
-
139
-
140
-
141
-
142
-
143
-
144
-
145
-
146
-
147
-
148
-
149
-
150
-
151
-
152
-
153
-
154
-
155
-
156
-
157
-
158
-
159
-
160
-
161
-
162
-
163
-
164
-
165
-
166
-
167
-
168
-
169
-
170
-
171
-
172
-
173
-
174
-
175
-
176
-
177
-
178
-
179
-
180
-
181
-
182
-
183
-
184
-
185
-
186
-
187
-
188
-
189
-
190
-
191
-
192
-
193
-
194
-
195
-
196
-
197
-
198
-
199
-
200
-
201
-
202
-
203
-
204
-
205
-
206
-
207
-
208
-
209
-
210
-
211
-
212
 |
 |