Xerox 3635MFP Systems Administrator Guide - Page 26
Enter a Static IP Address, <Log In/Out> - password
 |
UPC - 095205741049
View all Xerox 3635MFP manuals
Add to My Manuals
Save this manual to your list of manuals |
Page 26 highlights
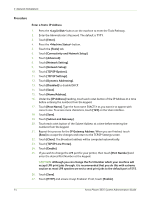
3 Network Installation Procedure Enter a Static IP Address 1. Press the button on the machine to enter the Tools Pathway. 2. Enter the Administrator's Password. The default is 1111. 3. Touch [Enter]. 4. Press the button. 5. Touch the [Tools] tab. 6. Touch [Connectivity and Network Setup]. 7. Touch [Advanced]. 8. Touch [Network Setting]. 9. Touch [Network Setup]. 10. Touch [TCP/IP Options]. 11. Touch [TCP/IP Settings]. 12. Touch [Dynamic Addressing]. 13. Touch [Disabled] to disable DHCP. 14. Touch [Save]. 15. Touch [Name/Address]. 16. Under the [IP Address] heading, touch each octet button of the IP Address at a time before entering the numbers from the keypad. 17. Touch [Host Name]. Type the host name EXACTLY as you want it to appear with correct case. To access more characters, touch [123] on the User interface. 18. Touch [Save]. 19. Touch [Subnet and Gateway]. 20. Touch each octet button of the Subnet Address at a time before entering the numbers from the keypad. 21. Repeat this process for the IP Gateway Address. When you are finished, touch [Save] to accept the changes and return to the TCP/IP Settings screen. 22. Touch [Close]. The Broadcast address will be computed automatically. 23. Touch [TCP/IP-Line Printer]. 24. Touch [Enable]. 25. If you wish to change the LPR port for your printer, then touch [Port Number] and enter the desired Port Number at the keypad. CAUTION: Although you can change the Port Number which your machine will accept LPR print jobs through, it is recommended that you do this with extreme caution as most LPR spoolers are set to send print jobs to the default port of 515. 26. Touch [Save]. 27. Touch [HTTP] and ensure it says Enabled. If not, touch [Enable]. 14 Xerox Phaser 3635 System Administration Guide
-
 1
1 -
2
-
3
-
4
-
5
-
6
-
7
-
8
-
9
-
10
-
11
-
12
-
13
-
14
-
15
-
16
-
17
-
18
-
19
-
20
-
 21
21 -
 22
22 -
 23
23 -
 24
24 -
 25
25 -
 26
26 -
 27
27 -
 28
28 -
 29
29 -
 30
30 -
 31
31 -
32
-
33
-
34
-
35
-
36
-
37
-
38
-
39
-
40
-
41
-
42
-
43
-
44
-
45
-
46
-
47
-
48
-
49
-
50
-
51
-
52
-
53
-
54
-
55
-
56
-
57
-
58
-
59
-
60
-
61
-
62
-
63
-
64
-
65
-
66
-
67
-
68
-
69
-
70
-
71
-
72
-
73
-
74
-
75
-
76
-
77
-
78
-
79
-
80
-
81
-
82
-
83
-
84
-
85
-
86
-
87
-
88
-
89
-
90
-
91
-
92
-
93
-
94
-
95
-
96
-
97
-
98
-
99
-
100
-
101
-
102
-
103
-
104
-
105
-
106
-
107
-
108
-
109
-
110
-
111
-
112
-
113
-
114
-
115
-
116
-
117
-
118
-
119
-
120
-
121
-
122
-
123
-
124
-
125
-
126
-
127
-
128
-
129
-
130
-
131
-
132
-
133
-
134
-
135
-
136
-
137
-
138
-
139
-
140
-
141
-
142
-
143
-
144
-
145
-
146
-
147
-
148
-
149
-
150
-
151
-
152
-
153
-
154
-
155
-
156
-
157
-
158
-
159
-
160
-
161
-
162
-
163
-
164
-
165
-
166
-
167
-
168
-
169
-
170
-
171
-
172
-
173
-
174
-
175
-
176
-
177
-
178
-
179
-
180
-
181
-
182
-
183
-
184
-
185
-
186
-
187
-
188
-
189
-
190
-
191
-
192
-
193
-
194
-
195
-
196
-
197
-
198
-
199
-
200
-
201
-
202
-
203
-
204
-
205
-
206
-
207
-
208
-
209
-
210
-
211
-
212
 |
 |