Xerox 3635MFP Systems Administrator Guide - Page 28
Installation via DHCP Dynamic Host Configuration Protocol, TCP/IP - Line Printer]
 |
UPC - 095205741049
View all Xerox 3635MFP manuals
Add to My Manuals
Save this manual to your list of manuals |
Page 28 highlights
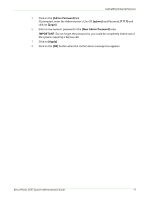
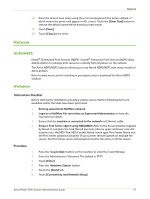
3 Network Installation Procedure Installation via DHCP (Dynamic Host Configuration Protocol) DHCP is enabled on the machine by default. If the machine is connected to the network, the TCP/IP information will be configured when the machine is powered on and no further configuration is required. 1. Print a Configuration Report to verify that the information was assigned correctly. Installation via BOOTP or DHCP Ensure your machine is connected to the network with Ethernet cabling. 1. Press the button on the machine to enter the Tools Pathway. 2. Enter the Administrator's Password. The default is 1111. 3. Touch [Enter]. 4. Press the button. 5. Touch the [Tools] tab. 6. Touch [Connectivity and Network Setup]. 7. Touch [Advanced]. 8. Touch [Network Setting]. 9. Touch [Network Setup]. 10. Touch [TCP/IP Options]. 11. Touch [TCP/IP Settings]. 12. Touch [Dynamic Addressing]. By default, DHCP is selected. 13. Select the required Dynamic Addressing method: • [BOOTP]. • [DHCP]. 14. Touch [Save]. 15. Touch [Close]. 16. Touch [TCP/IP - Line Printer]. 17. Touch [Enable]. 18. If you wish to change the LPR port for your printer, touch [Port Number] and enter the desired port number at the keypad. NOTE: While you can change the port number at which your machine will accept LPR print jobs, it is recommended that you do this ONLY with extreme caution as most LPR spoolers are set to send print jobs to the default port, 515. 19. Touch [Save]. 20. Touch [HTTP]. 21. Touch [Enable]. 22. Touch [Save]. 16 Xerox Phaser 3635 System Administration Guide
-
 1
1 -
2
-
3
-
4
-
5
-
6
-
7
-
8
-
9
-
10
-
11
-
12
-
13
-
14
-
15
-
16
-
17
-
18
-
19
-
20
-
21
-
22
-
 23
23 -
 24
24 -
 25
25 -
 26
26 -
 27
27 -
 28
28 -
 29
29 -
 30
30 -
 31
31 -
 32
32 -
 33
33 -
34
-
35
-
36
-
37
-
38
-
39
-
40
-
41
-
42
-
43
-
44
-
45
-
46
-
47
-
48
-
49
-
50
-
51
-
52
-
53
-
54
-
55
-
56
-
57
-
58
-
59
-
60
-
61
-
62
-
63
-
64
-
65
-
66
-
67
-
68
-
69
-
70
-
71
-
72
-
73
-
74
-
75
-
76
-
77
-
78
-
79
-
80
-
81
-
82
-
83
-
84
-
85
-
86
-
87
-
88
-
89
-
90
-
91
-
92
-
93
-
94
-
95
-
96
-
97
-
98
-
99
-
100
-
101
-
102
-
103
-
104
-
105
-
106
-
107
-
108
-
109
-
110
-
111
-
112
-
113
-
114
-
115
-
116
-
117
-
118
-
119
-
120
-
121
-
122
-
123
-
124
-
125
-
126
-
127
-
128
-
129
-
130
-
131
-
132
-
133
-
134
-
135
-
136
-
137
-
138
-
139
-
140
-
141
-
142
-
143
-
144
-
145
-
146
-
147
-
148
-
149
-
150
-
151
-
152
-
153
-
154
-
155
-
156
-
157
-
158
-
159
-
160
-
161
-
162
-
163
-
164
-
165
-
166
-
167
-
168
-
169
-
170
-
171
-
172
-
173
-
174
-
175
-
176
-
177
-
178
-
179
-
180
-
181
-
182
-
183
-
184
-
185
-
186
-
187
-
188
-
189
-
190
-
191
-
192
-
193
-
194
-
195
-
196
-
197
-
198
-
199
-
200
-
201
-
202
-
203
-
204
-
205
-
206
-
207
-
208
-
209
-
210
-
211
-
212
 |
 |