Xerox 3635MFP Systems Administrator Guide - Page 126
Information Checklist, Enable Xerox Standard Accounting in CentreWare Internet Services, Enter]
 |
UPC - 095205741049
View all Xerox 3635MFP manuals
Add to My Manuals
Save this manual to your list of manuals |
Page 126 highlights
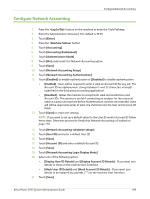
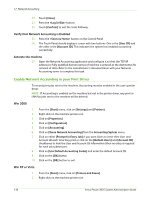
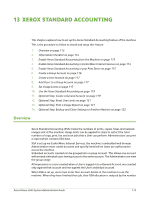
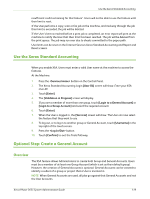
13 Xerox Standard Accounting of prints, copies or scans performed. When XSA is enabled, Users must enter their account details in the printer driver to print documents from their Workstations. The XSA feature is mutually exclusive from any other accounting feature. If XSA is enabled at the machine, you cannot enable Foreign Device Interface or Network Accounting. Xerox Standard Accounting can be enabled via the CentreWare Internet Service. Each machine supports a maximum of: • 500 unique XSA User IDs • 250 General Accounts • 250 Group Accounts All User IDs must be assigned to one or more Group Accounts. NOTE: The XSA settings and account data are stored in the machine. It is strongly recommended that you back-up the settings and data regularly using the Cloning procedure available through the Internet Services screens. Should the machine lose your XSA data and settings you can restore them from the file produced by the Cloning process. Information Checklist Before starting the Installation procedure, please ensure that the following items are available and/or the tasks have been performed: 1. Ensure that your Xerox machine is configured on the network. 2. TCP/IP and HTTP protocols must be enabled on the machine so that the machine web browser can be accessed. Enable Xerox Standard Accounting in CentreWare Internet Services NOTE: You must first create a default Group Account (See Create a Group Account on page 116) before you can enable XSA or create User Accounts. 1. At your Workstation, open the web browser, enter the TCP/IP Address of the machine in the Address bar. 2. Press [Enter]. 3. Click on the [Properties] tab. 4. Select the [General Setup] link. 5. Select the [Xerox Standard Accounting] link. 6. Select the [Manage Accounting] link. The first time you use XSA, you must log in as the Machine Administrator. Select [Login as Machine Administrator] and type the User name and Password for the Administrator's account. The default is admin and 1111. 7. Click on the [Enable Accounting] button. 8. The "Enabling Accounting will require a user account to use the machine..." pop up box will appear. Click [OK] to close box. 114 Xerox Phaser 3635 System Administration Guide
-
 1
1 -
2
-
3
-
4
-
5
-
6
-
7
-
8
-
9
-
10
-
11
-
12
-
13
-
14
-
15
-
16
-
17
-
18
-
19
-
20
-
21
-
22
-
23
-
24
-
25
-
26
-
27
-
28
-
29
-
30
-
31
-
32
-
33
-
34
-
35
-
36
-
37
-
38
-
39
-
40
-
41
-
42
-
43
-
44
-
45
-
46
-
47
-
48
-
49
-
50
-
51
-
52
-
53
-
54
-
55
-
56
-
57
-
58
-
59
-
60
-
61
-
62
-
63
-
64
-
65
-
66
-
67
-
68
-
69
-
70
-
71
-
72
-
73
-
74
-
75
-
76
-
77
-
78
-
79
-
80
-
81
-
82
-
83
-
84
-
85
-
86
-
87
-
88
-
89
-
90
-
91
-
92
-
93
-
94
-
95
-
96
-
97
-
98
-
99
-
100
-
101
-
102
-
103
-
104
-
105
-
106
-
107
-
108
-
109
-
110
-
111
-
112
-
113
-
114
-
115
-
116
-
117
-
118
-
119
-
120
-
 121
121 -
 122
122 -
 123
123 -
 124
124 -
 125
125 -
 126
126 -
 127
127 -
 128
128 -
 129
129 -
 130
130 -
 131
131 -
132
-
133
-
134
-
135
-
136
-
137
-
138
-
139
-
140
-
141
-
142
-
143
-
144
-
145
-
146
-
147
-
148
-
149
-
150
-
151
-
152
-
153
-
154
-
155
-
156
-
157
-
158
-
159
-
160
-
161
-
162
-
163
-
164
-
165
-
166
-
167
-
168
-
169
-
170
-
171
-
172
-
173
-
174
-
175
-
176
-
177
-
178
-
179
-
180
-
181
-
182
-
183
-
184
-
185
-
186
-
187
-
188
-
189
-
190
-
191
-
192
-
193
-
194
-
195
-
196
-
197
-
198
-
199
-
200
-
201
-
202
-
203
-
204
-
205
-
206
-
207
-
208
-
209
-
210
-
211
-
212
 |
 |