Xerox 3635MFP Systems Administrator Guide - Page 19
Initial Connection, Card Reader for Feature Enablement Key - phaser fax card
 |
UPC - 095205741049
View all Xerox 3635MFP manuals
Add to My Manuals
Save this manual to your list of manuals |
Page 19 highlights
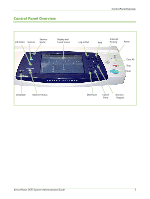
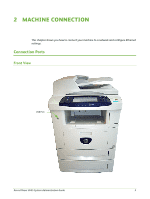
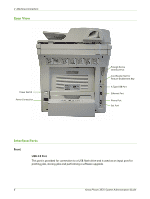
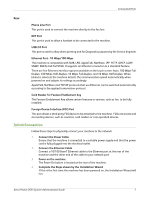
Connection Ports Rear Phone Line Port This port is used to connect the machine directly to the fax line. EXT Port This port is used to allow a handset to be connected to the machine. USB 2.0 Port This port is used to allow direct printing and for Diagnostic purposes by the Service Engineer. Ethernet Port - 10 Mbps/100 Mbps The machine is compatible with SMB, LPD, AppleTalk, NetWare, IPP, HTTP, DHCP, LDAP, SNMP, DDNS and Port9100. It supports an Ethernet connector as a standard feature. There are five Ethernet interface options available on the touch screen: Auto, 100 Mbps FullDuplex, 100 Mbps Half-Duplex, 10 Mbps Full-Duplex, and 10 Mbps Half-Duplex. When [Auto] is selected, the machine detects the communication speed automatically when powered on and adjusts its settings accordingly. AppleTalk, NetWare and TCP/IP protocols that use Ethernet can be switched automatically according to the applied transmission protocol. Card Reader for Feature Enablement Key The Feature Enablement Key allows certain features or services, such as fax, to be fully installed. Foreign Device Interface (FDI) Port This port allows a third party FDI device to be attached to the machine. FDIs are access and accounting devices, such as counters, card readers or coin-operated devices. Initial Connection Follow these steps to physically connect your machine to the network: 1. Connect the Power Cable Ensure that the machine is connected to a suitable power supply and that the power cord is fully plugged into the electrical outlet. 2. Connect the Ethernet Cable Connect a 10/100 BaseT Ethernet cable to the Ethernet port at the rear of the machine and the other end of the cable to your network port. 3. Power on the machine The Power On button is located at the rear of the machine. 4. Complete the Steps shown by the Installation Wizard If this is the first time the machine has been powered on, the Installation Wizard will run. Xerox Phaser 3635 System Administration Guide 7
-
 1
1 -
2
-
3
-
4
-
5
-
6
-
7
-
8
-
9
-
10
-
11
-
12
-
13
-
 14
14 -
 15
15 -
 16
16 -
 17
17 -
 18
18 -
 19
19 -
 20
20 -
 21
21 -
 22
22 -
 23
23 -
 24
24 -
25
-
26
-
27
-
28
-
29
-
30
-
31
-
32
-
33
-
34
-
35
-
36
-
37
-
38
-
39
-
40
-
41
-
42
-
43
-
44
-
45
-
46
-
47
-
48
-
49
-
50
-
51
-
52
-
53
-
54
-
55
-
56
-
57
-
58
-
59
-
60
-
61
-
62
-
63
-
64
-
65
-
66
-
67
-
68
-
69
-
70
-
71
-
72
-
73
-
74
-
75
-
76
-
77
-
78
-
79
-
80
-
81
-
82
-
83
-
84
-
85
-
86
-
87
-
88
-
89
-
90
-
91
-
92
-
93
-
94
-
95
-
96
-
97
-
98
-
99
-
100
-
101
-
102
-
103
-
104
-
105
-
106
-
107
-
108
-
109
-
110
-
111
-
112
-
113
-
114
-
115
-
116
-
117
-
118
-
119
-
120
-
121
-
122
-
123
-
124
-
125
-
126
-
127
-
128
-
129
-
130
-
131
-
132
-
133
-
134
-
135
-
136
-
137
-
138
-
139
-
140
-
141
-
142
-
143
-
144
-
145
-
146
-
147
-
148
-
149
-
150
-
151
-
152
-
153
-
154
-
155
-
156
-
157
-
158
-
159
-
160
-
161
-
162
-
163
-
164
-
165
-
166
-
167
-
168
-
169
-
170
-
171
-
172
-
173
-
174
-
175
-
176
-
177
-
178
-
179
-
180
-
181
-
182
-
183
-
184
-
185
-
186
-
187
-
188
-
189
-
190
-
191
-
192
-
193
-
194
-
195
-
196
-
197
-
198
-
199
-
200
-
201
-
202
-
203
-
204
-
205
-
206
-
207
-
208
-
209
-
210
-
211
-
212
 |
 |