Samsung SPH-D710 User Guide - Page 114
Email, Add an Email Account
 |
View all Samsung SPH-D710 manuals
Add to My Manuals
Save this manual to your list of manuals |
Page 114 highlights
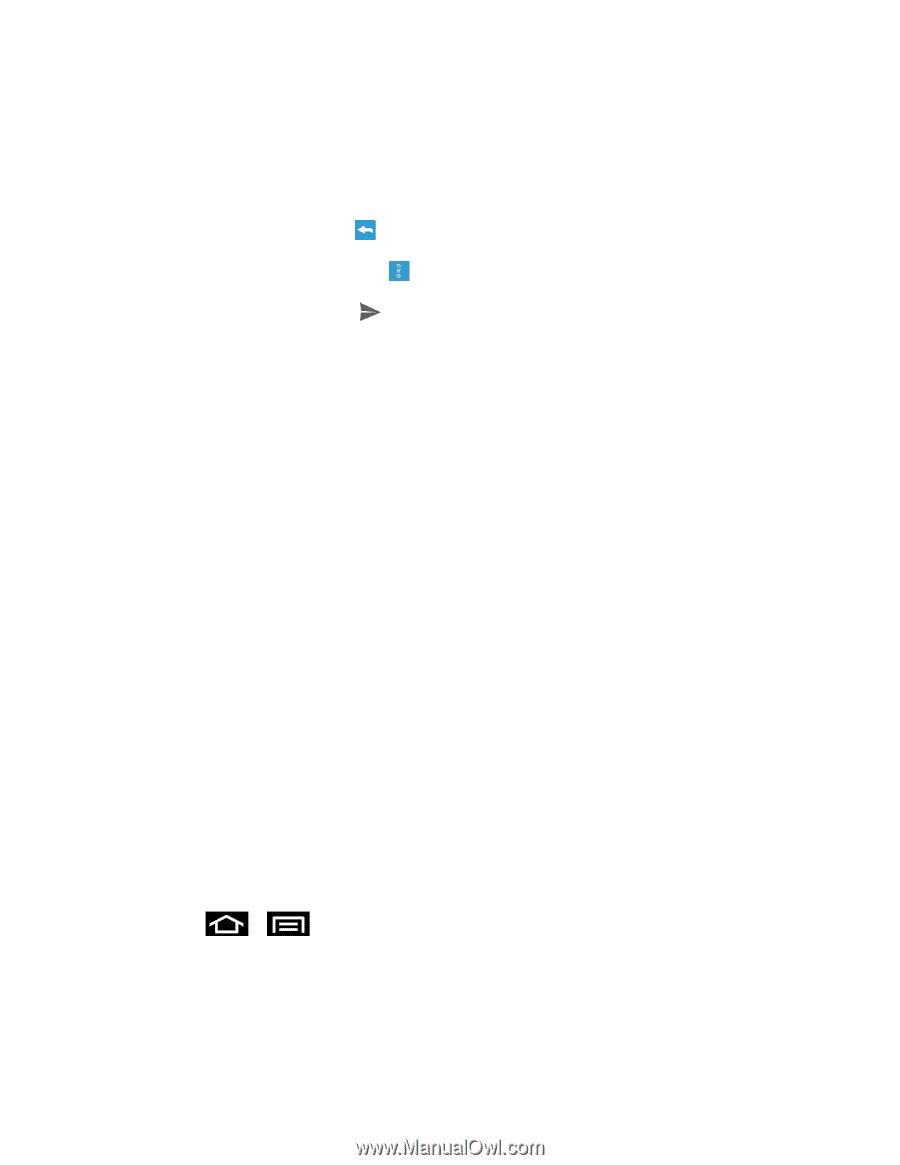
2. Tap a message to display its contents. Tip: You can also access new messages through the Notifications bar. When a new Gmail message arrives, you'll see the icon in the Notifications bar. Touch and hold the bar and slide it down to display notifications. Tap a message to display it. 3. To reply to a message, tap . 4. Tap Reply All, or Forward, tap and tap the appropriate reply action. 5. To send your message, tap . Email Use the Mail application to send and receive email from your webmail or other accounts, using POP3 or IMAP. You can also access your Exchange ActiveSync email and other features on your phone. Add an Email Account Add a Corporate Email Account Setting Up a Corporate Email Compose and Send Email View and Reply to Email Manage Your Email Inbox Corporate Email Features Edit Email Account Settings Delete an Email Account Add the Mail Widget Add an Email Account You can add several types of personal email accounts, such as POP3 and IMAP accounts, on your device. 1. Press > and tap Settings > Accounts and sync. 2. Tap Microsoft Exchange ActiveSync (from the add email account screen). 3. Tap Next and follow the remaining procedures. Accounts and Messaging 102
-
 1
1 -
2
-
3
-
4
-
5
-
6
-
7
-
8
-
9
-
10
-
11
-
12
-
13
-
14
-
15
-
16
-
17
-
18
-
19
-
20
-
21
-
22
-
23
-
24
-
25
-
26
-
27
-
28
-
29
-
30
-
31
-
32
-
33
-
34
-
35
-
36
-
37
-
38
-
39
-
40
-
41
-
42
-
43
-
44
-
45
-
46
-
47
-
48
-
49
-
50
-
51
-
52
-
53
-
54
-
55
-
56
-
57
-
58
-
59
-
60
-
61
-
62
-
63
-
64
-
65
-
66
-
67
-
68
-
69
-
70
-
71
-
72
-
73
-
74
-
75
-
76
-
77
-
78
-
79
-
80
-
81
-
82
-
83
-
84
-
85
-
86
-
87
-
88
-
89
-
90
-
91
-
92
-
93
-
94
-
95
-
96
-
97
-
98
-
99
-
100
-
101
-
102
-
103
-
104
-
105
-
106
-
107
-
108
-
 109
109 -
 110
110 -
 111
111 -
 112
112 -
 113
113 -
 114
114 -
 115
115 -
 116
116 -
 117
117 -
 118
118 -
 119
119 -
120
-
121
-
122
-
123
-
124
-
125
-
126
-
127
-
128
-
129
-
130
-
131
-
132
-
133
-
134
-
135
-
136
-
137
-
138
-
139
-
140
-
141
-
142
-
143
-
144
-
145
-
146
-
147
-
148
-
149
-
150
-
151
-
152
-
153
-
154
-
155
-
156
-
157
-
158
-
159
-
160
-
161
-
162
-
163
-
164
-
165
-
166
-
167
-
168
-
169
-
170
-
171
-
172
-
173
-
174
-
175
-
176
-
177
-
178
-
179
-
180
-
181
-
182
-
183
-
184
-
185
-
186
-
187
-
188
-
189
-
190
-
191
-
192
-
193
-
194
-
195
-
196
-
197
-
198
-
199
-
200
-
201
-
202
-
203
-
204
-
205
-
206
-
207
-
208
-
209
-
210
-
211
-
212
-
213
-
214
-
215
-
216
-
217
-
218
-
219
-
220
-
221
-
222
 |
 |