Samsung SPH-D710 User Guide - Page 193
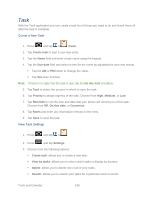
Month, Week, Day, Create event, Tap to enter title, From/To, Time zone, All day, My calendars
 |
View all Samsung SPH-D710 manuals
Add to My Manuals
Save this manual to your list of manuals |
Page 193 highlights
The default view for the Calendar is the Month view. To change the view, tap the available tabs along the top (in portrait view) or the left (in landscape view) of the Calendar screen. Choose from Month, Week, Day, and List. 4. Tap a day to which you would like to add an event to reveal the Create event screen. 5. Tap the Tap to enter title field and enter a title for the event. 6. Select a From/To date for the event by tapping the corresponding fields, and adjusting the month, day, and year. Tap Set when finished. 5. Select a time for the event by tapping the time field and then adjusting the hour and minute. Tap the AM or PM button to change the value. Tap Set when finished. 6. Select a Time zone. 7. Tap the All day field to assign this as an all day event. If assigned as an all day event, the time fields are removed as options. 8. Assign the new calendar event to a current account by tapping the Calendar field and then selecting an account. For this example we are choosing a Google account. My calendars are calendar entries that are stored locally on the phone and not part of an email account. Google/Gmail are calendar entries that are synchronized between your phone and your online Google account. Corporate are calendar entries that are synchronized between your phone and either an Exchange Server or available from within Microsoft® Outlook®. Note: Some of the previous options appear when compatible email accounts (such as Outlook) have been created and synced. If also supported, additional categories appear: Business, Red Category+, Important, and Personal. Tap OK when finished. 9. Enter a location for the event in the Location field. 10. Enter participants in the Participants field. 11. Select a recurrence cycle for the event by tapping the Repeat field. Tools and Calendar 181
-
 1
1 -
2
-
3
-
4
-
5
-
6
-
7
-
8
-
9
-
10
-
11
-
12
-
13
-
14
-
15
-
16
-
17
-
18
-
19
-
20
-
21
-
22
-
23
-
24
-
25
-
26
-
27
-
28
-
29
-
30
-
31
-
32
-
33
-
34
-
35
-
36
-
37
-
38
-
39
-
40
-
41
-
42
-
43
-
44
-
45
-
46
-
47
-
48
-
49
-
50
-
51
-
52
-
53
-
54
-
55
-
56
-
57
-
58
-
59
-
60
-
61
-
62
-
63
-
64
-
65
-
66
-
67
-
68
-
69
-
70
-
71
-
72
-
73
-
74
-
75
-
76
-
77
-
78
-
79
-
80
-
81
-
82
-
83
-
84
-
85
-
86
-
87
-
88
-
89
-
90
-
91
-
92
-
93
-
94
-
95
-
96
-
97
-
98
-
99
-
100
-
101
-
102
-
103
-
104
-
105
-
106
-
107
-
108
-
109
-
110
-
111
-
112
-
113
-
114
-
115
-
116
-
117
-
118
-
119
-
120
-
121
-
122
-
123
-
124
-
125
-
126
-
127
-
128
-
129
-
130
-
131
-
132
-
133
-
134
-
135
-
136
-
137
-
138
-
139
-
140
-
141
-
142
-
143
-
144
-
145
-
146
-
147
-
148
-
149
-
150
-
151
-
152
-
153
-
154
-
155
-
156
-
157
-
158
-
159
-
160
-
161
-
162
-
163
-
164
-
165
-
166
-
167
-
168
-
169
-
170
-
171
-
172
-
173
-
174
-
175
-
176
-
177
-
178
-
179
-
180
-
181
-
182
-
183
-
184
-
185
-
186
-
187
-
 188
188 -
 189
189 -
 190
190 -
 191
191 -
 192
192 -
 193
193 -
 194
194 -
 195
195 -
 196
196 -
 197
197 -
 198
198 -
199
-
200
-
201
-
202
-
203
-
204
-
205
-
206
-
207
-
208
-
209
-
210
-
211
-
212
-
213
-
214
-
215
-
216
-
217
-
218
-
219
-
220
-
221
-
222
 |
 |