HP C7280 User Guide - Page 208
Solution, To preview the print layout, Properties, Cause, A blank came out while printing
 |
UPC - 883585105137
View all HP C7280 manuals
Add to My Manuals
Save this manual to your list of manuals |
Page 208 highlights
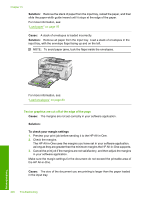
Solution: Make sure the layout of the document you are trying to print fits on a paper size supported by the HP All-in-One. To preview the print layout 1. Load the correct paper size into the input tray. 2. Preview your print job before sending it to the HP All-in-One. 3. Check the graphics in the document to make sure that the current size fits within the printable area of the HP All-in-One. 4. Cancel the print job if the graphics do not fit in the printable area of the page. TIP: Some software applications allow you to scale the document to fit the paper size currently selected. Additionally, you can scale the size of a document from the print Properties dialog box. Cause: The paper is loaded incorrectly. Solution: If the paper is misfeeding, it could cause parts of the document to cut off. Remove the stack of paper from the input tray, and then reload the paper following the steps below. For more information, see: "Load paper" on page 76 A blank page came out while printing Cause: The document you are printing contains an additional blank page. Solution: Open the document file in your software application and remove any extra pages or lines at the end of the document. Cause: The HP All-in-One picked up two sheets of paper. Solution: If the HP All-in-One has only a few sheets remaining, load more paper in the input tray. If there is plenty of paper in the input tray, remove the paper, tap the stack of paper against a flat surface, and reload the paper into the input tray. For more information, see: "Load paper" on page 76 Ink is spraying the inside of the HP All-in-One when I print a photo Cause: The borderless print settings require photo paper to be loaded in the input tray. You are using the wrong paper type. Solution: Make sure you load photo paper in the input tray before you print a borderless print job. Option for automatic two-sided printing cannot be selected Cause: The Two-sided printing accessory is not installed or it is installed incorrectly. Print troubleshooting 207 Troubleshooting
-
 1
1 -
2
-
3
-
4
-
5
-
6
-
7
-
8
-
9
-
10
-
11
-
12
-
13
-
14
-
15
-
16
-
17
-
18
-
19
-
20
-
21
-
22
-
23
-
24
-
25
-
26
-
27
-
28
-
29
-
30
-
31
-
32
-
33
-
34
-
35
-
36
-
37
-
38
-
39
-
40
-
41
-
42
-
43
-
44
-
45
-
46
-
47
-
48
-
49
-
50
-
51
-
52
-
53
-
54
-
55
-
56
-
57
-
58
-
59
-
60
-
61
-
62
-
63
-
64
-
65
-
66
-
67
-
68
-
69
-
70
-
71
-
72
-
73
-
74
-
75
-
76
-
77
-
78
-
79
-
80
-
81
-
82
-
83
-
84
-
85
-
86
-
87
-
88
-
89
-
90
-
91
-
92
-
93
-
94
-
95
-
96
-
97
-
98
-
99
-
100
-
101
-
102
-
103
-
104
-
105
-
106
-
107
-
108
-
109
-
110
-
111
-
112
-
113
-
114
-
115
-
116
-
117
-
118
-
119
-
120
-
121
-
122
-
123
-
124
-
125
-
126
-
127
-
128
-
129
-
130
-
131
-
132
-
133
-
134
-
135
-
136
-
137
-
138
-
139
-
140
-
141
-
142
-
143
-
144
-
145
-
146
-
147
-
148
-
149
-
150
-
151
-
152
-
153
-
154
-
155
-
156
-
157
-
158
-
159
-
160
-
161
-
162
-
163
-
164
-
165
-
166
-
167
-
168
-
169
-
170
-
171
-
172
-
173
-
174
-
175
-
176
-
177
-
178
-
179
-
180
-
181
-
182
-
183
-
184
-
185
-
186
-
187
-
188
-
189
-
190
-
191
-
192
-
193
-
194
-
195
-
196
-
197
-
198
-
199
-
200
-
201
-
202
-
 203
203 -
 204
204 -
 205
205 -
 206
206 -
 207
207 -
 208
208 -
 209
209 -
 210
210 -
 211
211 -
 212
212 -
 213
213 -
214
-
215
-
216
-
217
-
218
-
219
-
220
-
221
-
222
-
223
-
224
-
225
-
226
-
227
-
228
-
229
-
230
-
231
-
232
-
233
-
234
-
235
-
236
-
237
-
238
-
239
-
240
-
241
-
242
-
243
-
244
-
245
-
246
-
247
-
248
-
249
-
250
-
251
-
252
-
253
-
254
-
255
-
256
-
257
-
258
-
259
-
260
-
261
-
262
-
263
-
264
-
265
-
266
-
267
-
268
-
269
-
270
-
271
-
272
-
273
-
274
-
275
-
276
-
277
-
278
-
279
-
280
-
281
-
282
-
283
-
284
-
285
-
286
-
287
-
288
-
289
-
290
-
291
-
292
-
293
-
294
-
295
-
296
-
297
-
298
-
299
-
300
-
301
-
302
-
303
-
304
-
305
-
306
-
307
-
308
-
309
 |
 |