HP Deskjet 320 Solutions Guide - Page 162
Table 6-13., Continued
 |
View all HP Deskjet 320 manuals
Add to My Manuals
Save this manual to your list of manuals |
Page 162 highlights
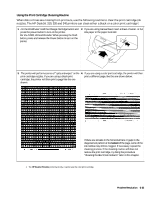
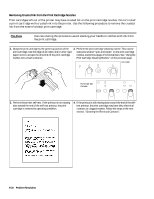
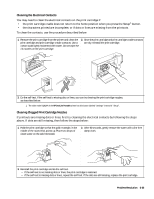
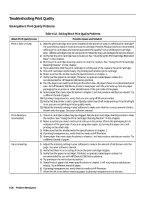
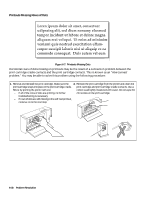
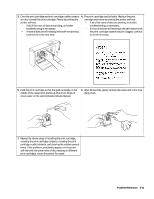
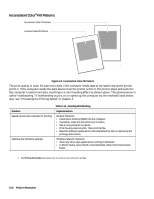
Table 6-13. Solving Color Print Quality Problems (Continued) Color Print Quality Issue Printouts contain inconsistent color fill patterns with horizontal bands or thin lines running completely across the sheet Printed colors do not match screen color Color smudges on transparencies Possible Cause If bands or thin lines run all the way across the printout, the inconsistent color fill pattern can result from either of two problems: waitbanding or overlapping lines. These problems require different solutions. • If you see horizontal bands of color, the printer may be experiencing waitbanding ("color banding"). See "Inconsistent Color Fill Patterns" at the end of this chapter for solutions. One approach is to print the document to a file; then you can print the file as a binary file from DOS. • If you see thin horizontal lines of color, the problem is likely to be overlapping lines. - Try printing the sheet again using manual feed. - If you are printing from a Windows application, select the "Best" setting under Print Quality in the Printer Setup dialog box. If you are using Windows, try the following: 1. Verify that the "Match Screen"1 option is selected under Color Control in the Options dialog box of the Printer Setup menu. 2. The print cartridge may be running out of one color of ink. 3. Try a different dithering method. In DOS applications, a solution is dependent on the printer driver for that DOS software package. Refer to the software documentation or contact the software vendor for possible solutions. If you are using Windows: 1. In the Printer Setup dialog box, make sure that you have selected "Transparency Film"1 or "Transparency Film (Extra Dry Time)" in the "Media Type" field. • If you have selected "Transparency Film," the printer will add several extra minutes of drying time before dropping another sheet on top of the transparency that was last printed. The Busy light flashes during the drying interval. • If you have selected "Transparency Film (Extra Dry Time)," the printer will print each transparency and stop before printing the next. You will see the message, "Remove Printed Page." Remove the transparency and click the OK button in the dialog box. Place the removed transparency in a drying area, out of the sun. 2. Make sure that you load the transparency into the sheet feeder or directly into the paper feed slot with the rough side of the transparency up. 3. Wait several minutes before placing transparencies in sleeves or avoid placing transparencies in sleeves. Color smudges on glossy paper If you are using Windows: 1. In the Printer Setup dialog box, make sure that you have selected "Glossy Paper"1 or "Glossy Paper (Extra Dry Time)" in the "Media Type" field. • If you have selected "Glossy Paper," the printer will add several extra minutes of drying time before dropping another sheet on top of the sheet that was last printed. The Busy light flashes during the drying interval. • If you have selected "Glossy Paper (Extra Dry Time)," the printer will print each sheet and stop before printing the next. You will see the message, "Remove Printed Page." Remove the sheet and click the OK button in the dialog box. Place the removed sheet in a drying area, out of the sun. 2. Make sure that you load the sheet into the sheet feeder or directly into the paper feed slot with the glossy side up. 3. Be sure to give the ink several minutes to dry. 1. These option settings are from the HP DeskJet 300 Series v4.1 Printer Driver. This is the driver recommended for all DeskJet 300 Series printers. 6-38 Problem Resolution
-
 1
1 -
2
-
3
-
4
-
5
-
6
-
7
-
8
-
9
-
10
-
11
-
12
-
13
-
14
-
15
-
16
-
17
-
18
-
19
-
20
-
21
-
22
-
23
-
24
-
25
-
26
-
27
-
28
-
29
-
30
-
31
-
32
-
33
-
34
-
35
-
36
-
37
-
38
-
39
-
40
-
41
-
42
-
43
-
44
-
45
-
46
-
47
-
48
-
49
-
50
-
51
-
52
-
53
-
54
-
55
-
56
-
57
-
58
-
59
-
60
-
61
-
62
-
63
-
64
-
65
-
66
-
67
-
68
-
69
-
70
-
71
-
72
-
73
-
74
-
75
-
76
-
77
-
78
-
79
-
80
-
81
-
82
-
83
-
84
-
85
-
86
-
87
-
88
-
89
-
90
-
91
-
92
-
93
-
94
-
95
-
96
-
97
-
98
-
99
-
100
-
101
-
102
-
103
-
104
-
105
-
106
-
107
-
108
-
109
-
110
-
111
-
112
-
113
-
114
-
115
-
116
-
117
-
118
-
119
-
120
-
121
-
122
-
123
-
124
-
125
-
126
-
127
-
128
-
129
-
130
-
131
-
132
-
133
-
134
-
135
-
136
-
137
-
138
-
139
-
140
-
141
-
142
-
143
-
144
-
145
-
146
-
147
-
148
-
149
-
150
-
151
-
152
-
153
-
154
-
155
-
156
-
 157
157 -
 158
158 -
 159
159 -
 160
160 -
 161
161 -
 162
162 -
 163
163 -
 164
164 -
 165
165 -
 166
166 -
 167
167 -
168
-
169
-
170
-
171
-
172
-
173
-
174
-
175
-
176
-
177
-
178
-
179
-
180
-
181
-
182
-
183
-
184
-
185
-
186
-
187
-
188
-
189
-
190
-
191
-
192
-
193
-
194
-
195
-
196
-
197
-
198
-
199
-
200
-
201
-
202
 |
 |