HP Deskjet 320 Solutions Guide - Page 61
Description of Printer Buttons and Lights for the HP DeskJet 300 Series except the HP DeskJet 340
 |
View all HP Deskjet 320 manuals
Add to My Manuals
Save this manual to your list of manuals |
Page 61 highlights
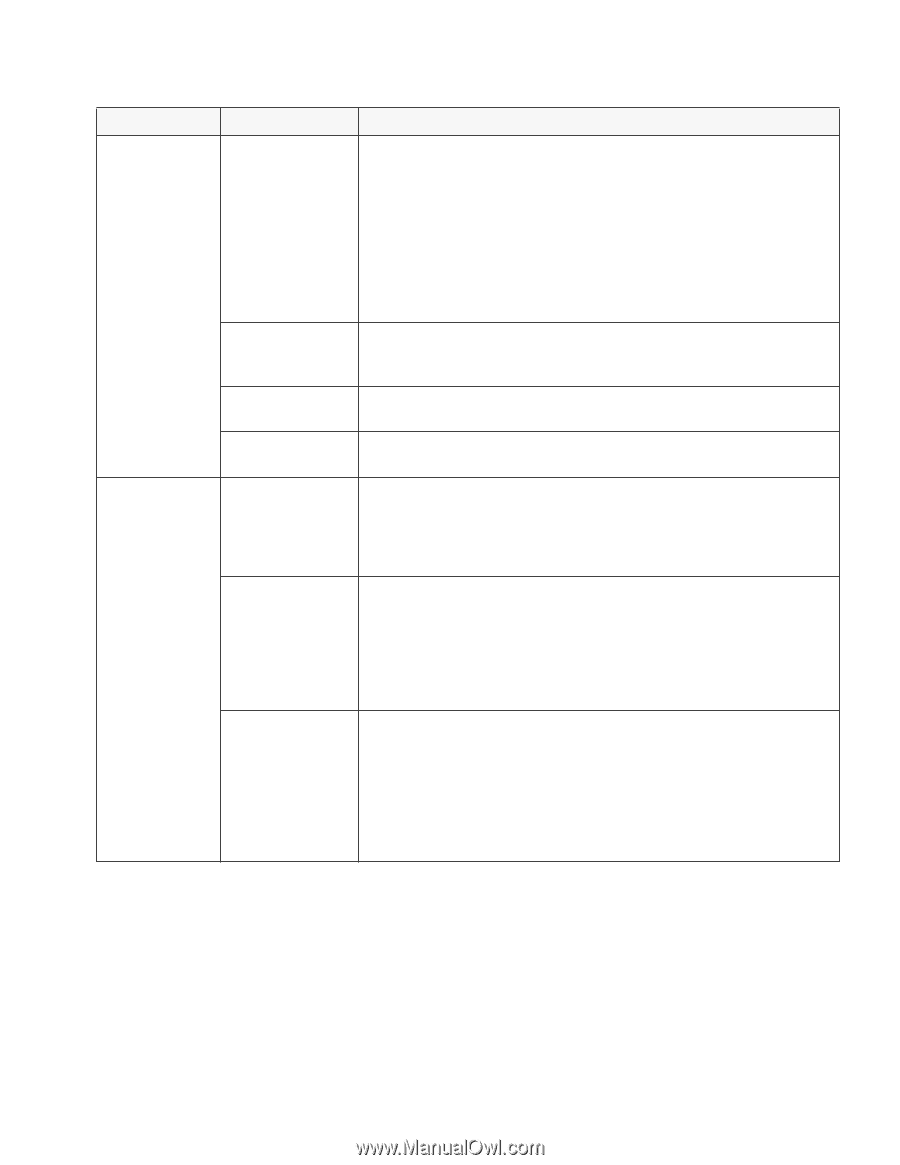
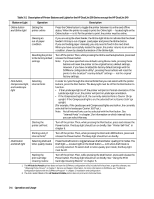
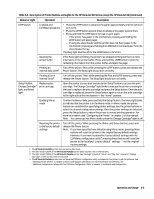
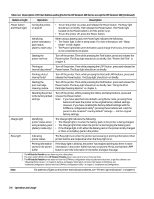
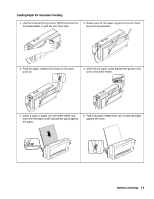
Table 3-2. Description of Printer Buttons and Lights for the HP DeskJet 300 Series except the HP DeskJet 340 (Continued) Button or Light Operation Description LF/FF button Linefeed and formfeed operations • Press the LF/FF button to advance the paper approximately one line (1/6 inch or 0.4 cm). • Press the LF/FF button several times to advance the paper several lines. • Press and hold the LF/FF button to load or eject paper. - If the printer has paper in the mechanism, pressing and holding the LF/FF button will eject paper. - If using the sheet feeder and the printer does not have paper in the mechanism, pressing and holding the LF/FF button will load paper from the sheet feeder IN tray. The Busy light must be off for the LF/FF button to function. Clearing the printer buffer If the Busy light is blinking, the printer has stopped printing but there is more information in the printer buffer. Press and hold the LF/FF button to print the remaining information from the printer buffer and eject the page. Printing an Turn off the printer. Then while pressing the LF/FF button, press and release the internal data sheet1 Power button. The Busy light should turn on briefly. Setup3 button, Change Cartridge3 light, and Menu light Printing a list of internal fonts2 Replacing the print cartridge Enabling Menu mode Turn off the printer. Then, while pressing the Font and LF/FF buttons, press and release the Power button. The Busy light should turn on briefly. Open the printer access door and press the Setup3 button to access the print cartridge. The Change Cartridge3 light blinks to indicate the printer is waiting for the user to replace the print cartridge and press the Setup button. Once the print cartridge is replaced, press the Setup button again to return the print cartridge to the right side of the mechanism - the "home" position. To enter the Menu mode, press and hold the Setup3 button. The Menu light blinks to indicate that the printer is in the Menu mode. In Menu mode, the printer buttons are redefined for specifying printer settings. Use the printer buttons to select the desired configuration settings. Once the printer settings are selected, press the Setup button to return the printer to normal printing operation. For more information, see "Configuring the Printer" in chapter 2 of this manual. Note: You cannot go into Menu mode unless the Change Cartridge3 light is off. Resetting the printer to the factory default settings Turn off the printer. While pressing the Online and Setup buttons, press and release the Power button. Note: If you have specified new defaults using Menu mode, pressing these buttons will reset the printer to the original factory default settings. However, if you have localized the factory default settings with the DJPMenu configuration utility4, pressing these buttons will reset the printer to the localized "country default" settings - not the original factory settings. 1. The HP DeskJet Portable printer does not print a data sheet. 2. The older model C2614A of the HP DeskJet Portable printer does not print a list of internal fonts. 3. The older model C2614A of the HP DeskJet Portable printer has "Settings" instead of "Setup" and "Chg. Pen" instead of "Change Cartridge" written on the printer's front panel. 4. The HP DeskJet Portable printer does not have the DJPMenu configuration utility included with the printer; to get this software, see "Obtaining Printer Drivers" in chapter 6, Service and Support Information. For more information on DJPMenu, see "Additional Configuration Options with the DJPMenu Configuration Utility" in chapter 2, Installation and Configuration. Operation and Usage 3-5
-
 1
1 -
2
-
3
-
4
-
5
-
6
-
7
-
8
-
9
-
10
-
11
-
12
-
13
-
14
-
15
-
16
-
17
-
18
-
19
-
20
-
21
-
22
-
23
-
24
-
25
-
26
-
27
-
28
-
29
-
30
-
31
-
32
-
33
-
34
-
35
-
36
-
37
-
38
-
39
-
40
-
41
-
42
-
43
-
44
-
45
-
46
-
47
-
48
-
49
-
50
-
51
-
52
-
53
-
54
-
55
-
 56
56 -
 57
57 -
 58
58 -
 59
59 -
 60
60 -
 61
61 -
 62
62 -
 63
63 -
 64
64 -
 65
65 -
 66
66 -
67
-
68
-
69
-
70
-
71
-
72
-
73
-
74
-
75
-
76
-
77
-
78
-
79
-
80
-
81
-
82
-
83
-
84
-
85
-
86
-
87
-
88
-
89
-
90
-
91
-
92
-
93
-
94
-
95
-
96
-
97
-
98
-
99
-
100
-
101
-
102
-
103
-
104
-
105
-
106
-
107
-
108
-
109
-
110
-
111
-
112
-
113
-
114
-
115
-
116
-
117
-
118
-
119
-
120
-
121
-
122
-
123
-
124
-
125
-
126
-
127
-
128
-
129
-
130
-
131
-
132
-
133
-
134
-
135
-
136
-
137
-
138
-
139
-
140
-
141
-
142
-
143
-
144
-
145
-
146
-
147
-
148
-
149
-
150
-
151
-
152
-
153
-
154
-
155
-
156
-
157
-
158
-
159
-
160
-
161
-
162
-
163
-
164
-
165
-
166
-
167
-
168
-
169
-
170
-
171
-
172
-
173
-
174
-
175
-
176
-
177
-
178
-
179
-
180
-
181
-
182
-
183
-
184
-
185
-
186
-
187
-
188
-
189
-
190
-
191
-
192
-
193
-
194
-
195
-
196
-
197
-
198
-
199
-
200
-
201
-
202
 |
 |