HP Deskjet 320 Solutions Guide - Page 40
Installing/Replacing a Battery Pack
 |
View all HP Deskjet 320 manuals
Add to My Manuals
Save this manual to your list of manuals |
Page 40 highlights
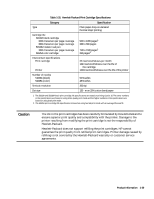
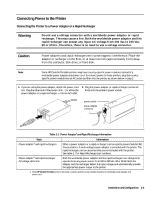
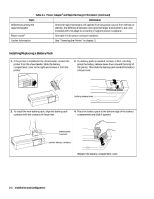
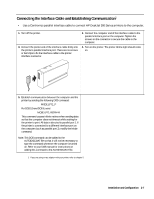
Table 2-1. Power Adapter1 and Rapid Recharger Information (Continued) Topic Information Differences among the rapid rechargers Power cords1 Since the rapid rechargers will operate from any power source from 100 Vac to 240 Vac, the difference between one rapid recharger and another is the cord included with it to adapt to a country or region's power receptacle. See table 1-6 for power cord part numbers. Further information See "Powering the Printer" in chapter 3. Installing/Replacing a Battery Pack 1. If the printer is installed in the sheet feeder, remove the printer from the sheet feeder. Slide the battery compartment cover to the right and remove it from the printer. 2. If a battery pack is installed, remove it. First, carefully press the battery release lever down toward the body of the printer. Then slide the battery pack toward the battery release lever. ƒ ‚ BPATATCEKRY battery release lever 3. To install the new battery pack, align the battery pack contacts with the contacts in the printer. 4. Place the battery pack at the bottom edge of the battery compartment and slide it upward. BPATATCEKRY battery pack contacts printer battery contacts Replace the battery compartment cover. 2-4 Installation and Configuration
-
 1
1 -
2
-
3
-
4
-
5
-
6
-
7
-
8
-
9
-
10
-
11
-
12
-
13
-
14
-
15
-
16
-
17
-
18
-
19
-
20
-
21
-
22
-
23
-
24
-
25
-
26
-
27
-
28
-
29
-
30
-
31
-
32
-
33
-
34
-
 35
35 -
 36
36 -
 37
37 -
 38
38 -
 39
39 -
 40
40 -
 41
41 -
 42
42 -
 43
43 -
 44
44 -
 45
45 -
46
-
47
-
48
-
49
-
50
-
51
-
52
-
53
-
54
-
55
-
56
-
57
-
58
-
59
-
60
-
61
-
62
-
63
-
64
-
65
-
66
-
67
-
68
-
69
-
70
-
71
-
72
-
73
-
74
-
75
-
76
-
77
-
78
-
79
-
80
-
81
-
82
-
83
-
84
-
85
-
86
-
87
-
88
-
89
-
90
-
91
-
92
-
93
-
94
-
95
-
96
-
97
-
98
-
99
-
100
-
101
-
102
-
103
-
104
-
105
-
106
-
107
-
108
-
109
-
110
-
111
-
112
-
113
-
114
-
115
-
116
-
117
-
118
-
119
-
120
-
121
-
122
-
123
-
124
-
125
-
126
-
127
-
128
-
129
-
130
-
131
-
132
-
133
-
134
-
135
-
136
-
137
-
138
-
139
-
140
-
141
-
142
-
143
-
144
-
145
-
146
-
147
-
148
-
149
-
150
-
151
-
152
-
153
-
154
-
155
-
156
-
157
-
158
-
159
-
160
-
161
-
162
-
163
-
164
-
165
-
166
-
167
-
168
-
169
-
170
-
171
-
172
-
173
-
174
-
175
-
176
-
177
-
178
-
179
-
180
-
181
-
182
-
183
-
184
-
185
-
186
-
187
-
188
-
189
-
190
-
191
-
192
-
193
-
194
-
195
-
196
-
197
-
198
-
199
-
200
-
201
-
202
 |
 |