HP Deskjet 320 Solutions Guide - Page 43
Connecting the Interface Cable and Establishing Communication - printer manual
 |
View all HP Deskjet 320 manuals
Add to My Manuals
Save this manual to your list of manuals |
Page 43 highlights
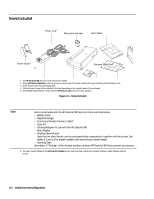
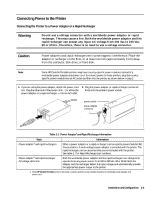
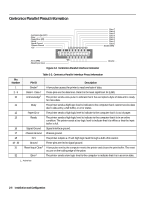
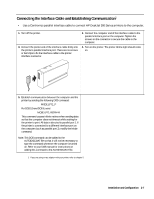
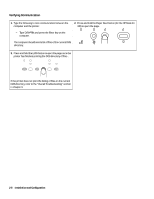
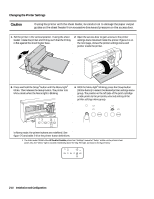
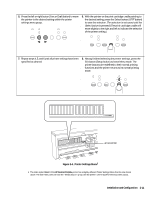
Connecting the Interface Cable and Establishing Communication1 • Use a Centronics parallel interface cable to connect HP DeskJet 300 Series printers to the computer. 1. Turn off the printer. 3. Connect the printer end of the interface cable firmly into the printer's parallel interface port. There are no screws or bail clips to fix the interface cable to the printer interface connector. 2. Connect the computer end of the interface cable to the parallel interface port on the computer. Tighten the screws on the connector to secure the cable to the computer. 4. Turn on the printer. The printer Online light should come on. 5. Establish communication between the computer and the printer by sending the following DOS command: MODE LPT1:,,P For DOS 5.0 and DOS 6, send MODE LPT1: RETRY=R This command causes infinite retries when sending data so that the computer does not timeout while waiting for the printer to print. All data is directed to parallel port 1. If the printer is connected to a different interface port on the computer (such as parallel port 2), modify the Mode command. Note: This DOS command can be added to the AUTOEXEC.BAT file so that it will not be necessary to type the command whenever the computer is turned on. Refer to your DOS manual for instructions on adding this command to the AUTOEXEC.BAT file. 1. If you are using a mac adapter with your printer, refer to chapter 5. Installation and Configuration 2-7
-
 1
1 -
2
-
3
-
4
-
5
-
6
-
7
-
8
-
9
-
10
-
11
-
12
-
13
-
14
-
15
-
16
-
17
-
18
-
19
-
20
-
21
-
22
-
23
-
24
-
25
-
26
-
27
-
28
-
29
-
30
-
31
-
32
-
33
-
34
-
35
-
36
-
37
-
 38
38 -
 39
39 -
 40
40 -
 41
41 -
 42
42 -
 43
43 -
 44
44 -
 45
45 -
 46
46 -
 47
47 -
 48
48 -
49
-
50
-
51
-
52
-
53
-
54
-
55
-
56
-
57
-
58
-
59
-
60
-
61
-
62
-
63
-
64
-
65
-
66
-
67
-
68
-
69
-
70
-
71
-
72
-
73
-
74
-
75
-
76
-
77
-
78
-
79
-
80
-
81
-
82
-
83
-
84
-
85
-
86
-
87
-
88
-
89
-
90
-
91
-
92
-
93
-
94
-
95
-
96
-
97
-
98
-
99
-
100
-
101
-
102
-
103
-
104
-
105
-
106
-
107
-
108
-
109
-
110
-
111
-
112
-
113
-
114
-
115
-
116
-
117
-
118
-
119
-
120
-
121
-
122
-
123
-
124
-
125
-
126
-
127
-
128
-
129
-
130
-
131
-
132
-
133
-
134
-
135
-
136
-
137
-
138
-
139
-
140
-
141
-
142
-
143
-
144
-
145
-
146
-
147
-
148
-
149
-
150
-
151
-
152
-
153
-
154
-
155
-
156
-
157
-
158
-
159
-
160
-
161
-
162
-
163
-
164
-
165
-
166
-
167
-
168
-
169
-
170
-
171
-
172
-
173
-
174
-
175
-
176
-
177
-
178
-
179
-
180
-
181
-
182
-
183
-
184
-
185
-
186
-
187
-
188
-
189
-
190
-
191
-
192
-
193
-
194
-
195
-
196
-
197
-
198
-
199
-
200
-
201
-
202
 |
 |
