Brother International PEDESIGN 8.0 Users Manual - English - Page 122
Importing Image Data - pe design 8 0 digitizing software
 |
View all Brother International PEDESIGN 8.0 manuals
Add to My Manuals
Save this manual to your list of manuals |
Page 122 highlights
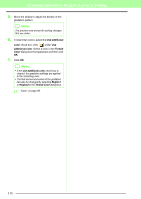
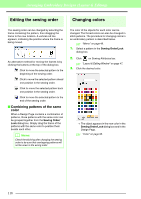
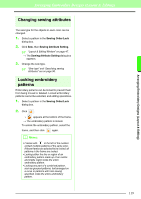
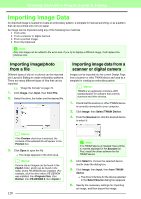
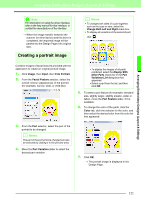
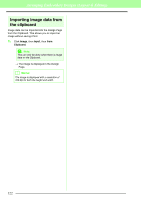
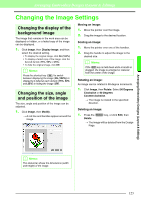
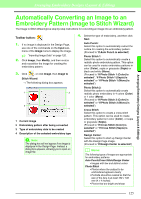
Arranging Embroidery Designs (Layout & Editing) Importing Image Data An imported image is needed to create an embroidery pattern, a template for manual punching, or as a pattern that can be printed onto iron-on paper. An image can be imported using any of the following four methods. 1 From a file 2 From a scanner or digital camera 3 From a portrait image 4 From the Clipboard a Note: Only one image can be added to the work area. If you try to display a different image, it will replace the previous one. Importing image/photo from a file Different types of clip art or photos can be imported into Layout & Editing to create embroidery patterns. There are many different types of files that can be imported. c "Image file formats" on page 19. 1. Click Image, then Input, then from File. 2. Select the drive, the folder and the desired file. Importing image data from a scanner or digital camera Images can be imported into the current Design Page from a scanner or other TWAIN device and used as a template for creating an embroidery pattern. b Memo: TWAIN is an application interface (API) standardization for software that controls scanners and other devices. 1. Check that the scanner or other TWAIN device is correctly connected to your computer. 2. Click Image, then Select TWAIN Device. 3. From the Sources list, click the desired device to select it. b Memo: If the Preview check box is selected, the contents of the selected file will appear in the Preview box. 3. Click Open to open the file. → The image appears in the work area. b Memo: Various clip art images can be found in the ClipArt folder, which can be found in the folder where PE-DESIGN was installed. (For example, click the drive where PE-DESIGN was installed, then Program Files, then Brother, then PE-DESIGN 8, then ClipArt.) 120 a Note: If no TWAIN device is installed, there will be no names displayed in the Sources list. First, install the driver software for the TWAIN device. 4. Click Select to choose the selected device and to close the dialog box. 5. Click Image, then Input, then from TWAIN device. → The driver interface for the device selected in the Select Source dialog box appears. 6. Specify the necessary settings for importing an image, and then import the image.
-
 1
1 -
2
-
3
-
4
-
5
-
6
-
7
-
8
-
9
-
10
-
11
-
12
-
13
-
14
-
15
-
16
-
17
-
18
-
19
-
20
-
21
-
22
-
23
-
24
-
25
-
26
-
27
-
28
-
29
-
30
-
31
-
32
-
33
-
34
-
35
-
36
-
37
-
38
-
39
-
40
-
41
-
42
-
43
-
44
-
45
-
46
-
47
-
48
-
49
-
50
-
51
-
52
-
53
-
54
-
55
-
56
-
57
-
58
-
59
-
60
-
61
-
62
-
63
-
64
-
65
-
66
-
67
-
68
-
69
-
70
-
71
-
72
-
73
-
74
-
75
-
76
-
77
-
78
-
79
-
80
-
81
-
82
-
83
-
84
-
85
-
86
-
87
-
88
-
89
-
90
-
91
-
92
-
93
-
94
-
95
-
96
-
97
-
98
-
99
-
100
-
101
-
102
-
103
-
104
-
105
-
106
-
107
-
108
-
109
-
110
-
111
-
112
-
113
-
114
-
115
-
116
-
 117
117 -
 118
118 -
 119
119 -
 120
120 -
 121
121 -
 122
122 -
 123
123 -
 124
124 -
 125
125 -
 126
126 -
 127
127 -
128
-
129
-
130
-
131
-
132
-
133
-
134
-
135
-
136
-
137
-
138
-
139
-
140
-
141
-
142
-
143
-
144
-
145
-
146
-
147
-
148
-
149
-
150
-
151
-
152
-
153
-
154
-
155
-
156
-
157
-
158
-
159
-
160
-
161
-
162
-
163
-
164
-
165
-
166
-
167
-
168
-
169
-
170
-
171
-
172
-
173
-
174
-
175
-
176
-
177
-
178
-
179
-
180
-
181
-
182
-
183
-
184
-
185
-
186
-
187
-
188
-
189
-
190
-
191
-
192
-
193
-
194
-
195
-
196
-
197
-
198
-
199
-
200
-
201
-
202
-
203
-
204
-
205
-
206
-
207
-
208
-
209
-
210
-
211
-
212
-
213
-
214
-
215
-
216
-
217
-
218
-
219
-
220
-
221
-
222
-
223
-
224
-
225
-
226
-
227
-
228
-
229
-
230
-
231
-
232
-
233
-
234
-
235
-
236
-
237
-
238
-
239
-
240
-
241
-
242
-
243
-
244
-
245
-
246
-
247
-
248
-
249
-
250
-
251
-
252
-
253
-
254
-
255
-
256
-
257
-
258
-
259
-
260
-
261
-
262
-
263
-
264
-
265
-
266
-
267
-
268
-
269
 |
 |