Brother International PEDESIGN 8.0 Users Manual - English - Page 68
Checking the stitching, Viewing design in the, reference window
 |
View all Brother International PEDESIGN 8.0 manuals
Add to My Manuals
Save this manual to your list of manuals |
Page 68 highlights
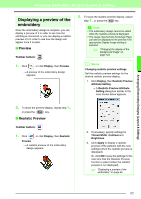
Arranging Embroidery Designs (Layout & Editing) Checking the stitching The actual stitching as it will be performed by the embroidery machine can be viewed using the stitch simulator. Toolbar button: 1. Click , or click Display, then Stitch Simulator. The Stitch Simulator dialog box appears, and the embroidery design is cleared from the Design Page. 2. Click to begin the stitching simulation. b Memo: • The slider shows the current location in the simulation. In addition, the slider can be moved to change the position in the simulation. • To get a better view of the stitching, zoom in on the design before opening the Stitch Simulator dialog box. The following operations can be performed if the corresponding button is clicked. : Stops the simulation and returns to the previous display. : Temporarily stops the simulation. To restart the simulation, click . : Drag the slider to adjust the simulation stitching speed. : Returns to the beginning of the previous color. : Advances to the beginning of the next color. : Reverses the stitching by the number of stitches specified in the stitches/ step selector. : Advances the stitching by the number of stitches specified in the stitches/ step selector. *: Returns to the beginning of the design in the previous hoop section. *: Advances to the beginning of the design in the next hoop section. * Appear only for patterns created on customsized Design Pages. The numbers indicate the following. Number of the current stitch Total number of stitches Number of the color being drawn Total number of colors used Pattern section that is displayed Total number of hoop sections in the pattern This indicator appears only for patterns created on custom-sized Design Pages. 3. Click in the upper-right corner of the dialog box to close the dialog box. b Memo: If a pattern was selected when the Stitch Simulator dialog box was displayed, only the selected pattern is drawn in the simulation. Viewing design in the reference window A design in the Design Page is displayed in the Reference Window, giving you an overall view of the design while you work on a detailed area. The display area frame (red rectangle) indicates the part of the pattern displayed in the Design Page. Toolbar button: To switch between displaying and hiding the Reference window, click , click Display, then Reference Window, or press the shortcut key ( F11 ). 66
-
 1
1 -
2
-
3
-
4
-
5
-
6
-
7
-
8
-
9
-
10
-
11
-
12
-
13
-
14
-
15
-
16
-
17
-
18
-
19
-
20
-
21
-
22
-
23
-
24
-
25
-
26
-
27
-
28
-
29
-
30
-
31
-
32
-
33
-
34
-
35
-
36
-
37
-
38
-
39
-
40
-
41
-
42
-
43
-
44
-
45
-
46
-
47
-
48
-
49
-
50
-
51
-
52
-
53
-
54
-
55
-
56
-
57
-
58
-
59
-
60
-
61
-
62
-
 63
63 -
 64
64 -
 65
65 -
 66
66 -
 67
67 -
 68
68 -
 69
69 -
 70
70 -
 71
71 -
 72
72 -
 73
73 -
74
-
75
-
76
-
77
-
78
-
79
-
80
-
81
-
82
-
83
-
84
-
85
-
86
-
87
-
88
-
89
-
90
-
91
-
92
-
93
-
94
-
95
-
96
-
97
-
98
-
99
-
100
-
101
-
102
-
103
-
104
-
105
-
106
-
107
-
108
-
109
-
110
-
111
-
112
-
113
-
114
-
115
-
116
-
117
-
118
-
119
-
120
-
121
-
122
-
123
-
124
-
125
-
126
-
127
-
128
-
129
-
130
-
131
-
132
-
133
-
134
-
135
-
136
-
137
-
138
-
139
-
140
-
141
-
142
-
143
-
144
-
145
-
146
-
147
-
148
-
149
-
150
-
151
-
152
-
153
-
154
-
155
-
156
-
157
-
158
-
159
-
160
-
161
-
162
-
163
-
164
-
165
-
166
-
167
-
168
-
169
-
170
-
171
-
172
-
173
-
174
-
175
-
176
-
177
-
178
-
179
-
180
-
181
-
182
-
183
-
184
-
185
-
186
-
187
-
188
-
189
-
190
-
191
-
192
-
193
-
194
-
195
-
196
-
197
-
198
-
199
-
200
-
201
-
202
-
203
-
204
-
205
-
206
-
207
-
208
-
209
-
210
-
211
-
212
-
213
-
214
-
215
-
216
-
217
-
218
-
219
-
220
-
221
-
222
-
223
-
224
-
225
-
226
-
227
-
228
-
229
-
230
-
231
-
232
-
233
-
234
-
235
-
236
-
237
-
238
-
239
-
240
-
241
-
242
-
243
-
244
-
245
-
246
-
247
-
248
-
249
-
250
-
251
-
252
-
253
-
254
-
255
-
256
-
257
-
258
-
259
-
260
-
261
-
262
-
263
-
264
-
265
-
266
-
267
-
268
-
269
 |
 |
