Brother International PEDESIGN 8.0 Users Manual - English - Page 249
Display menu, Select Sewing Area
 |
View all Brother International PEDESIGN 8.0 manuals
Add to My Manuals
Save this manual to your list of manuals |
Page 249 highlights
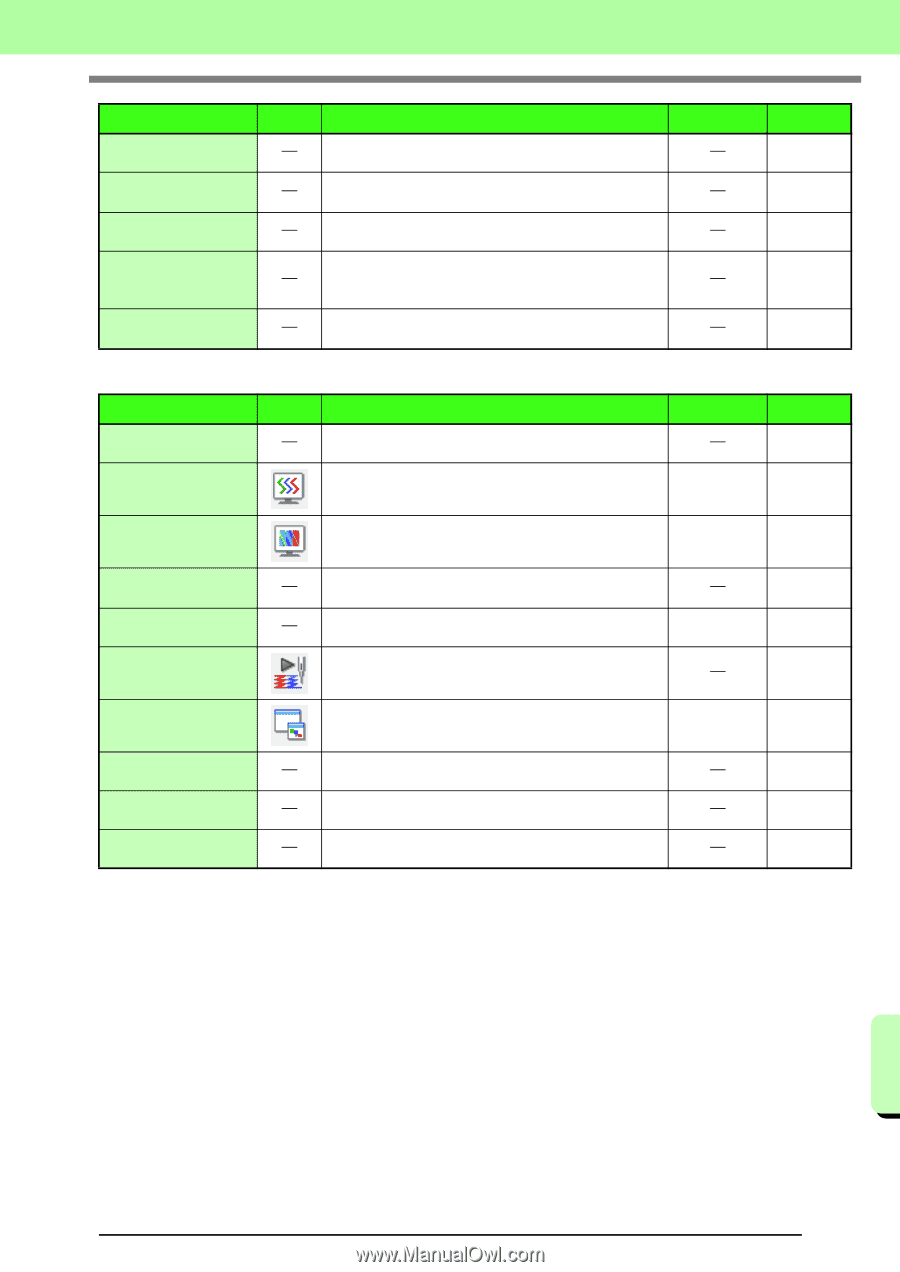
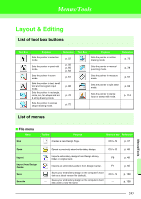
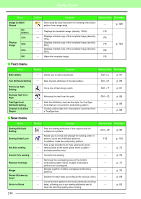
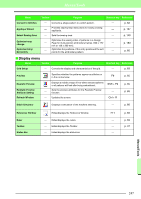
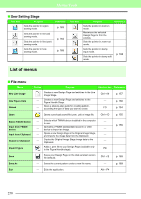
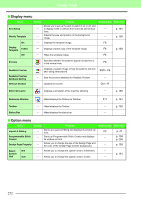
Menus/Tools Menu Convert to Stitches Applique Wizard Select Sewing Area Optimize hoop change Optimize Entry/ Exit points Toolbar Purpose Shortcut key Reference Converts a shape pattern to a stitch pattern. p. 62 Provides step-by-step instructions for easily creating appliqués. Sets the sewing area. p. 137 p. 140 Optimizes the sewing order of patterns in a Design Page for multi-position embroidery frames (100 × 172 mm or 130 × 300 mm). Optimizes the positions of the entry points and the exit points for the embroidery pattern. p. 183 p. 60 ■ Display menu Menu Toolbar Purpose Grid Setup Controls the display and characteristics of the grid. Shortcut key Reference p. 69 Preview Specifies whether the patterns appear as stitches or in the normal view. F9 p. 65 Realistic Preview Realistic Preview Attribute Setting Refresh Window Displays a realistic image of how either selected patterns or all patterns will look after being embroidered. Sets the preview attributes for the Realistic Preview function. Updates the screen. Shift + F9 Ctrl + R p. 65 p. 65 Stitch Simulator Displays a simulation of the machine stitching. p. 66 Reference Window Ruler Toolbar Status Bar Hides/displays the Reference Window. Hides/displays the rulers. Hides/displays the Toolbar. Hides/displays the status bar. F11 p. 66 p. 69 p. 47 Menus/Tools 247
-
 1
1 -
2
-
3
-
4
-
5
-
6
-
7
-
8
-
9
-
10
-
11
-
12
-
13
-
14
-
15
-
16
-
17
-
18
-
19
-
20
-
21
-
22
-
23
-
24
-
25
-
26
-
27
-
28
-
29
-
30
-
31
-
32
-
33
-
34
-
35
-
36
-
37
-
38
-
39
-
40
-
41
-
42
-
43
-
44
-
45
-
46
-
47
-
48
-
49
-
50
-
51
-
52
-
53
-
54
-
55
-
56
-
57
-
58
-
59
-
60
-
61
-
62
-
63
-
64
-
65
-
66
-
67
-
68
-
69
-
70
-
71
-
72
-
73
-
74
-
75
-
76
-
77
-
78
-
79
-
80
-
81
-
82
-
83
-
84
-
85
-
86
-
87
-
88
-
89
-
90
-
91
-
92
-
93
-
94
-
95
-
96
-
97
-
98
-
99
-
100
-
101
-
102
-
103
-
104
-
105
-
106
-
107
-
108
-
109
-
110
-
111
-
112
-
113
-
114
-
115
-
116
-
117
-
118
-
119
-
120
-
121
-
122
-
123
-
124
-
125
-
126
-
127
-
128
-
129
-
130
-
131
-
132
-
133
-
134
-
135
-
136
-
137
-
138
-
139
-
140
-
141
-
142
-
143
-
144
-
145
-
146
-
147
-
148
-
149
-
150
-
151
-
152
-
153
-
154
-
155
-
156
-
157
-
158
-
159
-
160
-
161
-
162
-
163
-
164
-
165
-
166
-
167
-
168
-
169
-
170
-
171
-
172
-
173
-
174
-
175
-
176
-
177
-
178
-
179
-
180
-
181
-
182
-
183
-
184
-
185
-
186
-
187
-
188
-
189
-
190
-
191
-
192
-
193
-
194
-
195
-
196
-
197
-
198
-
199
-
200
-
201
-
202
-
203
-
204
-
205
-
206
-
207
-
208
-
209
-
210
-
211
-
212
-
213
-
214
-
215
-
216
-
217
-
218
-
219
-
220
-
221
-
222
-
223
-
224
-
225
-
226
-
227
-
228
-
229
-
230
-
231
-
232
-
233
-
234
-
235
-
236
-
237
-
238
-
239
-
240
-
241
-
242
-
243
-
 244
244 -
 245
245 -
 246
246 -
 247
247 -
 248
248 -
 249
249 -
 250
250 -
 251
251 -
 252
252 -
 253
253 -
 254
254 -
255
-
256
-
257
-
258
-
259
-
260
-
261
-
262
-
263
-
264
-
265
-
266
-
267
-
268
-
269
 |
 |