Brother International PEDESIGN 8.0 Users Manual - English - Page 127
Automatically Converting an Image to an Embroidery Pattern (Image to Stitch Wizard
 |
View all Brother International PEDESIGN 8.0 manuals
Add to My Manuals
Save this manual to your list of manuals |
Page 127 highlights
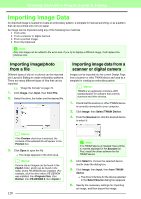
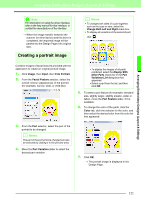
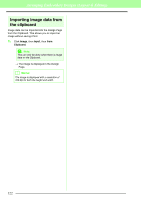
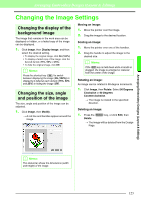
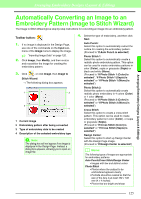
Arranging Embroidery Designs (Layout & Editing) Arranging Embroidery Designs (Layout & Editing) Automatically Converting an Image to an Embroidery Pattern (Image to Stitch Wizard) The Image to Stitch Wizard gives step-by-step instructions for converting an image into an embroidery pattern. Toolbar button: 1. If no image is displayed in the Design Page, use one of the commands on the Input submenu of the Image menu to display the image. c "Importing Image Data" on page 120. 2. Click Image, then Modify, and then re-size and re-position the image for creating the embroidery pattern. 3. Click , or click Image, then Image to Stitch Wizard. → The following dialog box appears. 1 3 2 4 1 Current image 2 Embroidery pattern after being converted 3 Type of embroidery data to be created 4 Description of the selected embroidery type a Note: The dialog box will not appear if no image is displayed in the Design Page. Instead, a dialog box appears, allowing you to open an image file. 4. Select the type of embroidery, and then click Next. Auto Punch: Select this option to automatically extract the outline for creating the embroidery pattern. (Proceed to "If Auto Punch is selected") Photo Stitch 1: Select this option to automatically create a realistic photo embroidery pattern. This option can be used to create embroidery patterns in color (Color), sepia or grayscale (Sepia) or black and white (Mono). (Proceed to "If Photo Stitch 1 (Color) is selected", "If Photo Stitch 1 (Sepia) is selected" or "If Photo Stitch 1 (Mono) is selected") Photo Stitch 2: Select this option to automatically create realistic photo embroidery in 4 colors (Color) or 1 color (Mono). (Proceed to "If Photo Stitch 2 (Color) is selected" or "If Photo Stitch 2 (Mono) is selected") Cross Stitch: Select this option to create a cross stitch pattern. This option can be used to create embroidery patterns in color (Color), or sepia or grayscale (Sepia). (Proceed to "If Cross Stitch (Color) is selected" or "If Cross Stitch (Sepia) is selected") Design Center: Select this option to start up Design Center with the Design Page image. (Proceed to "If Design Center is selected") b Memo: The following types of images are appropriate for embroidery patterns. Auto Punch/Cross Stitch/Design Center • Images with few and distinct colors Photo Stitch • Photos where the subject to be embroidered appears clearly • Portraits should be resized so that the size of the face is at least 100 × 100 mm (4 × 4 inches). • Photos that are bright and sharp 125
-
 1
1 -
2
-
3
-
4
-
5
-
6
-
7
-
8
-
9
-
10
-
11
-
12
-
13
-
14
-
15
-
16
-
17
-
18
-
19
-
20
-
21
-
22
-
23
-
24
-
25
-
26
-
27
-
28
-
29
-
30
-
31
-
32
-
33
-
34
-
35
-
36
-
37
-
38
-
39
-
40
-
41
-
42
-
43
-
44
-
45
-
46
-
47
-
48
-
49
-
50
-
51
-
52
-
53
-
54
-
55
-
56
-
57
-
58
-
59
-
60
-
61
-
62
-
63
-
64
-
65
-
66
-
67
-
68
-
69
-
70
-
71
-
72
-
73
-
74
-
75
-
76
-
77
-
78
-
79
-
80
-
81
-
82
-
83
-
84
-
85
-
86
-
87
-
88
-
89
-
90
-
91
-
92
-
93
-
94
-
95
-
96
-
97
-
98
-
99
-
100
-
101
-
102
-
103
-
104
-
105
-
106
-
107
-
108
-
109
-
110
-
111
-
112
-
113
-
114
-
115
-
116
-
117
-
118
-
119
-
120
-
121
-
 122
122 -
 123
123 -
 124
124 -
 125
125 -
 126
126 -
 127
127 -
 128
128 -
 129
129 -
 130
130 -
 131
131 -
 132
132 -
133
-
134
-
135
-
136
-
137
-
138
-
139
-
140
-
141
-
142
-
143
-
144
-
145
-
146
-
147
-
148
-
149
-
150
-
151
-
152
-
153
-
154
-
155
-
156
-
157
-
158
-
159
-
160
-
161
-
162
-
163
-
164
-
165
-
166
-
167
-
168
-
169
-
170
-
171
-
172
-
173
-
174
-
175
-
176
-
177
-
178
-
179
-
180
-
181
-
182
-
183
-
184
-
185
-
186
-
187
-
188
-
189
-
190
-
191
-
192
-
193
-
194
-
195
-
196
-
197
-
198
-
199
-
200
-
201
-
202
-
203
-
204
-
205
-
206
-
207
-
208
-
209
-
210
-
211
-
212
-
213
-
214
-
215
-
216
-
217
-
218
-
219
-
220
-
221
-
222
-
223
-
224
-
225
-
226
-
227
-
228
-
229
-
230
-
231
-
232
-
233
-
234
-
235
-
236
-
237
-
238
-
239
-
240
-
241
-
242
-
243
-
244
-
245
-
246
-
247
-
248
-
249
-
250
-
251
-
252
-
253
-
254
-
255
-
256
-
257
-
258
-
259
-
260
-
261
-
262
-
263
-
264
-
265
-
266
-
267
-
268
-
269
 |
 |
