Brother International PEDESIGN 8.0 Users Manual - English - Page 126
Saving the image data, Saving as a file, Outputting to the Clipboard
 |
View all Brother International PEDESIGN 8.0 manuals
Add to My Manuals
Save this manual to your list of manuals |
Page 126 highlights
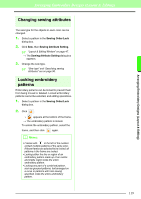
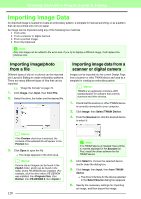
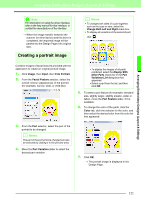
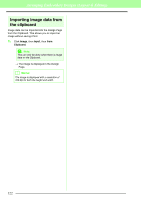
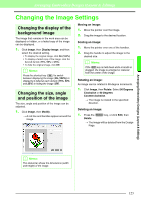
Arranging Embroidery Designs (Layout & Editing) Saving the image data The image can be saved as a file or outputted to the Clipboard. ■ Saving as a file 1. Click Image, then Output, then to File. 2. Select the drive, the folder and the format in which you want to save the image data. 3. Type in the file name. b Memo: The image data can be saved in either of the following formats: Windows bitmap (.bmp), Exif (.jpg). 4. Click Save to save the data. ■ Outputting to the Clipboard 1. Click Image, then Output, then to Clipboard. → The image data in the Design Page is copied onto the Clipboard. 124
-
 1
1 -
2
-
3
-
4
-
5
-
6
-
7
-
8
-
9
-
10
-
11
-
12
-
13
-
14
-
15
-
16
-
17
-
18
-
19
-
20
-
21
-
22
-
23
-
24
-
25
-
26
-
27
-
28
-
29
-
30
-
31
-
32
-
33
-
34
-
35
-
36
-
37
-
38
-
39
-
40
-
41
-
42
-
43
-
44
-
45
-
46
-
47
-
48
-
49
-
50
-
51
-
52
-
53
-
54
-
55
-
56
-
57
-
58
-
59
-
60
-
61
-
62
-
63
-
64
-
65
-
66
-
67
-
68
-
69
-
70
-
71
-
72
-
73
-
74
-
75
-
76
-
77
-
78
-
79
-
80
-
81
-
82
-
83
-
84
-
85
-
86
-
87
-
88
-
89
-
90
-
91
-
92
-
93
-
94
-
95
-
96
-
97
-
98
-
99
-
100
-
101
-
102
-
103
-
104
-
105
-
106
-
107
-
108
-
109
-
110
-
111
-
112
-
113
-
114
-
115
-
116
-
117
-
118
-
119
-
120
-
 121
121 -
 122
122 -
 123
123 -
 124
124 -
 125
125 -
 126
126 -
 127
127 -
 128
128 -
 129
129 -
 130
130 -
 131
131 -
132
-
133
-
134
-
135
-
136
-
137
-
138
-
139
-
140
-
141
-
142
-
143
-
144
-
145
-
146
-
147
-
148
-
149
-
150
-
151
-
152
-
153
-
154
-
155
-
156
-
157
-
158
-
159
-
160
-
161
-
162
-
163
-
164
-
165
-
166
-
167
-
168
-
169
-
170
-
171
-
172
-
173
-
174
-
175
-
176
-
177
-
178
-
179
-
180
-
181
-
182
-
183
-
184
-
185
-
186
-
187
-
188
-
189
-
190
-
191
-
192
-
193
-
194
-
195
-
196
-
197
-
198
-
199
-
200
-
201
-
202
-
203
-
204
-
205
-
206
-
207
-
208
-
209
-
210
-
211
-
212
-
213
-
214
-
215
-
216
-
217
-
218
-
219
-
220
-
221
-
222
-
223
-
224
-
225
-
226
-
227
-
228
-
229
-
230
-
231
-
232
-
233
-
234
-
235
-
236
-
237
-
238
-
239
-
240
-
241
-
242
-
243
-
244
-
245
-
246
-
247
-
248
-
249
-
250
-
251
-
252
-
253
-
254
-
255
-
256
-
257
-
258
-
259
-
260
-
261
-
262
-
263
-
264
-
265
-
266
-
267
-
268
-
269
 |
 |

124
Arranging Embroidery Designs (Layout & Editing)
Saving the image data
The image can be saved as a file or outputted to the
Clipboard.
■
Saving as a file
1.
Click
Image
, then
Output
, then
to File
.
2.
Select the drive, the folder and the format in
which you want to save the image data.
3.
Type in the file name.
4.
Click
Save
to save the data.
■
Outputting to the Clipboard
1.
Click
Image
, then
Output
, then
to Clipboard
.
→
The image data in the Design Page is
copied onto the Clipboard.
b
Memo:
The image data can be saved in either of the
following formats: Windows bitmap (.bmp),
Exif (.jpg).