Brother International PEDESIGN 8.0 Users Manual - English - Page 180
Step 4, Attaching stabilizer to the, fabric, Marking the embroidering, position
 |
View all Brother International PEDESIGN 8.0 manuals
Add to My Manuals
Save this manual to your list of manuals |
Page 180 highlights
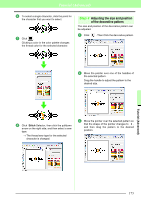
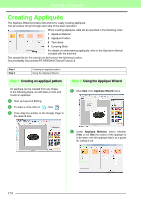
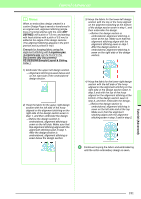
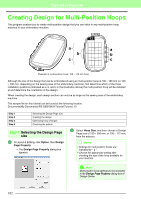
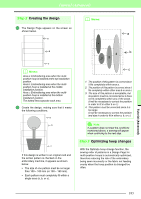
Tutorial (Advanced) a Note: Before an embroidery pattern created in a custom Design Page is saved or transferred to an original card, running stitches are added at the edges of the design sections so that the design sections can easily be aligned during sewing. This alignment stitching appears in the NOT DEFINED color and cannot be edited. c "Memo" on page 181. Step 4 Attaching stabilizer to the fabric Stabilizer must always be used when embroidering to stabilize the fabric. There are many types of stabilizer; the type that you will use depends on the type of fabric that you are embroidering on. For large-size designs that are split into sections, the stabilizer must be adhered to the fabric, for example, by using iron-on stabilizer, sticky stabilizer or spray adhesive. When using spray adhesive, spray the adhesive onto a hooped piece of stabilizer that is strong enough for the entire large-size embroidery. In some cases, you may need to use two pieces of stabilizer for your embroidery. a Note: • For best results, attach the stabilizer to the fabric (as described on this page). Without the correct stabilizer, the design may become misaligned due to puckering in the fabric. • Be sure to check the recommendations on the stabilizer package. Step 5 Marking the embroidering position Using the template for the size of hoop that you are using, mark the embroidering position on the fabric. b Memo: • The templates are included in the package. • The templates are also in the Template folder and can be printed out with a printer. • Template PDF files have been described within actual size completely. Please confirm the printing property of your Adobe® Reader ® program. If some printing properties such like "Reduce/Enlarge to fit page" would be "Checked", the Adobe® Reader® will resize the PDF automatically. So, please "Uncheck" these properties before your printing out. 1 Punch a hole at the end of each arrow on the template. 2 Place the template on the fabric, and then insert the tip of a marking pen into each hole to mark the fabric. 3 Connect the points marked on the fabric to draw reference lines. 178
-
 1
1 -
2
-
3
-
4
-
5
-
6
-
7
-
8
-
9
-
10
-
11
-
12
-
13
-
14
-
15
-
16
-
17
-
18
-
19
-
20
-
21
-
22
-
23
-
24
-
25
-
26
-
27
-
28
-
29
-
30
-
31
-
32
-
33
-
34
-
35
-
36
-
37
-
38
-
39
-
40
-
41
-
42
-
43
-
44
-
45
-
46
-
47
-
48
-
49
-
50
-
51
-
52
-
53
-
54
-
55
-
56
-
57
-
58
-
59
-
60
-
61
-
62
-
63
-
64
-
65
-
66
-
67
-
68
-
69
-
70
-
71
-
72
-
73
-
74
-
75
-
76
-
77
-
78
-
79
-
80
-
81
-
82
-
83
-
84
-
85
-
86
-
87
-
88
-
89
-
90
-
91
-
92
-
93
-
94
-
95
-
96
-
97
-
98
-
99
-
100
-
101
-
102
-
103
-
104
-
105
-
106
-
107
-
108
-
109
-
110
-
111
-
112
-
113
-
114
-
115
-
116
-
117
-
118
-
119
-
120
-
121
-
122
-
123
-
124
-
125
-
126
-
127
-
128
-
129
-
130
-
131
-
132
-
133
-
134
-
135
-
136
-
137
-
138
-
139
-
140
-
141
-
142
-
143
-
144
-
145
-
146
-
147
-
148
-
149
-
150
-
151
-
152
-
153
-
154
-
155
-
156
-
157
-
158
-
159
-
160
-
161
-
162
-
163
-
164
-
165
-
166
-
167
-
168
-
169
-
170
-
171
-
172
-
173
-
174
-
 175
175 -
 176
176 -
 177
177 -
 178
178 -
 179
179 -
 180
180 -
 181
181 -
 182
182 -
 183
183 -
 184
184 -
 185
185 -
186
-
187
-
188
-
189
-
190
-
191
-
192
-
193
-
194
-
195
-
196
-
197
-
198
-
199
-
200
-
201
-
202
-
203
-
204
-
205
-
206
-
207
-
208
-
209
-
210
-
211
-
212
-
213
-
214
-
215
-
216
-
217
-
218
-
219
-
220
-
221
-
222
-
223
-
224
-
225
-
226
-
227
-
228
-
229
-
230
-
231
-
232
-
233
-
234
-
235
-
236
-
237
-
238
-
239
-
240
-
241
-
242
-
243
-
244
-
245
-
246
-
247
-
248
-
249
-
250
-
251
-
252
-
253
-
254
-
255
-
256
-
257
-
258
-
259
-
260
-
261
-
262
-
263
-
264
-
265
-
266
-
267
-
268
-
269
 |
 |
