Brother International PEDESIGN 8.0 Users Manual - English - Page 44
Print and Stitch - pe design next tutorial
 |
View all Brother International PEDESIGN 8.0 manuals
Add to My Manuals
Save this manual to your list of manuals |
Page 44 highlights
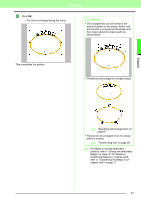
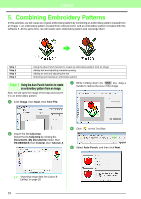
Tutorial 6. Print and Stitch In this example, we will create a design that combines embroidery and an image. We will import an image into Layout & Editing, and then create an embroidery design that combines it with the image. Next, we will print the image on an iron-on transfer sheet or printable fabric, and then use the embroidery machine to sew the embroidery on top of printed fabric. Print the background image on fabric. Embroider Step 1 Step 2 Step 3 Step 4 Creating a design combined with a background image Printing the background image Printing the positioning sheet Embroidering Step 1 Creating a design combined with a background image These designs can be created by importing an image, then creating an embroidery pattern or importing an existing embroidery pattern. For this example, we will use the gift box image (Bear_Background.jpg) and the embroidery pattern of the bear (Bear.pes) provided with this software. 3 Import the file Bear_Background.jpg. Select the file Bear_Background.jpg by clicking the Documents (My Documents) folder, then PE-DESIGN 8, then Tutorial, then Tutorial_6. 1 Start up Layout & Editing. Specify a Design Page size of 130 x 180 mm. c "Specifying the Design Page Size and Color" on page 68. 2 Click Image, then Input, then from File. c "Importing Image Data" on page 120. 4 Click . 42
-
 1
1 -
2
-
3
-
4
-
5
-
6
-
7
-
8
-
9
-
10
-
11
-
12
-
13
-
14
-
15
-
16
-
17
-
18
-
19
-
20
-
21
-
22
-
23
-
24
-
25
-
26
-
27
-
28
-
29
-
30
-
31
-
32
-
33
-
34
-
35
-
36
-
37
-
38
-
 39
39 -
 40
40 -
 41
41 -
 42
42 -
 43
43 -
 44
44 -
 45
45 -
 46
46 -
 47
47 -
 48
48 -
 49
49 -
50
-
51
-
52
-
53
-
54
-
55
-
56
-
57
-
58
-
59
-
60
-
61
-
62
-
63
-
64
-
65
-
66
-
67
-
68
-
69
-
70
-
71
-
72
-
73
-
74
-
75
-
76
-
77
-
78
-
79
-
80
-
81
-
82
-
83
-
84
-
85
-
86
-
87
-
88
-
89
-
90
-
91
-
92
-
93
-
94
-
95
-
96
-
97
-
98
-
99
-
100
-
101
-
102
-
103
-
104
-
105
-
106
-
107
-
108
-
109
-
110
-
111
-
112
-
113
-
114
-
115
-
116
-
117
-
118
-
119
-
120
-
121
-
122
-
123
-
124
-
125
-
126
-
127
-
128
-
129
-
130
-
131
-
132
-
133
-
134
-
135
-
136
-
137
-
138
-
139
-
140
-
141
-
142
-
143
-
144
-
145
-
146
-
147
-
148
-
149
-
150
-
151
-
152
-
153
-
154
-
155
-
156
-
157
-
158
-
159
-
160
-
161
-
162
-
163
-
164
-
165
-
166
-
167
-
168
-
169
-
170
-
171
-
172
-
173
-
174
-
175
-
176
-
177
-
178
-
179
-
180
-
181
-
182
-
183
-
184
-
185
-
186
-
187
-
188
-
189
-
190
-
191
-
192
-
193
-
194
-
195
-
196
-
197
-
198
-
199
-
200
-
201
-
202
-
203
-
204
-
205
-
206
-
207
-
208
-
209
-
210
-
211
-
212
-
213
-
214
-
215
-
216
-
217
-
218
-
219
-
220
-
221
-
222
-
223
-
224
-
225
-
226
-
227
-
228
-
229
-
230
-
231
-
232
-
233
-
234
-
235
-
236
-
237
-
238
-
239
-
240
-
241
-
242
-
243
-
244
-
245
-
246
-
247
-
248
-
249
-
250
-
251
-
252
-
253
-
254
-
255
-
256
-
257
-
258
-
259
-
260
-
261
-
262
-
263
-
264
-
265
-
266
-
267
-
268
-
269
 |
 |
