Brother International PEDESIGN 8.0 Users Manual - English - Page 240
Sewing Wide Areas, Jump Stitch and Jump Stitch Trimming
 |
View all Brother International PEDESIGN 8.0 manuals
Add to My Manuals
Save this manual to your list of manuals |
Page 240 highlights
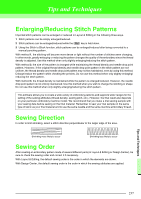
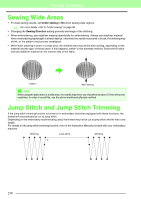
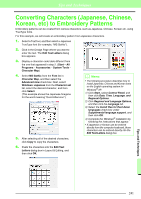
Tips and Techniques Sewing Wide Areas • For best sewing results, set Under sewing to On when sewing wide regions. c For more details, refer to "Under sewing" on page 98. • Changing the Sewing Direction setting prevents shrinkage of the stitching. • When embroidering, use stabilizer material specifically for embroidering. Always use stabilizer material when embroidering lightweight or stretch fabrics, otherwise the needle may bend or break, the stitching may shrink, or the pattern may become misaligned. • When satin stitching is sewn in a wide area, the stitched area may shrink after sewing, depending on the material and the type of thread used. If this happens, switch to this alternate method: Select the fill stitch and use stabilizer material on the reverse side of the fabric. Pattern After sewing a Note: When using the satin stitch in a wide area, the needle may move out of position by about 10 mm with some machines. In order to avoid this, use the above-mentioned alternate method. Jump Stitch and Jump Stitch Trimming If the jump stitch trimming function is turned on in embroidery machines equipped with these functions, the thread will automatically be cut at jump stitch. Depending on the embroidery machine being used, the thread may not be cut at jump stitch shorter than a set length. For details on the jump stitch trimming function, refer to the Instruction Manual provided with your embroidery machine. Stitching Jump stitch Stitching 238
-
 1
1 -
2
-
3
-
4
-
5
-
6
-
7
-
8
-
9
-
10
-
11
-
12
-
13
-
14
-
15
-
16
-
17
-
18
-
19
-
20
-
21
-
22
-
23
-
24
-
25
-
26
-
27
-
28
-
29
-
30
-
31
-
32
-
33
-
34
-
35
-
36
-
37
-
38
-
39
-
40
-
41
-
42
-
43
-
44
-
45
-
46
-
47
-
48
-
49
-
50
-
51
-
52
-
53
-
54
-
55
-
56
-
57
-
58
-
59
-
60
-
61
-
62
-
63
-
64
-
65
-
66
-
67
-
68
-
69
-
70
-
71
-
72
-
73
-
74
-
75
-
76
-
77
-
78
-
79
-
80
-
81
-
82
-
83
-
84
-
85
-
86
-
87
-
88
-
89
-
90
-
91
-
92
-
93
-
94
-
95
-
96
-
97
-
98
-
99
-
100
-
101
-
102
-
103
-
104
-
105
-
106
-
107
-
108
-
109
-
110
-
111
-
112
-
113
-
114
-
115
-
116
-
117
-
118
-
119
-
120
-
121
-
122
-
123
-
124
-
125
-
126
-
127
-
128
-
129
-
130
-
131
-
132
-
133
-
134
-
135
-
136
-
137
-
138
-
139
-
140
-
141
-
142
-
143
-
144
-
145
-
146
-
147
-
148
-
149
-
150
-
151
-
152
-
153
-
154
-
155
-
156
-
157
-
158
-
159
-
160
-
161
-
162
-
163
-
164
-
165
-
166
-
167
-
168
-
169
-
170
-
171
-
172
-
173
-
174
-
175
-
176
-
177
-
178
-
179
-
180
-
181
-
182
-
183
-
184
-
185
-
186
-
187
-
188
-
189
-
190
-
191
-
192
-
193
-
194
-
195
-
196
-
197
-
198
-
199
-
200
-
201
-
202
-
203
-
204
-
205
-
206
-
207
-
208
-
209
-
210
-
211
-
212
-
213
-
214
-
215
-
216
-
217
-
218
-
219
-
220
-
221
-
222
-
223
-
224
-
225
-
226
-
227
-
228
-
229
-
230
-
231
-
232
-
233
-
234
-
 235
235 -
 236
236 -
 237
237 -
 238
238 -
 239
239 -
 240
240 -
 241
241 -
 242
242 -
 243
243 -
 244
244 -
 245
245 -
246
-
247
-
248
-
249
-
250
-
251
-
252
-
253
-
254
-
255
-
256
-
257
-
258
-
259
-
260
-
261
-
262
-
263
-
264
-
265
-
266
-
267
-
268
-
269
 |
 |
