Brother International PEDESIGN 8.0 Users Manual - English - Page 181
Hooping the fabric, Step 6
 |
View all Brother International PEDESIGN 8.0 manuals
Add to My Manuals
Save this manual to your list of manuals |
Page 181 highlights
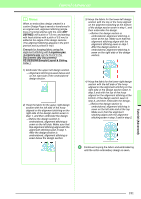
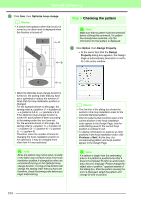
Tutorial (Advanced) 4 Place the template on the fabric, and mark points A, B, C and D. A B D C 5 To mark an area to the right of the previously marked area, align points A and D on the template with marks B and C on the fabric. a Note: • The intersection of the horizontal and vertical line indicates the center of the embroidery hoop. • While carefully considering how the fabric will be hooped, place the template on the fabric, and then draw lines to indicate the embroidering position. In addition, because all embroidery areas are not drawn on the template for large embroidery hoops, be careful that the embroidery area does not extend from the marked area on the fabric as shown below. A AB B D DC C 6 To mark an area below the previously marked area, align points A and B on the template with marks C and D on the fabric. A B A B D C D C 7 Repeat steps 4 through 6 to reposition the template and draw the embroidering position for each section of the embroidery pattern. Step 6 Hooping the fabric Using the hoop's plastic embroidery sheet, align the reference lines on the embroidery sheet with the marks on the fabric. Then, hoop the fabric while making sure that the fabric remains correctly aligned. 1 Insert the embroidery sheet into the inner ring of the embroidery hoop, and then place them on top of the fabric with the centerline on the embroidery sheet aligned with the reference lines (drawn on the fabric) for the first pattern section to be sewn. Tutorial (Advanced) 179
-
 1
1 -
2
-
3
-
4
-
5
-
6
-
7
-
8
-
9
-
10
-
11
-
12
-
13
-
14
-
15
-
16
-
17
-
18
-
19
-
20
-
21
-
22
-
23
-
24
-
25
-
26
-
27
-
28
-
29
-
30
-
31
-
32
-
33
-
34
-
35
-
36
-
37
-
38
-
39
-
40
-
41
-
42
-
43
-
44
-
45
-
46
-
47
-
48
-
49
-
50
-
51
-
52
-
53
-
54
-
55
-
56
-
57
-
58
-
59
-
60
-
61
-
62
-
63
-
64
-
65
-
66
-
67
-
68
-
69
-
70
-
71
-
72
-
73
-
74
-
75
-
76
-
77
-
78
-
79
-
80
-
81
-
82
-
83
-
84
-
85
-
86
-
87
-
88
-
89
-
90
-
91
-
92
-
93
-
94
-
95
-
96
-
97
-
98
-
99
-
100
-
101
-
102
-
103
-
104
-
105
-
106
-
107
-
108
-
109
-
110
-
111
-
112
-
113
-
114
-
115
-
116
-
117
-
118
-
119
-
120
-
121
-
122
-
123
-
124
-
125
-
126
-
127
-
128
-
129
-
130
-
131
-
132
-
133
-
134
-
135
-
136
-
137
-
138
-
139
-
140
-
141
-
142
-
143
-
144
-
145
-
146
-
147
-
148
-
149
-
150
-
151
-
152
-
153
-
154
-
155
-
156
-
157
-
158
-
159
-
160
-
161
-
162
-
163
-
164
-
165
-
166
-
167
-
168
-
169
-
170
-
171
-
172
-
173
-
174
-
175
-
 176
176 -
 177
177 -
 178
178 -
 179
179 -
 180
180 -
 181
181 -
 182
182 -
 183
183 -
 184
184 -
 185
185 -
 186
186 -
187
-
188
-
189
-
190
-
191
-
192
-
193
-
194
-
195
-
196
-
197
-
198
-
199
-
200
-
201
-
202
-
203
-
204
-
205
-
206
-
207
-
208
-
209
-
210
-
211
-
212
-
213
-
214
-
215
-
216
-
217
-
218
-
219
-
220
-
221
-
222
-
223
-
224
-
225
-
226
-
227
-
228
-
229
-
230
-
231
-
232
-
233
-
234
-
235
-
236
-
237
-
238
-
239
-
240
-
241
-
242
-
243
-
244
-
245
-
246
-
247
-
248
-
249
-
250
-
251
-
252
-
253
-
254
-
255
-
256
-
257
-
258
-
259
-
260
-
261
-
262
-
263
-
264
-
265
-
266
-
267
-
268
-
269
 |
 |
